Customizing Pages With Templates
Developer’s Overview
Start by reading this basic description of Templatesets if you haven’t done so.
Templates are files written in the Django template language and used by ActionKit to produce your hosted webpages. Templates also include page functionality, like ActionKit scripts and form fields, so information in this section may be relevant even if you’re hosting your own pages.
A Templateset is just a group of all available templates. The Original is our default Templateset - it has our latest code and a basic layout for each page type. It can’t be edited, but you can copy it.
You’ll want to create and customize at least one Templateset to include your logo, privacy policy and contact information. Once your set has been created it will be available from the Templateset dropdown on the Edit content screen when you create or edit a page.
For each alternate look and feel (e.g., for a microsite) you need to create another Templateset. You can’t create an individual template, but must create a whole new Templateset and then modify the necessary template(s). to create a new set, you must copy an existing one.
You may also need to create new sets if you want multiple versions of a page type layout within one overall appearance, e.g. for a secondary petition page layout. If you have a lot of variations, this can lead to a long list of Templatesets and it can be hard to keep track of the differences. In the Managing Templatesets section we outline some alternative approaches you might use to reduce the proliferation and manage variations. You may also want to consider Adding Your Own Templates to re-use bits of template code.
Note
The way you make a page “live” in ActionKit is just to share the URL with your users. If you save changes to a Templateset in use by a live page, the changes apply immediately.
Alternatively, you can preview changes before saving.
The steps for creating a new Templateset and the related options are described in the Page Tools section.
Anatomy of a Page
Each page type in ActionKit has at least one template. That template pulls in other templates that define specific page elements.
Go to Pages > Appearance > Templatesets and click on any of the listed templatesets. The screen will display the list of all the templates that make up the set, grouped into the following categories:
Shared - Templates in this category are templates that are used by other templates.
Action types - Each page type, except events, has at least one template in this category. These templates make the calls to the appropriate shared templates and grab your page content from the CMS tables.
Accounts and login - User login, password reset and site root templates among others are included in this category.
Events - as discussed in Events, creating and maintaining an event is a complex endeavor that can include one or more locations, schedules, speakers, hosts and attendees.
Custom - This section only shows if you have created one or more of your own templates.
To get a sense of how a page is constructed using these templates, let’s look at the templates that might be used to create one petition page:
Petition - This template turns on action processing and pulls in the content from the cms_petition_form table.
Wrapper - The petition template, like all action page types, extends the wrapper. The wrapper defines the header and footer and pulls in your CSS.
Language picker - The wrapper template includes the language picker template. for pages you’ve translated and associated with a multilingual campaign, this template displays the list of languages so the user can toggle between translations.
User form wrapper - The petition template, like those for most action pages, includes this wrapper. Here you where you can edit the text shown to recognized users; donation, recurring donation, and event attend page types have their own user form embedded in their page type templates.
User form - The user form wrapper includes the user form itself, which is the template that defines the fields displayed on your page, among other things, including:
Country select - The user form includes this template, which pulls a standard list of country names from our database and translates them into the page language, if it’s not English. to customize the country list you need to enter your own country list manually.
State select - The user form includes this template, which displays a U.S. state list, which you can customize.
Progress meter - The petition template includes the progress meter template, which adds a thermometer to the page if the page creator enters a goal.
Inline tellafriend - The petition template and the letter template include this (and no other action page type do). This template defines the layout for the tell-a-friend widget that is displayed on petition and letter pages (as opposed to the thanks page tell-a-friend layout).
As noted above, the petition template pulls in the content. Everything you enter in the text boxes when creating a page is stored in the CMS table related to the page type. for example, the content entered in the About text box for a petition page is saved to the “about_text” field in the cms_petition_form table. Its location is set in the petition template with the {% include_tmpl form.about_text %} tag.
There are a couple page types that are more complicated and therefore have more than one action type template:
Whipcount - Whipcount results shows the list of targets and Whipcount shows the phone number for the target selected, the script and the form for the user to enter their information and their response.
Events - Event campaigns actually involve multiple pages and multiple templates. These are described in Events.
Managing Templatesets
The following are some tips and techniques for managing templatesets. These can be used to make one templateset include variations that are triggered by page type or a custom page field, or to define one master version of a template that is included in all sets, so you only have to make edits and maintain one version.
When making changes to the functionality of your pages, you can either adapt an existing templateset or make a copy. We recommend, generally, that fewer, more flexible templatesets will result in less maintenance, fewer bugs, and greater consistency in the long run.
If you go the route of flexible templatesets, good news, it’s safe and easy to getting started. You probably don’t need that much code, either.
If you already have many templatesets you may want to track differences between them in a shared document.
New to templateset code? Read up on how previewing draft templates enables you to test your changes before publishing.
Conditional Content
One of the most common customizations is adding conditional content, e.g. {% if %} {% else %} {% endif %}.
For example, say you want to include a specific CSS stylesheet for pages that are part of a special project:
{% if page.name == "special_project" %}
    <link href="/css/special.css" rel="stylesheet">
{% else %}
    <link href="/css/normal.css" rel="stylesheet">
{% endif %}
Conditional statements can be used to check all kinds of details, including:
Custom page fields, page tags, name, etc.
Hostname. Have different brands for different hostnames?
{% if "specialproject.com" in request.get_host %}..special project code..{% endif %}Query parameters. You can pass data with query parameters, but these must be handled with extreme care. Using query parameters as part of conditional statement is fine:
{% if args.brand == "special_project" %}..special project code..{% endif %}But do not directly render query parameters, as that could introduce cross-site scripting vulnerability:
"(Danger!) Welcome to {{ args.dont_do_this }}. (Danger!)"
Using Custom Page Fields to Enable Features includes a thorough walkthrough of conditional content and custom page fields, see also Using Custom Templateset Fields to Simplify Changes
Other approaches can help organize template code or help avoid duplication. For example, use {% store %} to consolidate custom conditional logic into one place that’s easy to change, such as the top of a template:
{% store as specialObj %}
   {% if page.custom_fields.is_special %}
         var myObj = { name: 'special', amount: '42' }
   {% else %}
         var myObj = { name: 'not so special', amount: '10' , default: true}
   {% endif %]
{% endstore %}
...
<script>
  {{ specialObj }}
  $('input[name=amount_other]').val(myObj.amount)
</script>
Want to change how your templates display data such as products or candidates? You can conditionally filter or sort data to match your needs.
For example, the built-in Original templateset displays any products assigned to your page, but the sort order of products isn’t documented:
{% for product in products %}
To sort products by price or name instead, you can use a snippet to re-order the list of products based on the value of a custom field, and default to ordering by amount:
{% for product in products|dictsort:page.custom_fields.product_sort_order|default:'amount' %}
If you’re interested in making your templateset more reusable but need some advice on implementation, get in touch with ActionKit support.
Using Custom Page Fields to Enable Features
This technique is most useful if you have a few variations for pages that all use the same wrapper. for example, you might have two petition form layouts that you use regularly with your standard wrapper. Or you may have three fields that you often add to your user forms.
You can use custom page fields to “turn on” optional elements in your templates without creating a new Templateset for each variation.
For example, if you sometimes suppress the tell-a-friend widget on the first screen for your petition pages:
Create a new Templateset titled “Petition without taf” and remove the in-line taf code from the petition template. The page creator would select “Petition without taf” or your standard Templateset if they wanted to suppress or show the taf, respectively. Or
Create a page field, “suppress petition taf” and add some code to your default Templateset to tell ActionKit to hide the taf only if the page creator enters “1” in the page field when creating the page.
Both approaches work, but if you use the first approach you then need to maintain both templatesets. and it can be hard to keep track of the variations between sets if you have a second or third field that you also include sometimes (e.g. phone).
The second approach can lead to a long list of page fields if you have a lot of variations. In either case it’s a good idea to develop naming protocols and some basic documentation for your templatesets and page fields.
Here’s an example of what the code might look like if you were to use the same approach to include an occupation field in the user form based on a page field. If you’re using the Original Templateset or one modeled on this, you can customize the user form from the Edit content screen instead. Regardless the example demonstrates the concept above.
You might set up the field field as follows:
Create a page field called
add_occupation_to_form.Edit the User form template in your default Templateset.
Add something like the following:
{%if page.custom_fields.add_occupation_to_form == "yes" %}
  <div class="ak-field">
    <input type="text" name="add_occupation_to_form"  id="add_occupation_to_form">Occupation:</input>
  </div>
{% endif %}
Note
This assumes I already have a custom user field named occupation. If not, I’d have to create it first from the user’s tab.
Test it by creating a page, selecting the page field at the bottom of step 1, and enter “yes” as the value. Make sure the form shows the occupation field.
Document this and share with page creators so they know what the field does and how to use it.
You can use this approach for all kinds of variations. If you have three fields you often add to pages, create one page field for each and the campaigner can add all or some of them using this approach.
Here are some other examples of how you might use this:
Add an optional layout element, like a pull out quote or an image.
Add a custom action field or survey question.
Allow your campaigners to add a custom action field themselves by entering the action field information - you’d just have defined where and how it displays in the form.
Make your thermometer amount increase if you’ve already hit the original goal.
Include a lightbox with page specific content.
Add social media sharing options and page specific default messages for sharing.
Using Custom Templateset Fields to Simplify Changes
Templateset fields are a type of custom field, like custom page fields or user fields. They’re associated with the templateset and allow you to make templateset-specific customizations.
For example, if your site used a few different templatesets which were mostly similar but used different colors, you could define a custom templateset field for heading color, and reference it from within your template code. You could then copy the templateset and choose a different color without making any changes to the code.
Templateset fields you’ve created are available on the Settings screen for each templateset.
Note
If you don’t see a Custom Templateset Fields section on this screen, no custom templateset fields have been created for your organization.
To add custom templateset fields, select Custom Templateset Fields under Appearance on the sidebar on the right on the Pages Tab and click Add allowed templateset field. Enter the name and other settings for your templateset field and then save.
To use the field in your templateset, go to the Settings screen for your templateset to set the values for the templateset fields. And then include {{ templateset.custom_fields.YOUR_FIELD_NAME_HERE }} in your templates to use the field.
The Original templateset comes with a selection of default fields, which you can view and edit by making a copy of the Original templateset.
Using Page Type to Customize User Form
You can use one Templateset to display different fields based on the page type. to do this include something like the following in the user form template:
{% switch page.type %}
  {% case 'donation' %} [...one hide_by_default tag...]
  {% else %} [...different hide_by_default...]
  {% endswitch %}
The relevant page types in ActionKit are: Petition, Letter, Survey, Donation, Signup, Call, WhipCount, LTE, Unsubscribe, RecurringDonation, EventCreate, EventSignup, RecurringDonationUpdate, RecurringDonationCancel.
Defining Master Templates
You can use a template from one Templateset in another set. This technique allows you to define a master for a particular template so you only need to make edits in one place, even if you have more than one Templateset.
For example, if you only have one LTE layout, you could define the layout in your default Templateset, and have any additional sets pull the layout from the default set using something like this (where the default set is called “Master_templates”):
{% include "Master_templates/survey.html" %}
See also mirroring parent templatesets.
Reusing Code With Template Inheritance
If you have shared content areas and want to minimize code duplication, you can use Django’s built-in template inheritance to reuse code blocks.
In a parent template like wrapper.html, include:
{% block sidebar %}
<div id="sidebar">
  <h2>Sidebar Title</h2>
    <p>Sidebar Content</p>
</div>
{% endblock %}
Then, in your child template, make sure you extend the parent template at the very top of the file and include the block where appropriate. Note that any content you put inside the block in this child template will override the default content you defined inside the parent template.
{% extends "./wrapper.html" %}
{% block sidebar %}{% endblock %}
For more information about template inheritance, see: https://docs.djangoproject.com/en/4.2/ref/templates/language/#template-inheritance.
Adding Your Own Templates
See also: template inheritance.
New Templates are added to specific TemplateSets. to add a new Template, select a TemplateSet, and use either the upload button with the “Automatically add new custom templates in this upload to the Templateset.” option or the “Link Local Files” to upload the new file.
The filename is important, you’ll use it when you want to include this template in another. If you use the filename “weebles.html”, you’ll include it in your templates as:
{% include "./weebles.html" %}
Templates are included inline, before rendering runs.
Improving Page Load Speed
Here are some things that can improve load speed for your action pages.
Using CloudFront for Scripts and CSS
Amazon CloudFront is a fast way to serve static files like your CSS and JavaScript. Whereas Amazon S3 can take 0.3-0.5 sec to begin sending a requested file, CloudFront often takes less than 0.1 sec. Since Pages sometimes have to load a whole series of files before they display, using CloudFront can make a noticeable difference. CloudFront also has edge locations all around the world, which improves response times if many of your action-takers aren’t located in the US.
To set up CloudFront, use your organizations Amazon AWS credentials to open Amazon’s CloudFront Web console. Click Create Distribution and start creating a Web distribution. After you click in the “Origin Domain Name” textbox, you should be able to choose the name of the S3 bucket that you use for CSS/JavaScript/media uploads. When you go back to the list of distributions, copy the domain name Amazon gives for your newly created one (e.g., d12345example.cloudfront.net).
In ActionKit, click your user name at the top right of any screen in the admin, then select Configure ActionKit. Find the Pages > Media Prefix option there, and set it to “https://d12345example.cloudfront.net/” (but using the subdomain you copied in the last step instead of d12345example). The domain makes the CMS uploader give you links to CloudFront instead of S3. (Though this section talks about using CloudFront, the Media Prefix feature should work equally well with alternatives like MaxCDN.)
It may take about 15 minutes before Amazon finishes setting up your distribution and those links actually work. Once the distribution is working, open your Templateset and change existing links that point to your S3 bucket to point to CloudFront instead (e.g., change “https://s3.amazonaws.net/s3.mysite.org” to “//d12345example.cloudfront.net/”). Since CloudFront is effectively a cache in front of S3, you don’t need to do anything to copy existing files between them.
A tricky thing about using CloudFront is that if you change or delete an existing file in S3, the update may not show up in CloudFront for 24 hours. There are a few ways to deal with this:
If you’re temporarily going to be changing a file frequently (like during development), refer to it by its S3 URL or host it on your own server.
If you’re rolling out a change to a file, give the new version a new filename (think scripts-v3.js or even scripts-2014-01-05.js).
If you urgently need to change or delete a file in CloudFront, first change/delete it in S3, then follow Amazon’s instructions for invalidating a resource in CloudFront. This takes a few steps and Amazon says it might take 10 to 15 minutes to complete.
If you’ve uploaded a compressed version of a script or CSS file (a tricky process not covered here), you can use the Django template code {{ request.gz }} to serve it to clients that accept gzip but not others.
Note that CloudFront, like S3, charges for bandwidth and requests. for scripts and CSS (as opposed to, say, video) the cost is unlikely to be a big problem, and it can be one of the simplest ways to make your pages load quicker.
Other Things You Can Do
General best practices apply:
If you have lots of different JavaScript and CSS files, such as for jQuery plugins or a CSS framework, try to bundle them into just a few files. Don’t bundle actionkit.js, though, or you may miss important bugfixes to it.
If you have “heavy” but nonessential pieces of content, like a dynamic Google map on an event page or a signature scroller on a petition, load those after the main form is showing. In ActionKit, this means moving the code to load them after your page’s
initForm('act')call.
There are also some minor ActionKit-specific practices:
If you host action pages on ActionKit’s servers, make sure you’re using a newer Templateset with {% load_ak_context context %} in its header.
If you host pages using actionkit.js on your own server, links to them from mailings can use ?no_redirect=1 to skip the ActionKit redirector. (Links to non-action pages should usually still use the redirector, for click tracking’s sake.)
In the CONFIG settings (see below), enabling Preload Context and disabling Redirect All Links can help.
For those interested in taking a deeper dive into how their page loads, the output of a site like webpagetest.org, or the Network, Audits, and Timeline panels from Chrome’s development tools, can help you see what resources slow things down the most and what you might be able to do. In ActionKit, note the action form can’t be displayed until /context/[pagename] loads and initform('act') is reached; any slow-loading resources that block those things from happening are candidates to be sped up somehow, loaded later in the page HTML, or removed.
Generally, it’s important to balance page speed with other considerations: you want your pages to load quickly, but you also want it to be easy to make changes when you need to, and you certainly don’t want to hurt your site’s stability or browser compatibility.
Suggestions for Working With Templates
There are a number of features built into the Original Templateset. as noted above we recommend using the Original as the basis for your sets because it incorporates all of these features.
In this section we describe the built-in features, note where you can find the code needed to enable the feature and discuss some alternatives.
Note
Many of the features documented below, like in-field labels and the latest version of the user form, were added to the Original Templateset in October 2012. If your Templateset predates those changes, you may need to include new resources (like replacing /samples/actionkit.js with the newer /resources/actionkit.js, or adding a CSS include of /resources/ak-look.css), or update some of your code (like the user form) from the new Original.
Wrapper
The following elements are included in the Original Templateset; we recommend that you include them in your custom templates whether you’re hosting your pages in ActionKit or externally.
Your customized wrapper template should include the following:
<meta charset=UTF-8" />- This tag goes at the start of your document’s<HEAD>. ActionKit uses the UTF-8 character set to handle input in any language. Even if your site is all-English, using utf-8 helps ActionKit handle characters like “curly quotes” and accented characters in names.
//ajax.googleapis.com/ajax/libs/jquery/1.3.2/jquery.min.js- Adds the compressed version of the jquery library.
/resources/actionkit.js- This script provides the styles for theak-errorclass onform <inputs>and<label>tags and defines a bunch of JavaScript functions and attributes in an actionkit object. ActionKit automatically returns error messages for any fields that we validate. These don’t work without this script.to trigger our processing. you’ll also want to have:
<script type="text/javascript">
  actionkit.forms.contextRoot = 'http://yourgroup.actionkit.com/context/';
  actionkit.forms.initPage();
  actionkit.forms.initForm('act')
</script>
Once you’ve done that, any script you have in your page that is surrounded by the following code will be evaluated and the output placed in the element specified by the “for” tag. as an example the Call template includes the following:
<div id="what_to_say"></div>
<script type="text/ak-template" for="what_to_say">
  [% if (!incomplete) { %]
    <div id="script_intro">Call and say:</div>
    {% include_tmpl form.script_text %}
  [% } %]
</script>
CSS Files
The wrapper template, includes two CSS files, actionkit.css and ak-look.css.
The actionkit.css style sheet has styles used for features like validation, recognizing users, progress meters, and in-field labels. The ak-look.css style sheet has the default page design and layout: default column widths, fonts, margins, mobile style rules, and so on.
We strongly suggest you directly include actionkit.css in your templates. Some features rely on this.
It’s your choice what to do with ak-look.css. You might find it handy as a starting point for a new design, or you might copy none of it or only parts. (If you use the mobile styles, see Responsive design for more information.)
User Form
For most page types, there are two templates that are used to create the user form:
user form wrapper and
user form.
The donate, event attend and recurring update templates have the wrapper functionality and the user form embedded in the action type template.
The standard user form has a lot of built in functionality. Here’s a copy of the user_form.html code (current at 8.28.15) from the original Templateset with detailed comments, followed by more in-depth descriptions of some of the features included.
{% load actionkit_tags smartif switchcase %}{% filter remove_blank_lines %}

<!-- Makes ActionKit custom tags available in this form and filters out blank lines from the output -->

{% comment %}

to change which fields show, edit {% hide_by_default %} below and set individual pages' required fields in the page admin,
or activate the User Fields customization option in the page admin to override which fields are visible and the order
they're shown in.

Unhide or require the 'country' field to make the form international. to geolocate more users outside the United
States, unhide/require 'city'.

You can change label text in the language admin, change {% field_order %} below, edit the CSS, or replace this form
entirely with static HTML. See the advanced template ref for more:

https://docs.actionkit.com/docs/manual/guide/advanced_templates.html

name email prefix first_name middle_name last_name suffix country address1 address2 city state zip region postal phone

Enjoy!

{% endcomment %}

{% field_order name email prefix first_name middle_name last_name suffix country address1 address2 city state
zip region postal phone %}

<!-- The order in which form fields should show; this should include fields you rarely use, such as international fields
even if you're a mainly-US group. -->

{% hide_by_default prefix first_name middle_name last_name suffix country phone address1 address2 city state region postal %}

<!-- The fields to hide by default; take fields out of this list to show them. The fields in this list will be unhidden
if that's necessary for the page to work (like ZIP on a 'call your Representative' page). -->

<!-- The section below iterates over all the fields to show (not necessarily everything in field_order) -->

{% for field in user_fields %}
 <div id="id_{{ field.field_name }}_box" class="{% if field.field_name|is_in:context.required %}required{% endif %}">

 <!-- Wraps the label/input pair for, say, email in a div with id="id_email_box" and 'required' class if appropriate -->

    <label for="id_{{ field.field_name }}">{{ field.label_text }}{% if field.field_name|is_in:context.
    required %}<span class="ak-required-flag">*</span>{% endif %}</label>

    <!-- Labels the field, using the |ak_field_label filter to get the field name translated into the page's language
    and the |capfirst filter to capitalize. Adds a 'required' star if needed. -->

  {% switch field.field_name %}

  <!-- Switch which input HTML to use based on the field name.

       Note that for country and state selects, overlay labels aren't used; instead, the <select>'s default
       option acts as a makeshift label.

       Next is code to use country_select.html or state_select.html for country/state fields if you include those
       fields in your form. -->

  {% case 'country' %}
    {% include "./country_select.html" %}
  {% case 'state' %}
    {% include "./state_select.html" %}

  <!-- If you'd like to customize the HTML for a particular field type, you could add additional 'case' tags below -->

  {% else %}
    {{ field.input_tag }}
  {% endswitch %}
 </div>
{% endfor %}

{% if 'country'|is_in:fields %}
 <input type="hidden" name="auto_country" value="1">
 <style type="text/css">
  /* Ensure that, if there's no JavaScript, the global-friendly fields show
   * rather than the US-only ones */
  #id_zip_box, #id_state_box { display: none; }
 </style>
{% else %}
 <input type="hidden" name="country" value="United States">
{% endif %}

{% endfilter %}
Template Requirements for Customize Fields
When a staffer is creating a page they can override the user form field selections from the page’s Templateset using the Customize Fields option on the Edit content screen.
The customization choices available vary based on the version of the user form template in the Templateset used by the page:
Modern user form template:
Modeled on ActionKit’s current Original Templateset, these support the full range of Customize options. You can select the fields to be displayed and required, and their order. You can include, and require, any standard user field as well as custom user and action fields.
Intermediate user form template:
Modeled on older versions of the Original Templateset from 2013-2014, these support field visibility and display order customization, but do not support custom field input types, custom labels for action fields, or custom HTML.
Older user form template:
Modeled on ActionKit’s Original (before Fall 2012) Templateset, these have hard coded user fields. If you’re using an older Templateset, you’ll see a red message in the Customize box warning you about the limitations on the choices available. The choices you make here won’t change which fields are displayed. You can set the fields in your template to visible or required. None of the other options will work. If you delete a field here, it will still show up on your page. If you mark a field visible here that doesn’t exist in your template, it still won’t be displayed.
Note
Do not set a field to required that does not exist in your user form template. Users will be required to fill in the field, but the field won’t be available in your form, so nobody will ever be able to submit.
If you want to make a custom user field required you will need to modify the user form template to include the new fields. for more information, see Required Fields.
You can upgrade older user form templates to the modern style as follows:
to upgrade an older-style user form, replace the user form template with a copy from the Original Templateset, and then modify the layout and style if necessary to match your site’s design.
to upgrade an intermediate-style user form, either replace the user form template with a copy from the Original Templateset, or make the following changes to your current user form template:
Intermediate
Modern
{% for field in fields %}
{% for field in user_fields %}
{% switch field %}
{% switch field.field_name %}
<label for=”id_{{ field }}”>
<label for=”id_{{ field.field_name }}”>
{{ field|ak_field_label:field|capfirst }}
{{ field.label_text }}
{% if field|is_in:context.required %}
{% if field.field_name|is_in:context.required %}
<input name=”{{ field }}” id=”id_{{ field }}” type=”text”>
{{ field.input_tag }}
If you are using a modern user form template, there are a few additional expressions you can use inside the {% for field in user_fields %} block:
{{ field.field_name }}returns the field name used to store data for this field. (Will be blank for custom HTML fields.){{ field.label_text }}returns the translated label text for the field.{{ field.type }}returns the field type, one ofuserfor core user fields,customfor custom user fields,actionfor custom action fields, orhtmlfor custom HTML.{{ field.input }}returns the input field type, one oftext,textarea,number,select,radio,checkbox, ormultiple.{{ field.input_tag }}returns the HTML code for the input field to be used for data entry.
User Recognition
User recognition is described here. to enable user recognition you need to include the known_user and unknown_user divs. Disabling these also disables action tracking from a mailing.
These divs are in the user form wrapper template or in the action type template for page types with embedded user forms (e.g. donate, event attend, and recurring update).
An example from the user_form_wrapper is:
<div id="known_user">
  Not <span id="known_user_name"></span>?  <a href="?" onclick="return actionkit.forms.logOut()">Click here.</a>
  <hr />
</div>
<div id="unknown_user" class="user-form ak-labels-overlaid ak-errs-below">
  {% include "./user_form.html" %}
</div>
User Form Fields
The default user form template generates HTML for whatever fields your form uses, rather than static code for a fixed set of fields. The list of built in user form fields is:
name
email
prefix
first_name
middle_name
last_name
suffix
country
address1
address2
city
state
zip
region
postal
phone
To specify which of the fields are shown in your standard user form you hide those you don’t want by adding them to the list in the code line {% hide_by_default ...%) .
Whether or not a field is in your list, it will be included in the form if it’s required for the Page. This includes fields set as required on the Edit Content screen during page creation or where you didn’t specifically pick a required field, but ActionKit needs it for the Page to work. for example, when a Page is asking users to call their Representative and needs a ZIP code to determine the user’s representative. Read more about required fields.
Change the order fields are displayed in by editing the list in the code line (% field_order ...%).
A few notes:
Required fields are always shown and marked with a red asterisk ( *). That includes situations where you didn’t specifically pick a required field, but ActionKit needs it for the page to work. for example, when a page is asking users to call their Representative and needs a ZIP code to determine the user’s representive.
Labels in user forms are shown in the page’s language - a Spanish page’s name field will be labeled ‘Nombre’. You can edit the names of fields via the Languages tool.
You can use CSS or class names to change the placement of labels, or do appearance changes like making first and last name fields share a line.
Finally, you can replace the dynamic user form with a static one, though you lose any per-page flexibility. a sample static form is available here.
Country Settings
The Original user form template also has some special functionality built in for the country field. This is important whether your page is designed for international users or not. If you don’t include the country field, the template automatically submits “United States” as the country (and the field is hidden to the user).
Note
Even if all of your signatures will be from within the U.S., you still need a hidden <input> specifying country=United States. ActionKit’s geocoding and zip processing only happens if you include this.
If you do include the country field, zip or postal (or state or region), then ActionKit’s JavaScript will automatically show or hide the US-specific or international fields when the user picks ‘United States’ or a non-US country from the dropdown.
Custom Fields
Custom fields are just HTML inputs with certain names. Custom field naming conventions identify the type of field it is:
user_anything - a custom field that starts with ‘user’ is a custom user field, such as
user_organizationoruser_yearofbirth. You create these fields by following the process in Custom user field. Then you select them in the user form customization section on the Edit content screen or add them to your user form manually, if you are using an older user form template:<input name="user_organization" type="text">
action_anything - a custom field that starts with ‘action’ is a custom action field, such as
action_commenton a specific petition signature. You don’t need to add a custom action field in advance, you can set them up directly in template. In the petition template see:<input name="action_comment" type="text">
Other things to know about custom fields:
List/tag custom fields - Custom fields can have multiple values. You could use this to track a list of “tag” checkboxes for users (e.g., “I am a veteran,” “I am a small business owner”), for instance, and let the user check off all tags that apply to them:
<input type="checkbox" name="user_tag_list" value="veteran">
Querying by custom fields - The tables core_userfield and core_actionfield store values for user and action fields, respectively.
Required Fields
As noted above, required fields are always shown. They’re marked with a red asterisk (* ). This is defined in the CSS for the class ak-required-flag.
If you’re using a modern user form template, this happens automatically for any field you require on the Edit content screen, or any field that ActionKit requires for the Page.
If you’re using an older user form template you have to do this manually. In that case, you can set user fields as required by specifying the input type as hidden and the input name as required for any of the fields that the user provides. (If there are several required fields, use several hidden inputs.) to make a custom user field required, you must set it in the template code. The following is an example from the donate template:
<div>
  <label for="action_employer">Employer</label>
  <input id="action_employer"  type="text" name="action_employer" size="20"/>
  <input type="hidden" name="required" value="action_employer"/>
</div>
You can optionally give a “pretty” field name to use in the error message:
<input type="hidden" name="field_action_employer" value="Employer name" />
Finally, you can specify the whole error message in a field named error_action_employer, or append :missing or :invalid to the error field name to give different messages for a missing value vs. an invalid value.
Validation and Error Messages
ActionKit automatically returns error messages for any fields that we validate. for example, if a user doesn’t enter information for a required fields we’ll return an error or if a user enters a 4-digit zip we’ll return an error.
This is only true if you leave /resources/actionkit.js in the wrapper template in ActionKit. Among other things, this tag provides the styles for the ak-error class on form inputs and <label> tags.
Live, In-line Validation
The Original Templateset shows error messages below the relevant field as the form is filled out. This is done using the CSS class ak-errs-below. You can also substitute ak-errs-above or ak-err-above if you’d rather the errors show above the field instead.
To use these in other Templatesets, use the class in each template that generates error messages.
It’s possible to use third-party validation scripts on your forms, but we encourage you to use ActionKit’s built-in and supported validation. The built-in validation catches some errors others won’t, like when a credit card is declined on a donation template. If you need to customize error messages or styles, or add new validation rules, it’s possible to do that without replacing the default library.
When using live validation, your HTML structure matters, though most forms will either work from the start or be easy to adapt. You want to use outer <div> with class="ak-errs-below", then inner <div> s around each label/input pair:
<div class="ak-errs-below">
  <div>
    <label>Field 1</label>
    <input type="text" name="action_field1">
  </div>
  <div>
    <label>Field 2</label>
    <input type="text" name="action_field2">
  </div>
</div>
The exact tags used don’t matter (you could use <ul> and <li>, say), but the structure does. It matters because after an error, ActionKit looks for the parent of the <input> tag that had the error (in this case, the inner <div>), then adds the the error message(s) to the end of it, creating HTML like this:
<div>
  <label class="ak-error">Field 2</label>
  <input class="ak-error" type="text" name="action_field2">
  <ul class="ak-err" style="display: block;">
    <li>E-mail address is required.</li>
  </ul>
</div>
Note
The error itself is in a container with class="ak-err", and the <label> and <input> elements are each given class="ak-error". You can use those classes for styling.
Occasionally, you’ll want the errors to show above or below a group of inputs instead of an individual input. for example, the default donation form needs to show errors above a group of donation amount options. to do that, use the class ak-err-below or ak-err-above (note ‘err’ instead of ‘errs’). for example, this shows errors in a group at the top of a fieldset, instead of next to each field:
<fieldset class="ak-err-above">
  [...whatever fields and labels you want...]
</fieldset>
Live and in-line validation is optional. Without ak-errs-below, by default errors show in a red box above the user form (or wherever <ul id="ak-errors"></ul> is in your template). If a user ever makes a mix of errors that can be shown in-line and errors that can’t, all of the errors will show up in the red box for consistency.
Writing Your Own Validators
If a user doesn’t enter information for a required fields, we’ll return an error.
You can override our error messages, or add your own to validators you’ve added, by putting fields like these in all your forms:
<input type="hidden" name="field_zip" value="postal code" />
<input type="hidden" name="error_TEMPLATE:invalid" value="{0} isn't valid, eh" />
If one of your custom fields needs special validation, you can write your own validation code in JavaScript. to add custom validation, add an onvalidate= HTML attribute to your <input> tag:
<input type="text" name="action_theword" onvalidate="if (!/bird/i.test(this.value)) return 'Bird is the word'; else return true;">
If you need to add a more involved test, add a function called actionkitBeforeValidation that checks the form and assigns any error messages to a property in the global actionkit.errors object:
<script>
function actionkitBeforeValidation() {
  // Validate that no more than three choices were picked
  // The 'this' variable is set to the form being validated
  if ( $(this).find('[name=action_vote_list]:checked').length > 3 )
    actionkit.errors.too_many_votes = 'You cannot vote for more than three choices.';
}
</script>
You can change how ActionKit displays errors by adding a function called actionkitValidationErrors. It’s passed an object with error messages, and a field name if the error came from live-validating a field. Returning false from your function will keep ActionKit’s default validation from running.
For example, if you use Google Analytics, here’s (untested) sample code to fire a custom event when there is an error, which you’d add to the end of your Analytics script tag:
var recordedError = 0;
function actionkitValidationErrors() {
  if ( recordedError++ ) return; // only log once per hit
  _gaq.push(['_trackEvent', 'ActionKit', 'ValidationError']);
}
For another example, here’s code that replaces the default error display with an alert popup:
<script>
function actionkitValidationErrors(errors, field) {
  if (field) return; // don't run during live validation

  var errStr = 'There were errors:';
  for ( var name in errors ) {
    errStr += '\n' + errors[name];
  }
  errStr += '\nPlease correct them and resubmit.';
  alert(errStr);
  return false;
}
</script>
If your custom function crashes, validation won’t work at all, so be careful and consider wrapping any tricky code in a JavaScript try statement.
Finally, the function actionkitBeforeSubmit runs if validation succeeds. as with JavaScript onsubmit, it will stop submission if you return false.
Field Labels
The Original Templateset uses the ak-labels-overlaid class to place input labels within the input fields. as an example,
the text E-mail shows up inside the email field and disappears when the user starts entering data.
Overlaid labels aren’t right for every input. They work best for familiar fields, like contact information, rather than new and unfamiliar text like a survey question. They don’t work at all when the label is too large for the field. So, ActionKit builds in styles for two other ways to position labels: ak-labels-above positions the label above the input, and ak-labels-before positions the label to the left (or right in Herbrew/Arabic).
On narrow mobile phone screens, ‘labels before’ type layouts may be cramped. If you use a layout like that, you can change the mobile layout with CSS or JavaScript. Here’s an example of the latter approach, which you’d need to put above the default wrapper’s call to actionkit.forms.initForm:
// 750px is AK's default threshold for the narrower layout
if ( $(window).width() < 750 )
  $('.ak-labels-before').removeClass('ak-labels-before').addClass('ak-labels-overlaid');
ActionKit’s built-in overlay labels may work better for you than trying to do the same thing with third-party libraries or jQuery plugins: some plugins don’t work well with autofill or live validation on older browsers, or can inadvertently let users submit the field labels to the server. for instance, organizations using some plugins have inadvertently stored ‘City’ as the city of many of their supporters.
If you need a good stand-in for ak-overlaid-labels for non-ActionKit forms, one option is the HTML5 placeholder polyfill at https://github.com/ginader/HTML5-placeholder-polyfill - it uses the browser’s built-in placeholder feature when available, and provides a ‘safe’ fallback otherwise.
Creating a Static User Form
You can replace the dynamic user form with a static one, though you lose the functionality listed above. Here is a sample static form:
<div id="id_name_box">
  <label for="id_name">Name</label>
  <input name="name" id="id_name" type="text">
</div>
<div id="id_email_box">
  <label for="id_email">E-mail address</label>
  <input name="email" id="id_email" type="text">
</div>
<div id="id_address1_box">
  <label for="id_address1">Street address</label>
  <input name="address1" id="id_address1" type="text">
</div>
<div id="id_city_box">
  <label for="id_city">City</label>
  <input name="city" id="id_city" type="text">
</div>
<div id="id_state_box">
  <label for="id_state">State</label>
  {% include "./state_select.html" %}
</div>
<div id="id_zip_box">
  <label for="id_zip">ZIP Code</label>
  <input name="zip" id="id_zip" type="text">
</div>
Without switching entirely to the dynamic form, you can still hide an individual field when it’s not needed with code like this:
{% if "zip"|is_in:context.required %}
<div id="id_zip_box">
  <label for="id_zip">ZIP Code</label>
  <input name="zip" id="id_zip" type="text">
</div>
{% endif %}
This makes ‘zip’ show if you choose it on the Edit content screen (or if the page requires it, like a call page targeting Congress), but not otherwise.
Donation Forms
Users with javascript disabled will see a radio button next to “Other” so they cannot submit a donation that has both an amount selected and an amount entered. If this somehow gets submitted anyway, the user will see an error message.
If you set a donation page to accept international donations the “Country” selection box comes after all the address information so a user could enter their state and zip (under region and postal) only to have those entries disappear when they select “United States” as the country. You may want to move this up in your template for accepting international donations.
Displaying Payment Processor Information
Should you choose to, you can display additional payment processor information on your donation template, such as the payment processor name, the currency used on the page, and whether card validation and address aren’t required (true for import stubs):
{{ page.payment_processor_information.processor }}
{{ page.payment_processor_information.use_vzero }}
{{ page.payment_processor_information.currency }}
{{ page.payment_processor_information.no_card_validation }}
{{ page.payment_processor_information.no_address_required }}
Multilingual/International
Accepting International Sign Ups
If you want to easily allow users from other countries to take action on a page, set “country” to visible in the User Form Fields section on the Edit content screen, or if you’re using an older Templateset, you just need to remove “country” from the hide_by_default list in user_form.
If you’re using an older Templateset, and your form displays a country dropdown, include both zip and postal fields (or state and region). ActionKit’s JavaScript will automatically show or hide the US-specific or international fields when the user picks ‘United States’ or a non-US country from the dropdown.
Of course, you can also just use the international-friendly fields (postal and region); aside from field names, the main difference is that US users won’t get a state dropdown.
Translating Text In Templates
ActionKit provides tools you can use to provide content and communicate with members in other languages. You can read more about the language functionality here.
For each language you work in, you can either create a language specific Templateset, or add some code to your default set to pull in translations.
The ak_field_label filter, used in the user form template in the original Templateset, will automatically pull in the field name in the page’s language (for the languages you’ve added to your instance and translated).
You can also define a filter to pull other text you’ve translated into your default Templateset.
You define a filter to pull translated text from Pages > Related Tools >Languages. for example, you might include the following in your template:
{% filter ak_text:"ppolicy_link_text" %}Privacy Policy{% endfilter %}
And then you could enter translations for ppolicy_link_text into the Languages tool by editing the appropriate language set and clicking the Translate another piece of text link. The language used will be the language of the page being viewed, so if you use the same Templateset for an English and a French page, users on each page will see text in the right language.
Action Type Templates
There are a couple bits of functionality related to the tags in the action type templates:
The
<form>tag used in the page type templates - this helps with UTF-8 handling, among other things. as an example, the petition template contains<petition-form>.The
<label>tag for each<input>control tab - labels are highlighted .
Responsive Design
The original templates follow the strategy of responsive web design (http://en.wikipedia.org/wiki/Responsive_web_design). All devices get the same HTML document, but the CSS adapts it to phone screens. If you’re familiar with RWD, there’s little new here to learn, and if you aren’t, resources on the Web will teach you far more than you’ll learn here. But, to get you started, here is an ActionKit-centric crash course in keeping your templates responsive.
If all else fails, it can’t hurt to stay close to the default framework. You can customize a lot (fonts, colors, background, headers, page and column widths, etc.) in CSS with little risk of hurting the phone layout.
If you add items with fixed pixel widths, like images or YouTube videos, use a CSS rule like
max-width: 100%to ensure they’ll narrow down as needed on tablets or phones. In general, prefer percentages to hard pixel widths; a hard-coded 450px column of text might make sense on the desktop, but it could look awkward on a 768px iPad screen or unusable on a 320px iPhone.Speaking of screen widths, flexibility and percentage widths are better, when possible, than designing the site for only one ‘desktop’ and one ‘mobile’ width. There are lots of different ways your pages might be viewed: on unusual phones or tablets, in portrait and landscape modes, or even on as-yet-unreleased gadgets. If, like the Original templates, your page stays functional whatever width you set your browser window to, you’re doing it right.
Use stylesheets, not “style” attributes in HTML. In stylesheets you can write separate rules for narrow screens using media queries (see the end of ak-look.css for an example). You can’t do that with the style attribute.
If you have a two-column layout, you want to make sure it ‘collapses’ to a single column on screens that are too narrow to fit it comfortably. The default templates do it with CSS: near the end of
ak-look.css, floating columns with classcolget their float atribute set to ‘none’ on mobile. You can also change styles or classes from JavaScript; an example of that technique is in Field labels.Content should appear in your HTML in the same order you’d like it to appear on phones. See the default petition template for an example of this: the boxed petition statement shows first (with
float: right), then the user form (withfloat: left), then the explanatory text (withfloat: rightagain).You may want to use CSS to outright hide or show some elements on mobile or on the desktop. You might want a different, smaller header image on phones, say. ActionKit uses CSS rules to show a ‘Read more…’ link on petition pages only in its single-column layout; you can reverse the rules to make parts of your page show only on larger screens.
If you find your layout isn’t usable on narrow screens (if content is cut off or the like), you may just want to show mobile users your desktop site. In that case, remove the following
meta viewportline from your wrapper:<meta name="viewport" content="width=device-width, initial-scale=1, maximum-scale=1">
and take out any
@mediasections in your CSS.
Progress Meter
If you enter a goal when creating page, old and new Templatesets modeled on Original will display a thermometer. to keep this functionality, you have to keep {% include “./progress_meter.html” %} in your page type templates and the <input type=”hidden” name=”want_progress” value=”1” /> in the progress_meter template or the call to context.progress won’t include the progress data.
Customization Examples:
Adding a Domain Root Page
The site root template lets you control what is served up at the root of your client domains. The template is blank by default. This template may be useful if you want to retrieve Facebook Insights information for your domain or other data that requires you to demonstrate that you have control of the homepage for your ActionKit URL.
Alternatively, folks who would like to redirect traffic to the home pages of their client domains to their main site could use <meta refresh> tags or Javascript to do so.
<meta http-equiv="refresh" content="0;url=http://www.example.com/page.html">
Just change the URL to wherever you’d like folks to end up.
Using Snippets
You can use the predefined snippets that are available when creating pages and mailings to modify your templates. for the full list of snippets, see Customizing Content and Messages.
Customizing Pages With Javascript
Often, Django template tags (including ActionKit’s extensions) are the easiest way to insert context-specific info like a user name into your page. Sometimes, though, either you can’t use those tags (like if you’re hosting the page on a non-ActionKit server) or it’s just easier to use JavaScript for what you’re doing.
One way to do that is by using jQuery event hooks. If that works for you, it’s what we recommend; separating your code from your markup tends to make it easier to maintain them over the long term. jQuery event hooks are preferable to actionkitFormReady and similar JavaScript functions because you can install more than one, handlers are more standard than functions with special names, and if they crash it doesn’t stop the form from working.
actionkit.ready: form is ready
actionkit.recognized: user is recognized
actionkit.userFormShown: user is not recognized
These event hooks have ‘context’ as the second argument to the handler, after the event object. The basic usage is $(actionkit.form).bind('actionkit.ready', handlerFunc)
Before the jQuery event hooks were available, the previous recommendation was to use the actionkitFormReady JavaScript function. This function delays running your code until the form is fully loaded. This is useful when you want to know whether the user was recognized or not, or somehow modify dynamic parts of the form (like the checkboxes on a ‘call your Representative’ page). actionkitFormReady isn’t the only hook available: see the Advanced validation section for validation-related hooks. However, now that jQuery event hooks are available, you should use those instead.
Less frequently, you may find it’s just simpler if you can mix some code into your HTML. In that case, there’s JavaScript templating. Lots of JavaScript templating engines are out there; if you want to get a better idea of the general concept, check out the examples and code editor at the EJS Web site, for example.
ActionKit integrates a bare-bones templating facility we call text/ak-template. to use it, change your template to have a place for the content to go (<div for="some_id">) paired with a tag containing your template code (<script for="some_id" type="text/ak-template">). Both tags need to be inside your page’s <form> tag (not in the wrapper). Here’s an example:
<div id="greeting"></div>
<script for="greeting" type="text/ak-template">
[% if ( name ) { %]
Hi there, [%= name %]!
[% } else { %]
Hello stranger!
[% } %]
</script>
Control flow code, such as the if, else and close brace above, is wrapped in [% ... %]. Expressions whose output you want to insert into the document, like name in this example, are wrapped in [%= ... %] (note the added equals sign). Your JavaScript has access to everything in the window.actionkit.context object; name above refers to window.actionkit.context.name. Here’s code you could insert in a page to view the context on modern browsers:
<div id="hello"></div>
<script for="hello" type="text/ak-template">
<textarea>[%= JSON.stringify(window.actionkit.context) %]</textarea>
</script>
(Using a template isn’t the only or simplest way to see the context; you could also just type window.actionkit.context in your browser’s JavaScript console.)
Using a template was once the only easy way to make sure your JavaScript ran after ActionKit form setup was done and the context was loaded. Now, you can use actionkitFormReady for that instead. But ak-template is still available for situations where needed. ak-template is based on another micro-templating engine created by jQuery author John Resig and is similar to EJS.
When to Use "id_"
The
name=" "of an<input>for a user custom field has to have auser_prefix; for action custom fields the prefix isaction_.The
id=" "of an ActionKit form field should be its name withid_prepended. So you might get<input name="user_awesomeness" id="id_user_awesomeness">.
Note
Giving the <input> tags IDs as well as names makes them easier to style and retrieve in JavaScript, and prefixing IDs with id_ avoids some messiness on Internet Explorer 7 and older, which mix up id= and name= in their JavaScript getElementById function.
Security Warnings
If you’re seeing warnings that your page isn’t secure, confirm that everything your page is using (like images) is hosted on a secure site.
If the URL for your page starts with “https” (and the site has a valid SSL cert) then the page should be considered a secure resource. However, if you have CSS, JS or images that are being hosted somewhere without an SSL cert, many browsers, particularly Internet Explorer, will show a security warning.
Examples
The following section includes examples of things clients have done with Templatesets or responses to support requests. In some cases, the example refers to the old original Templateset. These aren’t tested and may not be complete, but they can give you sense of the range of page variations you can achieve using Templatesets or point you in the right direction for related issues. Be sure to test any changes you make based on these examples.
Additional examples are available in Frequently Asked Questions and Tutorials.
Add Attendees After Event
A feature was added to the Original templateset in a release in November of 2017 that allows hosts to add attendees after the fact.
To add this to your templatesets, you’ll need to make a few changes to your event_host_tools.html template. The update will consist of adding some JavaScript, HTML, and including the template event_roster_add.html.
You can see the individual changes that were applied to the Original templateset by navigating to the Original templateset in your instance, viewing the history of the templates, and clicking on the patch of event_host_tools.html on 2017-11-16.
Here’s a description of the changes you’ll need to make to your event_host_tools.html template. The highlighted code will need to be added to your template, the non-highlighted code is included for context.
Add JavaScript to the handleJumpLink function:
else if ( this.id == 'invite-friends-link' )
     targetEl = $('#taf');
else if ( this.id == 'add-attendees-link' )
    targetEl = $('#more-attendees');
 // console.log(targetEl);
 // Unhide email form if needed
 if ( /^email-/.test(this.id) ) {
     var emailButton = targetEl.closest('form').find('input[type="submit"].email');
     handleEmail.apply(emailButton, []);
 }
  if(this.id == 'add-attendees-link'){
    $('.signup-list-controls').slideUp('fast');
    $('#more-attendees').slideDown('fast');
    actionkit.forms.initValidation('attendees-add');
  }
 // Highlight
 targetEl.addClass('target');
 // Allow jump to #foo to happen
Add JavaScript to the initHostTools function:
if ($('#manage-attendee').length)
     actionkit.forms.initValidation('manage-attendee');
var attendeeTable = new formTable(fields, 'attendee_', 5);
$('#more-attendees .data-entry').append(attendeeTable.build());
$('#more-attendees input.more-rows').click(function(e){attendeeTable.addRows($(e.target).data('count'))});
// when adding attendees, clear empty rows
$('#more-attendees input[type=submit]').click(function(e){
    attendeeTable.clearEmptyRows()
    return true;
});
 $(window).load(function() {
     updateConfirmationMessage();
 });
Add HTML between the link to Email attendees and Invite friends:
 </li>
 {% endif %}
 {% if event.is_in_past %}
 <li class="if-js"><a class="jump-link" id="add-attendees-link" href="#attendees-add">Add Attendees</a></li>
 {% endif %}
 {% if event.is_open_for_signup and page.pagefollowup.send_taf %}
 <li class="if-js"><a class="jump-link" id="invite-friends-link" href="#invite-friends">Invite friends</a></li>
Finally include the event_roster_add.html template between the guest roster and the invite form.
 <!-- Optional no attendees message, e.g., "go use the Invite Folks tool at right" -->
 {% endif %}
 {% include './event_roster_add.html' %}
 <!-- Invite -->
 {% if event.is_open_for_signup %}
 <div class="ak-margin-top-2 ak-clearfix">
The event_roster_add.html template has already been added to your instance.
Once you’ve finished, you’ll want to test the changes. You can do this by previewing your templateset with the host view for an event that has already started. It’s important that the event has already started because the Add Attendees only appears once the event starts.
Click the Add Attendees link to open a form with boxes for Name, Email and Phone. You can test by adding a few attendees and clicking Save Attendees.
Display a Map on Event Search
To get the Open Street Map from the Original template on to your own template, first please make sure you include the following hidden input in event_search.html:
<input type="hidden" name="event_search_on_load" value="1">
Also on event_search.html, please make you include the following lines at the top of the file, before the {% block content %} block:
{% block css_additions %}
        <link href="/resources/leaflet/leaflet.css" rel="stylesheet" type="text/css">
        <link href="/resources/leaflet/MarkerCluster.css" rel="stylesheet" type="text/css">
        <link href="/resources/leaflet/MarkerCluster.Default.css" rel="stylesheet" type="text/css">
{% endblock %}

{% block script_additions %}
        <script type="text/javascript" src="/resources/leaflet/leaflet.js"></script>
        <script type="text/javascript" src="/resources/leaflet/leaflet.markercluster-src.js"></script>
{% endblock %}
Then, to display a map on the event search page on load (before a user types in a zip code to search), please copy from Original/event_search_results.html lines 26-98 (beginning with {% if campaign.show_address1 and not hide_map and events|length < 300 %} and ending with {% endif %}) and include it in your own event_search_results.html file.
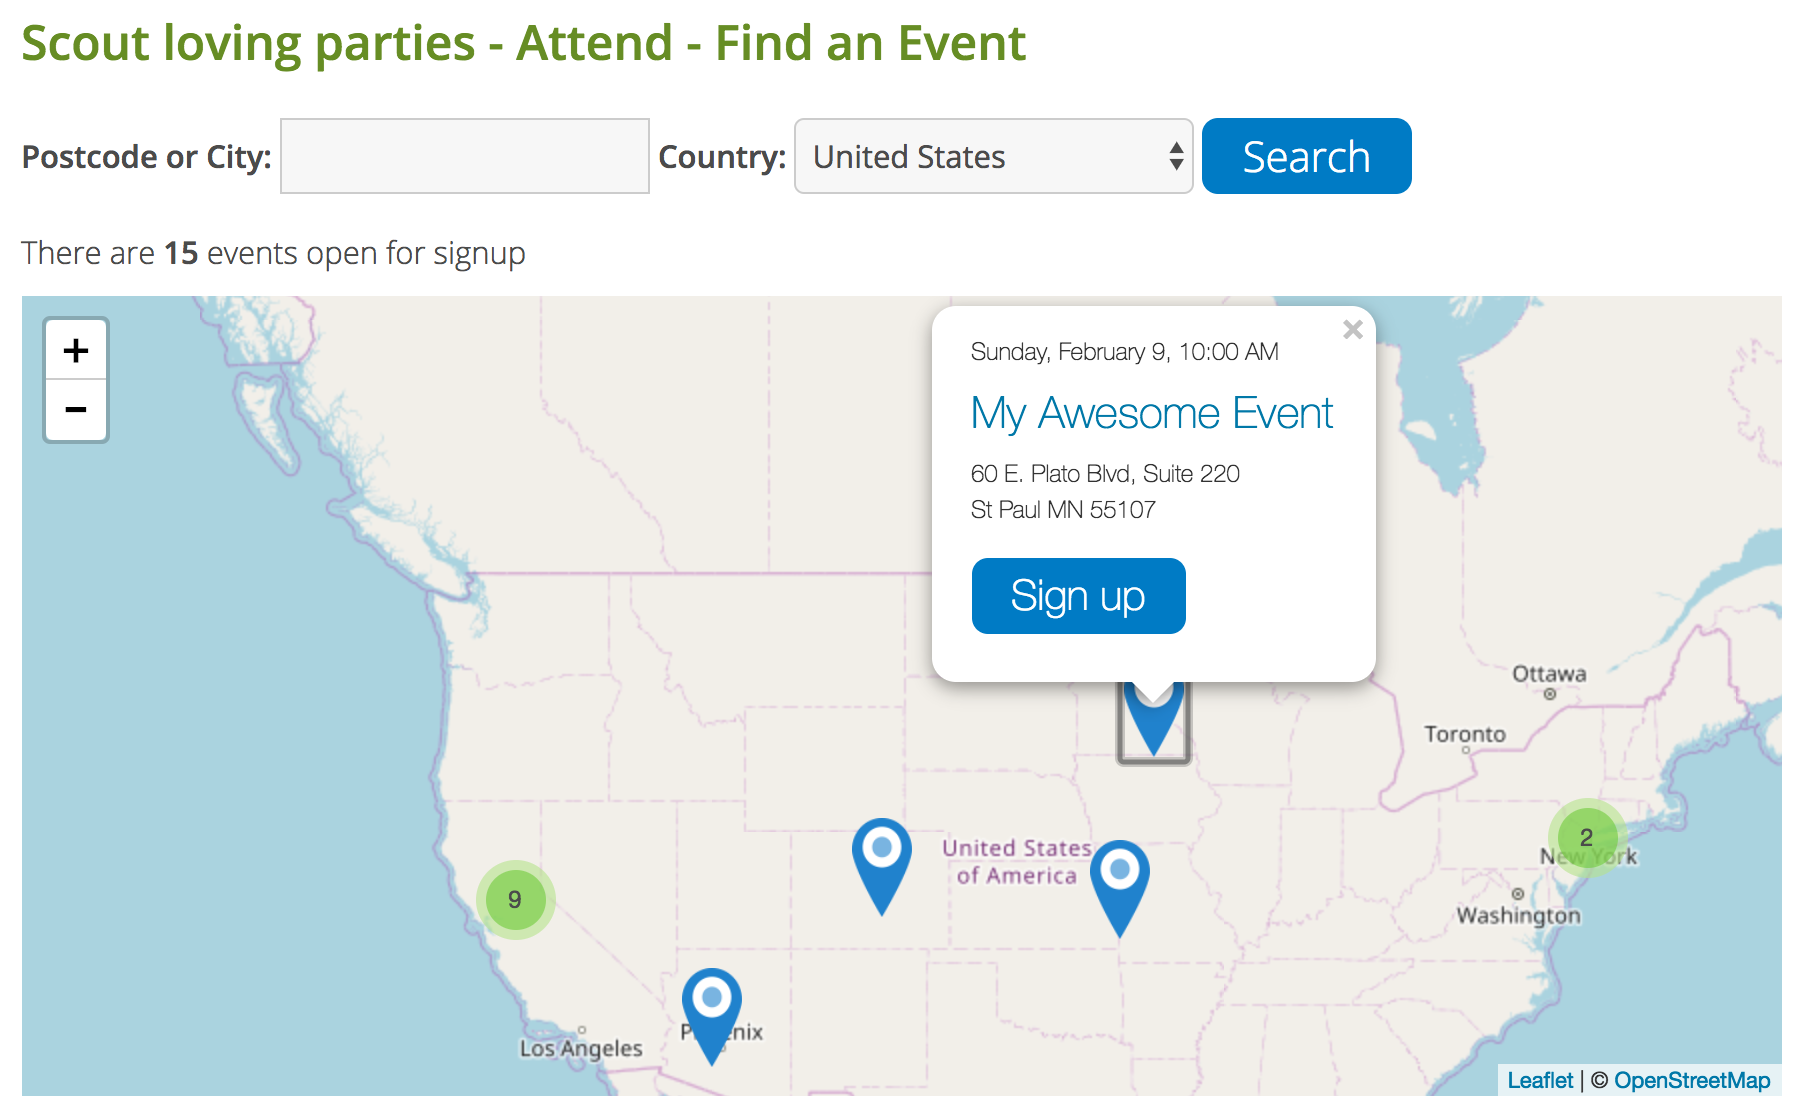
{% if campaign.show_address1 and not hide_map and events|length < 300 %}
<style>
#map {
width: 100%;
height: 400px;
}
.leaflet-container a.ak-button { color: #fff; }
#map .leaflet-popup-content p { margin: 5px 0px; }
</style>
<script>
/*List to hold events*/
var loc = [];
{% for event in events %}
loc.push([
{% if event.is_in_past or event.is_full %}
'<p>{{ event.starts_at_dt|date:"l, F jS, G:i a" }}</p>' +
'<p class="ak-event-title"><a href="/event/{{ campaign.local_name }}/{{event.id}}/signup/?akid={{args.akid}}&source={{args.source}}"' +
{% if campaign.use_title and campaign.show_title and event.title %}
'>{{ event.title }}' +
{% else %}
' class="ak-campaign-title">{{ campaign.local_title }}' +
{% endif %}
'</a></p>' +
'<p>{{ event.address1 }} <br />{{ event.city }} {{ event.state }} {{ event.zip }} </p>' +
'{% if event.is_in_past %} <p><strong>Sorry, the event is over.</strong></p> {% endif %} {% if event.is_full %} <p><strong>Sorry, the event is full.</strong></p> {% endif %}'
{% else %}
'<p>{{ event.starts_at_dt|date:"l, F jS, G:i a" }}</p>' +
'<p class="ak-event-title"><a href="/event/{{ campaign.local_name }}/{{event.id}}/signup/?akid={{args.akid}}&source={{args.source}}"' +
{% if campaign.use_title and campaign.show_title and event.title %}
'>{{ event.title }}' +
{% else %}
' class="ak-campaign-title">{{ campaign.local_title }}' +
{% endif %}
'</a></p>' +
'<p>{{ event.address1 }} <br />{{ event.city }} {{ event.state }} {{ event.zip }} </p>' +
'<a href="/event/{{ campaign.local_name }}/{{event.id}}/signup/?akid={{args.akid}}&source={{args.source}}" class="ak-button">Sign up</a>'
{% endif %},
{{ event.latitude }},
{{ event.longitude }},
{% if event.is_open_for_signup %} 'open_for_signup' {% else %} 'not_open_for_signup' {% endif %}
]);
{% endfor %}
/*Initialize the map*/
var first_event_coordinates = [{{ events.0.latitude }}, {{ events.0.longitude }}]
var map = L.map('map').setView(first_event_coordinates, {% if all %}2{% else %}12{% endif %});
L.tileLayer('http://{s}.tile.openstreetmap.org/{z}/{x}/{y}.png', {
maxZoom: 19,
attribution: '© <a href="http://www.openstreetmap.org/copyright">OpenStreetMap</a>'
}).addTo(map);
/* Plot markers */
var markers = L.markerClusterGroup({ maxClusterRadius: 20 });
var icon = {
open_for_signup: L.icon({
iconUrl: '/media/modern/blue_marker.png',
iconSize: [30, 50]
}),
not_open_for_signup: L.icon({
iconUrl: '/media/modern/grey_marker.png',
iconSize: [30, 50]
})
}; //icon
for(var i=0; i<loc.length; i++) {
markers.addLayer(L.marker([loc[i][1], loc[i][2]],{icon: icon[loc[i][3]]} ).bindPopup(loc[i][0]));
map.addLayer(markers);
}
</script>
<div id="map"></div>
{% endif %}
Optionally, to display counts of the total public events created, public events still open to signup, and public events that are now over, you can copy/paste lines 23-25 from event_search_results.html and put it above the map:
{% if not hide_map %}
    <p>There are <strong>{{ open_events|length }}</strong> events open for signup {% if is_in_past or is_full %}({% if is_full %}plus <strong>{{ is_full|length }}</strong> full{% endif %}{% if is_in_past and is_full %}, {% endif %}{% if is_in_past and not is_full %}plus {% endif %}{% if is_in_past %}<strong>{{ is_in_past|length }}</strong> ended{% endif %}){% endif %}</p>
{% endif %}
Notify signed-up users of an event of any changes to that event
When you or an event host makes changes to an event, you can notify any users who are signed up for that event. First, add a checkbox to event_create.html:
{% if update %}
<div>
    <input id="id_send_details_changed_email" type="checkbox" name="send_details_changed_email" value="1">
    <label class="ak-checkbox-label" for="id_send_details_changed_email">
        Send an email to attendees notifying them of the event details changing
    </label>
</div>
{% endif %}
It’s recommended to add this checkbox just above the submit button. Then, when changes are made, if the host checks the box, all users signed up will receive an email notifying them of the change.
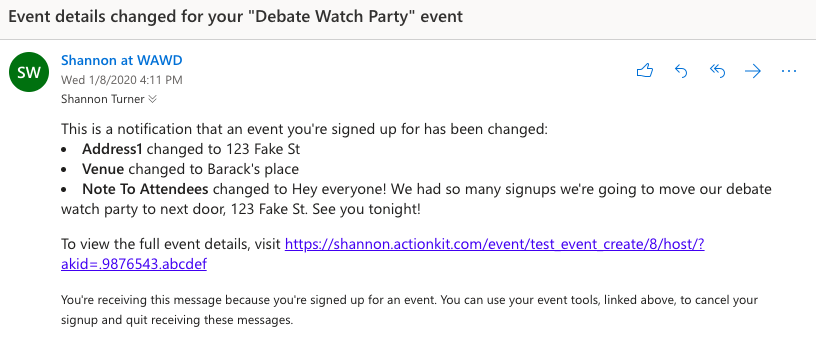
You can customize this email by editing event_email_details_changed.html.
Turning Off a Page
You can hide pages, but that means the page won’t be included in reports.
If you want to make a page inaccessible to users without hiding or deleting it, you can easily redirect from an AK donate page to another page by adding a meta refresh tag anyplace.
For example:
<meta http-equiv="refresh" content="0;url=http://www.example.com/page.html">
Just change the URL to wherever you’d like folks to end up.
Displaying List of Recent Signers
Several of you have asked how to display a list of recent signers on a page. We’ve made some new template tags available that make this easier:
The tag page.recent_actions (gives actions on the page sorted by reverse created_at) and the unique template tag filter emits only unique elements in a sequence: page.recent_actions and unique are limited to 100 elements. unique can take a key to use to determine uniqueness.
For example, you can display the last 10 unique users who acted on the page like this:
{% for a in page.recent_actions|unique:"user"|slice:":10" %}
{{ a.created_at }} {{ a.user.name }}
{% endfor %}
Note
Recent_actions uses a cache to avoid overwhelming the database when your site has a lot of traffic. Event though we have a very short expiration time, it’s possible a user will not see their own signature.
Combining Two Pages
This is a workaround to put additional forms in <iframe>.
So instead of putting multiple forms in the homepage HTML, you’d first create the homepage minus the forms, then create a standalone action page for each of the forms with no visible header/footer and with target="_top" in the <form> tag, then embed those form pages in the homepage using <iframe src="action_form_1.html" border=0></iframe> or similar code.
The result should look to the user just like the forms are part of the homepage, but they’ll be distinct pages as far as the browser is concerned.
Adding Users to Multiple Lists
It is possible to allow users to select a list to join, regardless of what list you select when you create the page. Add this to your template:
<input type="checkbox" name="lists" value="1" /> Subscribe to list 1<br />
<input type="checkbox" name="lists" value="2" /> Subscribe to list 2<br />
Or if you want to make the subscriptions unconditional, just change them to input type=hidden.
You’ll still need to select a list when creating the page in the Advanced Options but that list selection will only apply if a user submits on the page without selecting a list.
Creating An Opt-in Page
By default users who take action on a page are subscribed to the list you select when you create the page. If you don’t want a default subscription (if you want to only subscribe users to the lists they check and not automatically subscribe them to the list you assigned this page when creating it) you can put in <input type="hidden" name="opt_in" value="1" /> OR <input type="hidden" name="require_opt_in" value="1">. Both work the same way.
And you need to add a checkbox with name="lists" and value="[your list ID]":
<input type="checkbox" id="id_list_1" name="lists" value="1" />
<label for="id_list_1"> Keep me informed</label>
Be sure to remove <input type="hidden" name="lists" value="1"> if you see this in the template as it will conflict and users will be subscribed.
If a new user doesn’t choose to opt-in, a user will still be created and the action still recorded. The user’s subscription status will be set to ‘never’.
Suppressing Subscription Entirely
If you want to prevent a form submission from subscribing the user to any list at all, you can include:
<input type="hidden" name="suppress_subscribe" value="1" />
Unlike require_opt_in, which still subscribes users to lists they explicitly check, suppress_subscribe prevents all list subscriptions from the action. The action is still recorded and the user is still created (if new), but they will not be added to any list.
This is used in our default templates to implement country-specific consent requirements (e.g. for Canada). The country_select.html template includes a consent checkbox that sets suppress_subscribe via JavaScript when the user is in a country that requires explicit opt-in:
<input type="hidden" id="id_suppress_subscribe" name="suppress_subscribe" value="">
<input type="checkbox" id="id_subscription_consent" name="subscription_consent" value="1">
<label for="id_subscription_consent">Subscribe me to email updates</label>
With JavaScript toggling the hidden field based on whether the checkbox is checked.
There is also suppress_subscribe_in which suppresses subscription when the user’s country matches the given value. This is used as a <noscript> fallback:
<noscript><input type="hidden" name="suppress_subscribe_in" value="Canada"></noscript>
Creating a Standalone TAF Page
Our general recommendation for achieving a stand-alone TAF page with ActionKit is to use a Signup or Petition Page with the inline tell-a-friend widget. You can edit the Templateset to make it look very similar to a thank-you page, and for users that arrive with an AKID (from a mailing, for example), they won’t have to enter any data aside from their friend’s email addresses.
Specifically, you can tweak the template to make the signup template look and act more like a TAF-only form:
Adding
<input type="hidden" name="opt_in" value="1" />will make the form not subscribe the user to lists.You can replace
{% include "./user_form.html" %}with a form that just asks for the sender’s email and name if the user isn’t recognized.and if you want you can tweak the HTML so the message to edit is always showing.
Adding Text for Known Users
You can use context.name and javascript code block to add text that will only be shown to users that are recognized, by including the following in your page type template:
<div id="sector_x"></div>
<script type="text/ak-template" for="sector_x">
  [% if (actionkit.context.name) { %]
    <p>Because you have already agreed to our terms and conditions when you initially signed in, we will not bore you with it again.</p>
  [% } %]
</script>
Override Language Preference
You tell ActionKit to override the language selection made when you create the page by adding a lang= parameter to your template.
You can use this to, for example, create a page where end users can select their preferred language. The choice the user makes will then override whatever page’s language setting.
You could use something like this (where value corresponds to the lang_id for each language you’ve set up):
<input type="radio" checked="checked" class="radio lang" name="lang" value="100" id="lang-en" />
<label class="radio" for="lang-en">English</label>
<input type="radio" class="radio lang" name="lang" value="1" id="lang-fr" />
<label class="radio" for="lang-fr">Spanish</label>
<input type="radio" class="radio lang" name="lang" value="2" id="lang-de" />
<label class="radio" for="lang-de">French</label>
<input type="radio" class="radio lang" name="lang" value="3" id="lang-es" />
<label class="radio" for="lang-es">German</label>
Read more about using languages.
Adding Multiple Goals
If you wish to set up multiple goals (to avoid having possible goal of 120% which might depress action rates) do the following:
1 Add a custom page field to your page, let’s call it ‘goals’.
2 Change the following code in the progress meter template:
[% with (progress) { %]
    [% if ( goal && total ) { %]
        [% progress.current = goal_type == 'dollars' ? total.dollars : total.actions; %]
        [% progress.percent = parseInt(progress.current/goal*100); %]
        <div class="ak-progress-holder">
To:
[% with (progress) { %]
    [% if ( goal && total ) { %]
        [% progress.current = goal_type == 'dollars' ? total.dollars : total.actions; %]
        [% goals = "{{ page.custom_fields.goals }}" ? "{{ page.custom_fields.goals }}".split(',').map(Number) : [] ; %]
        [% new_goal = false; %]
        [% while (goals.length && goal <= progress.current) { goal = goals.shift();
          new_goal = true; } %]
        [% progress.percent = parseInt(progress.current/goal*100); %]
        <div class="ak-progress-holder">
3 to let the users know that the goal has been updated, change the following:
<div class="ak-progress-goals">
    [% if (goal_type == "dollars") { %]
        <span class="ak-progress-actions">
            {{ page.currency_sym|default:"$" }}[%= add_commas(total.dollars) %] raised so far
        </span> <br>
        of our goal of {{ page.currency_sym|default:"$" }}[%= add_commas(goal)  %]!
    [% } else { %]
        <span class="ak-progress-actions">
            [%= add_commas(total.actions) %] [%= total.actions != 1 ? 'actions' : 'action' %] taken so far
        </span> <br>
        of our goal of [%= add_commas(goal) %]!
    [% } %]
</div>
To:
<div class="ak-progress-goals">
    [% if (goal_type == "dollars") { %]
        <span class="ak-progress-actions">
            {{ page.currency_sym|default:"$" }}[%= add_commas(total.dollars) %] raised so far
        </span> <br>
        of our goal of {{ page.currency_sym|default:"$" }}[%= add_commas(goal)  %]!
    [% } else { %]
        <span class="ak-progress-actions">
            [%= add_commas(total.actions) %] [%= total.actions != 1 ? 'actions' : 'action' %] taken so far
        </span> <br>
        of our [%= new_goal ? "<b>NEW</b>" : "" %] goal of [%= add_commas(goal) %]!
    [% } %]
</div>
4 Add the custom page field to your page, with the goals in a comma-separated list. Ex: “1000,2500,5000,7500,10000,15000” etc.
Adding a Static Offset to the Goal Thermometer
You can add a static offset to the goal thermometer by updating your progress_meter.html template to use a custom page field holding the value of the offset amount.
For example, with a custom page field called “counter_offset”, you would add a line to add the value of “counter_offset” to the page count, or 0 if there is no value set for “counter_offset”:
progress.current = parseInt(progress.current) + {{ page.custom_fields.counter_offset|default:"0" }};
In progress_meter.html of the Original templateset, that would look like this (with the last line as the newly added in line):
[% with (progress) { %]
    [% if ( goal && total ) { %]
        [% progress.current = goal_type == 'dollars' ? total.dollars : total.actions; %]
        [% progress.current = parseInt(progress.current) + {{ page.custom_fields.counter_offset|default:"0" }}; %]
You would then also need to update the caption text to use the updated value of progress.current by replacing total.dollars and total.actions with progress.current in the following section:
[% if (goal_type == "dollars") { %]
    <span class="ak-progress-actions">
        {{ page.currency_sym|default:"$" }}[%= add_commas(total.dollars) %] raised so far
    </span> <br>
    of our goal of {{ page.currency_sym|default:"$" }}[%= add_commas(goal)  %]!
[% } else { %]
    <span class="ak-progress-actions">
        [%= add_commas(total.actions) %] [%= total.actions != 1 ? 'actions' : 'action' %] taken so far
    </span> <br>
    of our goal of [%= add_commas(goal) %]!
[% } %]
Which would result in this:
[% if (goal_type == "dollars") { %]
    <span class="ak-progress-actions">
        {{ page.currency_sym|default:"$" }}[%= add_commas(progress.current) %] raised so far
    </span> <br>
    of our goal of {{ page.currency_sym|default:"$" }}[%= add_commas(goal)  %]!
[% } else { %]
    <span class="ak-progress-actions">
        [%= add_commas(progress.current) %] [%= progress.current != 1 ? 'actions' : 'action' %] taken so far
    </span> <br>
    of our goal of [%= add_commas(goal) %]!
[% } %]
Finally, be sure to update ak-progress-holder and ak-progress-percent:
<div class="ak-progress-holder">
<div class="ak-progress-meter-border">
<div class="ak-progress-bar" style="width: [%= parseInt(progress.current) > goal ? 100 : (parseInt(progress.current)/goal)*100 %]%;"> </div>
</div>
</div>
...
<span class="ak-progress-percent">[%= parseInt((parseInt(progress.current)/goal)*100) %]%</span>
Turning Off User Recognition
There are different ways to accomplish this. One is to make a new Templateset that doesn’t make calls to the ActionKit Javascript code that sets up user recognition. These are calls into the ActionKit Javascript library. In our default Templateset they are in wrapper template and they look like:
<script type="text/javascript">actionkit.forms.initPage()</script>
and
<script type="text/javascript">
  actionkit.forms.contextRoot = '/context/';
  actionkit.forms.initForm('act');
</script>
If you create a new Templateset and remove both these script blocks you should find that user recognition is disabled.
If you do delete these blocks, be sure to test your page. There may be some functionality, like the tell-a-friend widget, that won’t work if user recognition is turned off.
Adding Header Tag to a Page Type
To add something to the header section for one page type only, use a snippet like this in the wrapper:
{% if page.type == "Donation" %}I'm a donation page!{% endif %}
To add something to the header section for two different page types, include an else statement in the wrapper:
{% if page.type == "Donation" %}I'm a donation page!
{% else %}
  {{ page.type }}
{% endif %}
Sample Commented <head>
The default <head> is defined in wrapper template. for convenience, here’s a commented version describing what each part of the header does.
A few of these comments refer to Django block tags that you can use to override sections of the default header; to learn more about Django block tags, see: https://docs.djangoproject.com/en/4.2/ref/templates/language/#template-inheritance
Here’s the head:
<!DOCTYPE html>
<!-- The DOCTYPE puts browsers, notably IE, in HTML5 standards mode. -->

<html lang="{{page.lang.iso_code|default:"en"}}"{% if page.lang.is_rtl %} dir="rtl"{% endif %}>
<!-- The template tags here mark the page with the right language and
     help ensure right-to-left languages like Hebrew and Arabic can be
     rendered correctly. -->

<head>
  <meta charset="utf-8">
  <!-- The utf-8 declaration forces browsers to treat the page as Unicode;
       keep this, or characters may show up garbled. -->

  <title>{% block title %}{{ page.title }} | {% filter ak_text:"org_name" %}
  {% client_name %}{% endfilter %}{% endblock %}</title>
  <!-- Title. Keep in mind that it's picked up by Facebook as well as the
       browser, and that you can make particular templates override it by
       adding a block named 'title' to them -->

  <script>startTime=new Date()</script>
  <!-- Used for performance timing; it's safe to drop if you like. -->

  <meta http-equiv="X-UA-Compatible" content="IE=edge;chrome=1">
  <!-- Tells Internet Explorer to use the most standards-compliant mode
       available, and turns on Google Chrome Frame if present. -->

  <meta name="viewport" content="width=device-width, initial-scale=1, maximum-scale=1">
  <!-- Makes phones display the page as one narrower column instead
       of as a tiny version of the desktop site.

       There are tips in the documentation on keeping your site easy-to-use
       in a phone format, but if that's not feasible, best to remove this
       tag so phones show a small version of the desktop site. -->

  {% if form.id %}<meta name="description" property="og:description" content="{% block description %}
  {{ page.custom_fields.description|default:form.intro|striptags }}{% endblock %}">{% endif %}
  {% if page.custom_fields.image %}<meta property="og:image" content="{{ page.custom_fields.image }}">{% endif %}
  {% block meta_additions %}{% endblock %}
  <!-- These pull in Facebook description and (if applicable) image fields.

       By default, description comes from your page content. Depending on
       the page type, it might be "introduction text," "about text,"
       "ask text," "host text," or "signup text." You can create a page
       custom field called "description" to override it, or use a Django
       block tag named 'description' in a template. HTML is removed.

       The image URL, if any, comes from a custom field on the page
       called 'image'. -->

  {% load_css %}
  /static/css/blueprint/bundle.css
  /resources/actionkit.css
  /resources/ak-look.css
  {% end %}
  {% block css_additions %}{% endblock %}
  <!-- load_css currently generates <link> tags to load the listed CSS files.
       You can use relative URLs or absolute ones pointing to your server.

       You can add CSS from another template using a Django block tag named
       'css_additions'.
   -->

  {% load_ak_context context %}
  {% load_js %}
  //ajax.googleapis.com/ajax/libs/jquery/1.3.2/jquery.min.js
  /resources/actionkit.js
  {% end %}

  <style>
    {% if templateset.custom_fields.color_fieldbox %}
      .ak-field-box {
          background-color: {{ templateset.custom_fields.color_fieldbox }};
      }
    {% endif %}
    {% if templateset.custom_fields.color_button %}
      button.ak-styled-submit-button {
          background-color: {{ templateset.custom_fields.color_button }};
      }
    {% endif %}
  </style>
  <!-- Templateset fields allow you to set CSS styles through the point-and-click interface on a copied templateset's Settings
       page. In order to take advantage of this feature, please do not remove the tags above inside the <style> tag. -->

  {% block script_additions %}{% endblock %}
  <!-- load_js and script_additions are JavaScript versions of load_css/
       css_additions above. -->
</head>
<body class="{{ filename|split:'.'|nth:0 }}-page lang-{{page.lang.iso_code|default:"unknown"}}{% if page.lang.is_rtl %} ak-rtl{% endif %} ak-no-js">
<!-- Django tags add a few CSS classes you can use:

     [type]-page (e.g., petition-page, thanks-page) based on the template
     filename.

     lang-[code] (e.g., lang-es, lang-de) based on the two-digit ISO code
     for the language;

     ak-rtl for pages in right-to-left languages like Hebrew/Arabic.

     ak-no-js if JavaScript hasn't loaded yet or failed to load.
     -->

<script type="text/javascript">actionkit.forms.initPage()</script>
<!-- Be sure to keep the initPage tag and put it in the <body>, not
     the <head>. -->
Randomizing Survey Question Order
To randomize the survey question order, create another Templateset and change the survey template. Change the code line:
{% for question in form.surveyquestion_set.all %}
to
{% for question in form.surveyquestion_set.all|shuffle %}
For more information on using filters, see Custom Template Filters and Tags.
Saving Survey Responses as a List
You could enter one question (like “Which of the following skills do you have?”) and provide a checkbox next to each response. The responses selected will be saved as a list. to do this you just use the same name for each choice you want to be included in the list.
Here’s an example of the HTML:
<input type="checkbox" name="action_skills" value="proofer" /> Excellent proofer<br />
<input type="checkbox" name="action_skills" value="writer" /> Have written for publication<br />
<input type="checkbox" name="action_skills" value="designer" /> Have graphic design experience<br />
<input type="checkbox" name="action_skills" value="programmer" />Can code in one or more computer languages<br>
<input type="checkbox" name="action_skills" value="fundraiser" />Like asking people for money<br />
If you use the survey downloader on the reports tab to download the results, each person’s responses will be shown in the “skills” column as a semi-colon separated list.
Adding Armed Services USPS Codes to Donation Pages
Add USPS codes (like ‘AP’) to the state select template for your donation pages. Most likely you’ll have to disable address verification (AVS) in your payment provider to get donations working from these addresses though, so you’ll want to do some testing with your own merchant vendor account.
Custom Billing Dates for Recurring Donations
You can provide your users with a choice of dates for when they’ll be billed each month.
Note
for PayFlow Pro and Authorize.net clients your end user is still billed immediately when they set up the recurring donation and then again on the date they choose. So if it’s 10/29 and the user sets up a recurring donation to be billed on the 1st every month, they’ll be billed on 10/29 and 11/1. to avoid this we suggest adding an offset (using javascript) for the first bill date.
for Braintree clients, the user will be billed on the date they select, so in the case above they would be billed on 11/1 (and every month after on the 1st). The status will show as pending in your Braintree admin but in ActionKit it will show as active (meaning from our end that the donation was not rejected or only partially transmitted to Braintree). The Braintree status changes after the first payment is processed.
Not currently supported for PayPal recurring orders.
In any case, you need to add a field to your donation template to allow your end user to make this selection. The field should be named recurring_start. This could be a text field, but a radio button is probably easier for your users. The format must be YYYY-MM-DD.
It’s critical that you test this yourself in your own instance by making a real donation (you can refund it from your user record,(see testing donation pages. The merchant vendors’ test processors do not work in exactly the same way as the real processor so you may discover problems.
Other Recurring Donation Periods
ActionKit defaults to a monthly period for recurring donations, but you can setup the donation form to allow your members to donate on other cycles if your payment processor supports it. PayPal, PayFlo Pro and Authorize.net all accept weekly, quarterly, monthly, and yearly donations. Braintree accepts monthly, quarterly, and yearly donations, but does not support weekly.
To create a recurring donation, the donation form must include an input donation_type with a value of recurring. The default templates use a radio input to let users select recurring or one-time, toggling the value of donation_type.
If donation_type is recurring, ActionKit looks for an input named recurring_period. The value can be months or weeks or quarters or years and defaults to months.
These two parameters interact as follows:
If donation_type=single (or anything but “recurring”), it’s a one-time donation and we ignore recurring_period.
If donation_type=recurring, it’s a recurring donation. If recurring_period is omitted or empty, we set it to monthly. If you specify the billing frequency in recurring_period, we’ll use that.
If donation_type is not provided at all, it’s a one-time donation if recurring_period is also omitted or empty and a recurring donation if recurring_period is provided.
There are several different ways you can set up your templates depending on what choices you want the user to see. for example:
You can offer radio button choices between one-time, monthly, quarterly and yearly: <input type=”radio” name=”recurring_period” value=”” checked>
<label>One-Time </label> <input type=”radio” name=”recurring_period” value=”months”> <label>Monthly</label> <input type=”radio” name=”recurring_period” value=”quarters”> <label>Quarterly</label> <input type=”radio” name=”recurring_period” value=”years”> <label>Annual</label>
Or, you can default to a one-time donation with a checkbox for yearly renewal:
<input name=”recurring_period” type=”checkbox” value=”years” /> Renew my donation annually
Or you can create a page that always creates recurring donations on one of these other cycles, you can add a hidden form element to the donate template:
<input type='hidden' name='recurring_period' value='weeks'>
Note
to reduce risk, you may want to create a new Templateset. You should carefully test your changes to make sure the page, the form, the confirmation email and the recurring donations all agree about the period of the recurring donation.
You could also let your users decide between monthly and weekly by using a second radio (or select) input that you reveal with Javascript if they opt to give a recurring donation.
When you change the recurring period you should also confirm that you don’t have static references to monthly built in for your confirmation email or in other places.
Display Products by Price on a Donation Page
To display your products in order by their price, use the dictsort filter on the for loop. So replace this line in your donate template:
{% for product in products %}
With:
{% for product in products|dictsort:"price" %}
Use Amount from URL to Skip Donation Amount Step
You can use the amount parameter from the URL to pre-select an amount for a user on a donation form (often when they’re coming from a mailing). On three-step donation forms, though, the user still comes to the first step. The javascript below provides a way to skip the first step of the donation form, moving directly to payment information. This approach may be especially helpful for Express Lane-style buttons where the user selects the amount they’d like to donate in the mailing itself. Thanks to Ben at Progress Now for the sample code, added to donate.html.
{% block below_form %}
{{ block.super }}
<script type="text/javascript">
$(document).ready(function() {
    // Go to Second Step from amount arg.
    if (typeof actionkit.args.amount != "undefined"){
        var amountEle = document.getElementById("id_amount_" + actionkit.args.amount);
        if (typeof amountEle == "undefined" || amountEle == null){
            var amountEle = document.getElementById("ak-other-amount-field");
            amountEle.value = actionkit.args.amount;
        }
    amountEle.click();
    three_step_goto("2");
    }
});
</script>
{% endblock %}
Suppress Confirmation Emails With a Parameter
Sometimes you want to link to a page that has a confirmation email set up, but skip the confirmation email. You can do this by passing
skip_confirmation=1 in the form on the page. Just add a hidden field to the form:
<input type="hidden" name="skip_confirmation" value="{{ args.skip_confirmation }}">
and then append skip_confirmation=1 to your URL.
This needs to go inside the form in your page’s template. It will have no effect if you don’t pass skip_confirmation=1, so it’s safe
to include in shared templates.
You can also include this as a parameter in an API call to skip the confirmation email for a given action.
Change Event Emails Subject Lines
The event invite emails, the emails from host, and emails from attendees have a subject line that is not editable by the sender. The subject lines are defined in the respective templates, theses normally come from the host - it’s only when you’re logged in to the ActionKit admin that they don’t. By default, the hosts are not able to change the subject line in emails. If you want to allow them to change the the subject line, you need to edit the email from host template.
Customizing Event Search Results
If you’re extending your event search page with JavaScript, note that the event search box can also accept a latitude/longitude pair like 38.895111,-77.036667 instead of the usual city or postcode. You could use this facility to have ActionKit search around a location that a user clicked on a map, or one provided by a third-party geocoder like Google’s or even a mobile phone’s geolocation API.
Displaying Cohosts on Event Search Results
To display all the hosts of an event on event_search_resuts.html, you can loop through {{ event.obj.host_signups }} or {{ event.obj.hosts }}.
For example:
{% for event in events %}
<p>
{{ event.title }} hosts include:
{% for host in event.obj.host_signups %}
{{ host.user }}
{% endfor %}
</p>
{% endfor %}
Using Whipcount Pages for “Thank and Spank” Actions
You can also use whipcount pages to ask users to call to thank legislators who have taken your position and “spank” legislators who have opposed your position.
To do this:
1 on the Edit content screen, click on the snippets link at the bottom of the script text box, and expand the Whipcount pages snippets category and select the Conditional for “thanks”, Conditional for “spanks” or Conditional for “uncommitted” snippets.
2 Add what you’d like users to say in the script section. for example, you’d edit the “Thank script” text in the snippet below:
{% if target.stance.view == "supportive" %}Thank script{% endif %}
3 Write an appropriate introduction, telling users to click on a target to see a script and the target’s phone number.
4 In the Whipcount Responses screen, select Admin configured and enter the appropriate value in the Whipcount Response Overrides section for every target.
When your users land on the page, they’ll see the list of targets. When they click on one, the appropriate script will show depending on the position you entered.
Using Whipcount Snippets
When using snippets you need to be aware of two different modes for the whipcount templates.
If a target argument is provided in the query string, the template expects that a user is making a call to a particular target. The snippets in this case start with ‘target’, e.g. {{ target.title_full }}. If no target argument is provided, the template displays the full results of the whipcount campaign. The following example is a modification to the whipcount results template.
{% for group in target_groups %}
  <h2>{{ group.name }}</h2>
  <table class="targets">
    <thead>
     <th>Name</th>
     <th>State</th>
     <th>District/Seat</th>
     <th>Calls Reported</th>
     <th>Stance</th>
    </thead>
    <tbody>
      {% for target in group.targets %}
        <tr class="target {{ target.stance.view }}">
          <td>{{ target.title_last }}</td>
          <td>{{ target.state }}</td>
          <td>{{ target.us_district }}{{ target.seat }}</td>
          <td>{{ target.stance.calls }}</td>
          <td>
            {% if target.stance %}{{ target.stance.view|title}}!{% else %} Unknown, call now!{%  endif %}
          </td>
        </tr>
      {% endfor %}
    </tbody>
  </table>
{% endfor %}
Using Google Maps on Your Event Pages
Older versions of the Original templateset featured a static Google map on the event search page that did not contain clickable popup markers. You can choose to continue using the old static Google map by putting the following HTML into event_search_results.html:
{% if not args.all and not hide_map and campaign.show_address1 %}
        <img src="http://maps.google.com/maps/api/staticmap?sensor=false&size=500x300&markers={% for event in events %}{% if event.is_in_past or event.is_full %}{% else %}{{ event.address1|urlencode }}, {{ event.city_etc|urlencode }}{% if not forloop.last %}|{% endif %}{% endif %}{% endfor %}">
{% endif %}
If you prefer having interactive popup markers on your map, you can decide to use the Google Maps API instead of the default Open Street Maps API. Below is some sample code for event_search_results.html and event_attend.html.
In event_search_results.html:
{% load actionkit_tags %}
{% filter collapse_spaces %}
{% comment %}
This file is so long because you can choose whether your campaign uses
event titles, venues, etc., and different choices produce different HTML.
The field that's linked in each search result is the first of these
that's defined:
1. Title
2. Venue
3. Distance
4. Campaign name
{% endcomment %}
{% block script_additions %}
{% endblock %}
{% if events|is_defined %}
<input type="hidden" id="id_have_events" name="have_events" value="1">
{% if not events|length %}
<h3>No events found near {{ place|default:"your location" }}.</h3>
{% else %}
{% if not hide_map %}
<p>There are <strong>{{ open_events|length }}</strong> events open for signup {% if is_in_past or is_full %}(plus <strong>{{ is_full|length }}</strong> full, <strong>{{ is_in_past|length }}</strong> ended){% endif %}</p>
{% endif %}
{% if campaign.show_address1 and not hide_map %}
<div id="map"></div>
<style type="text/css">
/* Always set the map height explicitly to define the size of the div
* element that contains the map. */
#map {
height: 300px;
}
/* Optional: Makes the sample page fill the window. */
html, body {
height: 100%;
margin: 0;
padding: 0;
}
</style>
<script>
var loc = [];
{% for event in events %}
loc.push([ {% if event.is_in_past or event.is_full %}
'<p>{{ event.starts_at_dt|date:"l, F jS, G:i a" }}</p>' +
'{% if campaign.use_title and campaign.show_title and event.title %}' +
'<p class="ak-event-title"><a href="/event/{{ campaign.local_name }}/{{event.id}}/signup/?akid={{args.akid}}&zip={{args.zip}}">{{ event.title }}</a>' +
'</p>' +
'{% else %}' +
'<p class="ak-event-title">' +
'<a href="/event/{{ campaign.local_name }}/{{event.id}}/signup/?akid={{args.akid}}&zip={{args.zip}}" class="ak-campaign-title" target="_blank">{{ campaign.local_title }}</a>' +
'</p>' +
'{% endif %}' +
'<p>{{ event.address1 }} <br />{{ event.city }} {{ event.state }} {{ event.zip }} </p>' +
'{% if event.is_in_past %} <p><strong>Sorry, the event is over.</strong></p> {% endif %} {% if event.is_full %} <p><strong>Sorry, the event is full.</strong></p> {% endif %}'
{% else %}
'<p>{{ event.starts_at_dt|date:"l, F jS, G:i a" }}</p>' +
'{% if campaign.use_title and campaign.show_title and event.title %}' +
'<p class="ak-event-title"><a href="/event/{{ campaign.local_name }}/{{event.id}}/signup/?akid={{args.akid}}&zip={{args.zip}}">{{ event.title }}</a>' +
'</p>' +
'{% else %}' +
'<p class="ak-event-title">' +
'<a href="/event/{{ campaign.local_name }}/{{event.id}}/signup/?akid={{args.akid}}&zip={{args.zip}}" class="ak-campaign-title" target="_blank">{{ campaign.local_title }}</a>' +
'</p>' +
'{% endif %}' +
'<p>{{ event.address1 }} <br />{{ event.city }} {{ event.state }} {{ event.zip }} </p>' +
'<a href="/event/{{ campaign.local_name }}/{{event.id}}/signup/?akid={{args.akid}}&zip={{args.zip}}" class="ak-button" target="_blank">Sign up</a>'
{% endif %},
{{ event.latitude }},
{{ event.longitude }},
{% if event.is_open_for_signup %} 'open_for_signup' {% else %} 'not_open_for_signup' {% endif %}
]);
{% endfor %}
function initMap() {
var center = {lat: loc[0][1], lng: loc[0][2]};
var map = new google.maps.Map(document.getElementById('map'), {
zoom: 4,
center: center
});
function markerplot( loc, iconType ) {
var latLng = new google.maps.LatLng( loc[1], loc[2]);
var icon = {
open_for_signup: {
url: '/media/modern/blue_marker.png',
scaledSize: new google.maps.Size(30, 40) // scaled size
},
not_open_for_signup: {
url: '/media/modern/grey_marker.png',
scaledSize: new google.maps.Size(30, 40) // scaled size
}
}; //icon
var marker = new google.maps.Marker({
position : latLng,
map : map,
icon : icon[iconType]
});
var infowindow = new google.maps.InfoWindow({
content: loc[0]
});
marker.addListener('click', function(){
infowindow.close();
infowindow.setContent( "<div class='infowindow'>"+ loc[0] +"</div>");
infowindow.open(map, marker);
});
} //markerplot
for(var i=0; i<loc.length; i++) {
markerplot( loc[i], loc[i][3] );
} //for
} //initMap
</script>
<script async defer
src="https://maps.googleapis.com/maps/api/js?key=AIzaSyAFxyvIOSlaYAYEkgHL7VnTiUMKqpFda6I&callback=initMap">
<!-- IMPORTANT: replace the API key above with your own API key -->
</script>
{% endif %}
{% for event in events %}
{% if event.is_in_past or event.is_full %}
{% else %}
{% if not all %}
<div class="ak-field-box {% if event.is_in_past or event.is_full %}ak-event-disabled{% endif %}">
<div class="ak-info-column">
{% if campaign.use_title and campaign.show_title and event.title %}
<p class="ak-event-title"><a href="/event/{{ campaign.local_name }}/{{event.id}}/signup/?akid={{args.akid}}&zip={{args.zip}}">{{ event.title }}</a></p>
{% else %}
<p class="ak-event-title">
<a href="/event/{{ campaign.local_name }}/{{event.id}}/signup/?akid={{args.akid}}&zip={{args.zip}}" class="ak-campaign-title">{{ campaign.local_title }}</a>
</p>
{% endif %}
{% if campaign.show_venue and event.venue %}
<span class="ak-event-venue">{{ event.venue }}</span>
{% endif %}
{% if campaign.show_address1 %}
<div class="ak-event-address1">{{ event.address1 }}</div>
{% endif %}
{% if campaign.show_city or campaign.show_state or campaign.show_zip %}
{% if campaign.show_zip %}
<div class="ak-event-city-etc">{{ event.city_etc }}</div>
{% else %}
<div class="ak-event-city-etc">{{ event.city_etc_no_postal }}</div>
{% endif %}
{% endif %}
{% if event.distance|is_nonblank %}
<p><span class="ak-event-distance">{{ event.distance_str }} away</a></span></p>
{% endif %}
<table cellspacing="0" class="ak-event-table">
{% if event.starts_at %}
<tr class="ak-event-time">
<th>When:</th>
<td>{{ event.starts_at_dt|date:"l, F jS, G:i a" }}</td>
</tr>
{% endif %}
{% if campaign.show_directions and event.directions %}
<tr class="ak-event-directions">
<th>Directions:</th>
<td>{{ event.directions }}</span></td>
</tr>
{% endif %}
{% if campaign.show_attendee_count %}
<tr class="ak-event-attendee-count">
<th>Attendee count:</th>
<td>{{ event.attendee_count }} attendee{{ event.attendee_count|pluralize }}</td>
</tr>
{% endif %}
</table>
</div>
<div class="ak-description-column">
{% if campaign.show_public_description %}
{% if event.public_description %}
<p class="ak-event-description">
{{ event.public_description }}
</p>
{% endif %}
{% endif %}
</div>
</div>
{% endif %}
{% endif %}
{% endfor %}
{% endif %}
{% if campaign.public_create_page %}
<div>
<a class="ak-button ak-event-create" href="/event/{{ campaign.name }}/create/">Create your own event</a>
</div>
{% endif %}
{% endif %}
{% if errors|length %}
<ul id="ak-errors">
{% for key,val in errors.items %}
<li>{{ val|nth:0 }}</li>
{% endfor %}
</ul>
{% endif %}
{% endfilter %}
An in event_attend.html:
...
{% if campaign.show_address1 %}
<div id="ak-map">
        <img src="http://maps.google.com/maps/api/staticmap?sensor=false&size=500x300&markers={{ event.address1|urlencode }}, {{ event.city_etc|urlencode }}">
<p class="caption">Sign up to get driving directions and more.</p>
</div>
{% endif %}
...
Prefilling Form Content From URL
ActionKit’s built-in JavaScript can prefill forms. We usually use this when the server sends the user back to a page after an error, like if a card is declined on a donation page, but you can construct URLs in mailings to trigger it, too.
For example, you can append ?amount_other=123&prefill=1 to fill in the other-amount field on a donation page.
Alternatively, you can use Django snippets in the value="" attributes of input tags for prefilling. The args variable holds URL arguments.
We don’t recommend prefilling potentially sensitive user info on most forms, because users forward messages. User recognition is designed to let the user avoid re-entering info too often without revealing all of their details if their links are used by someone else. Where ActionKit does prefill, like in the event update form, we require a login string (not just an akid) and the default message warns users not to forward the link for security and privacy reasons.
Creating Multiple Sample Letters
By default, a letter page fills a textarea with the sample letter provided by the campaigner. Using the code below, you can provide one random alternate letter as defined by a custom page field.
1 Create a custom page field named carousel with the type text.
2 Replace the textarea on the letter template.
Before
...
<textarea id="id_comment" name="action_comment" class="ak-letter-text">{% include_tmpl form.letter_text escaped %}</textarea>
...
After
...
{% spaceless %}
<textarea id="id_comment" name="action_comment" class="ak-letter-text">
  {% if page.custom_fields.carousel %}
    {{ page.custom_fields.carousel|force_list|random }}
  {% else %}
    {% include_tmpl form.letter_text escaped %}
  {% endif %}
</textarea>
{% endspaceless %}
...
3 Add one carousel custom page field to the page for each message and type the messages in.
4 Preview the page. a random message will appear on refresh.
Note
With the code above, the letter text filled into the content screen will not appear to the user.
Tweeting at Targets
The snippet for a target’s Twitter account links directly to that target’s Twitter profile. to link to a pre-filled sample tweet for a thank you page, use the code below. Replace YOUR TWEET GOES HERE with the content of your tweet. The target’s Twitter handle will appear at the end of the tweet.

<ul>
  {% for target in context.targets.targets %}
    {% if target.twitter %}
    {% with "YOUR TWEET GOES HERE" as tweet %}
      <li>
        {{ target.title_last }}: {{ tweet }} @{{ target.twitter }} <a href="https://twitter.com/intent/tweet?text={{ tweet|urlencode }}{{ ' @'|urlencode }}{{ target.twitter|urlencode }}">Tweet this</a>
      </li>
    {% endwith %}
    {% endif %}
  {% endfor %}
</ul>
Conditionally Display Fields on Moderation Form
It may be necessary to collect different details from moderators depending on how they’re marking an event. It’s possible to display specific fields or content depending the change selected by the moderator by customizing the templateset or by adding content to the Custom HTML field for the moderation page.
Add the conditionally visible HTML by assigning the css class ak-limit-by-mark to the elements, as well as either ak-approved, ak-flagged, or ak-deleted. These fields will be hidden when the page loads, and made visible when the user opts to mark the event approved, flagged, or deleted, respectively.
For an example, look at the event_moderate_tools.html template for the instructions shown to moderators when they’re deleting an event.
  <div class="ak-limit-by-mark ak-deleted instructions">
<p>
  Please explain why you're deleting this event e.g. spam, unresponsive host, etc.
</p>
  </div>
  <div>
Disable Sharing for Campaign Volunteer Pages
By default, campaign volunteer pages include social sharing functionality. This can be disabled by customizing the thanks.html template in the page’s templateset to disable sharing for this page type. Replace:
{% if page.SUPPRESS_SHARING %}
<div class="ak-grid-row">
<div class="ak-grid-col ak-grid-col-12-of-12">
<h2>
<img src="/media/modern/stance-supportive.svg" width="34" class="ak-checkmark-icon" alt="✓">
{% filter ak_text:"noshare_thanks_banner" %}
with
{% if page.SUPPRESS_SHARING or page.type = 'CampaignVolunteer' %}
<div class="ak-grid-row">
<div class="ak-grid-col ak-grid-col-12-of-12">
<h2>
<img src="/media/modern/stance-supportive.svg" width="34" class="ak-checkmark-icon" alt="✓">
{% filter ak_text:"noshare_thanks_banner" %}
Updating Custom Templatesets to Support Moderation
Event moderation requires a number of new templates which have been added to all templatesets. Changes to other existing templates in customized templatesets, namely user_view.html and event_host_tools.html, event_contact.html, and event_roster.html will likely also be necessary before using the feature.
The necessary changes are listed below.
event_contact.html
@@ -37,7 +37,7 @@
Your event host
{% else %}
<span class="if-js to-count">{{signups|length}}</span>
- {% if to == 'attendees' %}attendee{% else %}co-host{% endif %}{% if signups|length > 1 %}(s){% endif %}
+ {% if to == 'attendees' %}attendee{% else %}{% if to == 'cohosts' %}co-{% endif %}host{% endif %}{% if signups|length > 1 %}(s){% endif %}
{% endif %}
</span>
</td>
@@ -48,7 +48,7 @@
<label>Subject*</label>
</th>
<td>
- <input type="text" name="subject" class="ak-full-width" value="Message from your "{{ event.title|default:campaign.local_title }}" {% if to == 'cohosts'%}co-{% endif \
%}host">
+ <input type="text" name="subject" class="ak-full-width" value="Message from your "{{ event.title|default:campaign.local_title }}" {% if user_is_moderator %}moderator\
{% else %}{% if to == 'cohosts'%}co-{% endif %}host{% endif %}">
</td>
</tr>
{% endif %}
event_roster.html
@@ -9,7 +9,7 @@

 <div class="signup-list {{signups.role}}-list ak-clearfix">
     <h3>
-        {% if signups.role == 'host' %}Cohost{% else %}Attendee{% endif %}{{ signups|length|pluralize }} ({{ signups|length }}  total)
+        {% if signups.role == 'host' %}{% if user_is_moderator %}Host{% else %}Cohost{% endif %}{% else %}Attendee{% endif %}{{ signups|length|pluralize }} ({{ signups|length }}  total)
     </h3>
     <form id="manage-{{signups.role}}" onvalidate="return validateRoster(this)" onconfirm="return confirmRoster(this)" name="manage-{{signups.role}}" method="post" action="/event/{{campaign.local\
_name}}/{{event.id}}/manage_signups" accept-charset="utf-8">

@@ -62,9 +62,15 @@

         {% with 'no' as need_form %}
             {% if signups.role == 'host' %}
-                {% with 'cohosts' as to %}
-                    {% include "./event_contact.html" %}
-                {% endwith %}
+                {% if user_is_moderator %}
+                   {% with 'hosts' as to %}
+                       {% include "./event_contact.html" %}
+                   {% endwith %}
+                {% else %}
+                   {% with 'cohosts' as to %}
+                       {% include "./event_contact.html" %}
+                   {% endwith %}
+                {% endif %}
             {% else %}
                 {% with 'attendees' as to %}
                     {% include "./event_contact.html" %}
event_host_tools.html
@@ -115,7 +115,7 @@
$('.signup-list td:not(.toggle-col)').click(toggleRow);
$('input[type="submit"].email').click(handleEmail);
$('input[type="submit"]').click(setFormAction);
- $('.jump-link').click(handleJumpLink);
+ $('#event-host-links .jump-link').click(handleJumpLink);
$('a[confirm-message]').click(confirmSubmit);
if ($('#manage-host').length)
actionkit.forms.initValidation('manage-host');
@@ -167,15 +167,17 @@
<div class="ak-grid-col ak-grid-col-4-of-12">
<!-- Tools -->
<div class="ak-bar-holder">
+ {% block extra_links %}{% endblock %}
+ {% block host_links %}
<div class="ak-bar ak-field-box" id="event-host-tools">
<h3>Manage Event</h3>
- {% if event.is_awaiting_approval %}
+ {% if event.is_awaiting_approval and not user_is_moderator %}
<span class="ak-error">Note: this event is awaiting approval by staff.</span>
{% endif %}
<ul id="event-host-links">
{% include_tmpl form.tools_sidebar %}
{% if user_is_manager %}
- <li>Logged in as a manager
+ <li>Logged in as a manager
{% if campaign.require_email_confirmation and not event.host_is_confirmed %}
<br> <a onclick="$.get('/event/{{campaign.local_name}}/{{event.id}}/modify/confirm/'); $(this).text('Confirmed');" href="#">Confirm event</a>
{% endif %}
@@ -204,6 +206,7 @@
<li><a href="/logout/">Log out</a></li>
</ul>
</div>
+ {% endblock %}
</div><!-- bar holder -->
</div><!-- span -->
@@ -212,37 +215,37 @@
<div id="host-event-details ak-clearfix">
<h3>
Event Details
- (<a class="ak-underline-on-hover" href="../../create/?action_id={{ action.id }}&update=1&want_prefill_data=1">Edit</a>)
+ {% block event_edit_link %}(<a class="ak-underline-on-hover" href="../../create/?action_id={{ action.id }}&update=1&want_prefill_data=1">Edit</a>){% endblock %}
</h3>
{% include "./event_host_details.html" %}
</div>
+ {% block tools %}
+ <!-- Cohost roster -->
+ {% if cohosts %}
+ {% with cohosts as signups %}
+ {% include "./event_roster.html" %}
+ {% endwith %}
+ {% endif %}
- <!-- Cohost roster -->
- {% if cohosts %}
- {% with cohosts as signups %}
- {% include "./event_roster.html" %}
- {% endwith %}
- {% endif %}
-
- <!-- Guest roster -->
- {% if attendees %}
- {% with attendees as signups %}
- {% include "./event_roster.html" %}
- {% endwith %}
- {% else %}
- <!-- Optional no attendees message, e.g., "go use the Invite Folks tool at right" -->
- {% endif %}
+ <!-- Guest roster -->
+ {% if attendees %}
+ {% with attendees as signups %}
+ {% include "./event_roster.html" %}
+ {% endwith %}
+ {% else %}
+ <!-- Optional no attendees message, e.g., "go use the Invite Folks tool at right" -->
+ {% endif %}
- {% include './event_roster_add.html' %}
- <!-- Invite -->
- {% if event.is_open_for_signup %}
- <div class="ak-margin-top-2 ak-clearfix">
- {% include "./event_invite.html" %}
- </div>
- {% endif %}
+ {% include './event_roster_add.html' %}
+ <!-- Invite -->
+ {% if event.is_open_for_signup %}
+ <div class="ak-margin-top-2 ak-clearfix">
+ {% include "./event_invite.html" %}
+ </div>
+ {% endif %}
+ {% endblock %}
</div>
</div>
-
{% else %}
<div class="ak-grid-row">
@@ -254,7 +257,7 @@
<h3>Sorry, you aren't currently signed up for this event.</h3>
<p>If you think this is a mistake, check that you cut-and-pasted the entire link to this page.</p>
{% endif %}
- <div><a href="/event/{{ campaign.local_name }}/?akid={{args.akid}}&zip={{args.zip}}">Search for another event</a></div>
+ {% block find_another_event %}<div><a href="/event/{{ campaign.local_name }}/?akid={{args.akid}}&zip={{args.zip}}">Search for another event</a></div>{% endblock %}
</div>
</div>
user_view.html
@@ -64,6 +75,19 @@
         </ul>
         {% endif %}

+        {% for campaign in campaigns_moderating %}
+          {% if forloop.first %}
+            <h3>Event Moderation</h3>
+            <ul>
+          {% endif %}
+          <li>
+            <b>{{ campaign.title }}</b> campaign with {{ campaign.event_set.all|length }} events. <a href='/event/{{campaign.moderate_page.name}}/moderator_search/?akid={{akid}}'>Moderate</a>
+          </li>
+          {% if forloop.last %}
+            </ul>
+          {% endif %}
+        {% endfor %}
+
         {% if donations %}
             <h3> Donation History </h3>
             <ul>
Reference Documents
Knowledge of the following documents may come in handy: