Getting Started With ActionKit
This section provides information you may need in preparation for your launch – either sending your first mailing or directing users to an action ActionKit page for the first time.
Each section has links to more in-depth content. Where appropriate, we’ve included relevant videos and indicated their length for your convenience.
If you are really short on time, check out our TL;DR 10 essential things list.
Important Concepts
Throughout this guide we use specific terminology to refer to attributes of the software. The basics are described below.
Pages are where your users take an action like donating or signing a petition. Users are email addresses. Every time a user submits on a page an Action is recorded. By default, actions subscribe users to the Mailing List associated with the page (if they aren’t already subscribed). Only Subscribed Users can be emailed a Mailing through the mailer. Users who land on a page by following the link in a mailing are treated as Recognized Users by default, meaning they only need to enter required information that isn’t in your database.
The Reports Tab provides tools for accessing and analyzing your data. Staff users are people you have given access to the admin or the API.
TL;DR: The 10 most essential things to get started in ActionKit
The “Getting Started” section below is meant to orient you to the strengths and features of the ActionKit platform. ActionKit is such a robust advocacy tool with so many great features – for a new client, sometimes it can feel like a lot.
For those of you who are short on time, we’ve made a list of the 10 most essential tasks for new clients to take care of in order to launch.
1. Set up your page templates.
Every website has its own design and branding, and ActionKit’s Page Templatesets are where you set this up. You’ll probably want a designer or programmer to set this up for you. Click here to learn more.
2. Set up a merchant vendor or sync an ActBlue account.
To accept donations in ActionKit you must have a payment account with a vendor we integrate with. Click here to see the list of merchant vendors and how to set them up. Many ActionKit clients prefer to use ActBlue as their donation processor instead of a traditional merchant vendor, so we’ve made integrating with ActBlue super easy. Click here to learn more.
3. Add your teammates to the platform and set their staff permissions.
Staff users in ActionKit have access to the administrative interface – if you have colleagues who need to set up pages, mailings, look at reports, or manage users, then you’ll want to create staff accounts for them and set their access appropriately. Click here to learn more.
4. Create and test your first pages.
Pages in ActionKit are where your users can take an action, such as sign a petition or make a donation. Pages capture data about those actions and your users, and are completely configurable via the templateset you created in step one. Because pages are configurable, you can break them, so you want to triple check that the associated data capture is working as you’d expect by testing them thoroughly. We recommend you create and test at least your Petition page, Donate page, and Unsubscribe page. Click here to learn more.
5. Import your email list.
If you are coming from another email platform, you probably already have a list of subscribers that you want to import into ActionKit. You can import your list manually, or ask the ActionKit team to help if you want to import more than users and subscriptions. ActionKit support on imports may cost extra depending on the complexity of your request.
6. Set up your email wrapper & from lines.
Email wrappers define the header and footer appearance and content for your mailings, and from lines allow you to set the sender names of your emails. Click here to learn more about setting them up.
7. Set up DKIM, SPF & DMARC.
As of February 2024, DMARC is essentially a requirement due to Gmail/Yahoo’s new inbox placement rules. Clients should consider configuring these sending protocols as required for successful inbox placement. You can check the status of your settings by clicking here, or learn more about how to set up DMARC by clicking here.
8. Configure your home tab dash.
You can customize the “Your Progress” dashboard in the “Home” tab of the admin section of your ActionKit instance to offer valuable reports and any other information that your team might find useful. Click here for a tutorial on how to do this.
9. Check out ActionKit’s Suggested Configuration Settings.
The suggested configuration settings represent opportunities to make ActionKit more secure and useful, and are recommended for every ActionKit instance. Click here to see the suggested settings page or consult the ActionKit docs for details on making these changes.
10. File your first support ticket or just say hi.
ActionKit is unlike other advocacy platforms in that we offer premier customer support. When you file a ticket, you get connected directly to our team of engineers who write the code that runs our platform – not a call center. Our support is ticket-based and filed from the “Contact Us” section of the support tab. Go ahead and say hi.
Intro To Pages
Before you start making pages you may want to review the Pages Overview and the section on how pages work. You can also watch the “Creating your First Pages” and “ActionKit Pages” video tutorials later in this section.
Initial SetUp
There are several related objects you’ll use in pages that you may want to create first:
Templateset: Templatesets define the appearance of your pages. You’ll probably want a designer or programmer to set this up for you. The section on managing templatesets can help you avoid templateset proliferation.
You can create and host your pages entirely in ActionKit or use an external CMS and host your pages yourself. If you’re hosting your pages outside of ActionKit, you don’t need a templateset, but you should read the section on embedding.
From lines: You’ll use these in the thank you or confirmation emails you send to the user after they take action (and of course in mailings to users).
Email wrapper: Defines the appearance of your mailings and can be used in confirmation emails.
Mailing lists: Mailing lists can be used to enforce special mailing rules (e.g. they signed up to receive mailings once a week) or to allow users to remove themselves from particular mail streams. By default each page will subscribe action takers to one mailing list.
Tags: Tags are categories that you can associate with a Page or Mailing. They may represent issue areas or campaigns (e.g. Food Safety or Paris Climate Talks 2016). You can target mailings by tag when you want all users who took action on any page with that tag. Tag lists can easily grow unmanageable! Consider establishing a naming protocol.
Notification Emails: You can prompt an email to someone in addition to the action taker. Example uses: send an email from the donor to the honoree for an in-honor donation or notify your Development Director when a major gift is received so they can send a personal thank you.
AWS S3 & Cloudfront: You can easily connect your ActionKit instance to AWS to host your images cheaply in an Amazon s3 bucket. Advanced users can take AWS to the next level by provisioning CloudFront. Cloudfront can serve pages more than 3 times faster. Tests have proven that faster pages lead to more donations and petition signatures. You might need a more technical team member to implement CloudFront, but it will pay for itself with increased action and donation rates.
Video: Your First ActionKit Pages (4 minutes)
Creating Your First Pages
To add a page, you select the page type under Add Page on the Pages Tab.
You can find a general overview of the steps for creating a page. Each of the available settings for each page type are described here as well.
You may want to create model pages as the basis for future pages and set organizational defaults for certain settings.
Testing New Pages
This is especially important when you’re getting started. ActionKit offers great flexibility to customize your page design and function. However, that means you can break things! Read more about testing and at a minimum consider:
Submit as a new user and by following a link from a mailing
Confirm your data capture
Confirm you got the after action email (if you set one up)
Confirm TAF works
Unsubscribe Page Requirements
Every mailing sent from ActionKit must include an unsubscribe link. The default email wrapper links to the default unsubscribe page. Minimally, you’ll want to change the templateset for this page to one that has your logo and privacy policies. Read about the requirements for unsubscribe pages.
Action Sources: Tracking ROI
Every time a user submits on one of your pages an action is created. Every action has a source. The source of each user’s first action is saved as the user’s source. User source cannot be changed once it’s set.
Some source codes are set automatically. Read about automatic sourcing. You can also add your own source codes.
It’s worth thinking in advance about how you’ll set sources so you can compare the value and effectiveness of different possible methods of recruiting users.
Video: ActionKit Pages Tutorial (33 minutes)
Fundraising Through ActionKit
To accept donations through ActionKit, you must:
Set up a merchant vendor and/or PayPal account, if you don’t already have one.
Get us the information specified under account settings.
Create one or more donation pages.
You can also manage donations through the ActionKit admin.
Creating Donation Pages
Creating a donation page involves the same steps as creating other page types. You can read about the donation-specific settings, including the Suggested ask formula, which allows you to customize the donation amounts shown to a previous donor based on that user’s giving history. If you’ve had problems with credit card testers, you might also consider enabling Fraud Filtering, however this isn’t generally necessary unless you find that someone is testing multiple numbers against your pages.
Always test your donation pages.
NOTE: Donations are worth money!!! Do some extra testing on your donation pages. Make a real donation (you can go to your user record from the user’s tab and refund it). This is the only way to confirm that donations are working correctly.
Managing Donations Through ActionKit
Please manage your donations through ActionKit. If you make changes directly with your merchant vendor they will not be reflected in ActionKit. Read more about managing donations, including how to prompt a refund and change or cancel a recurring donation.
Accepting Recurring Donations
You can accept recurring donations through ActionKit as long as you’ve configured your merchant vendor account for this. A monthly donation option is included in your standard donation pages if you base your templateset on the Original.
If you are using Braintree, pay special attention to the custom retry options for recurring donations.
Pages For Recurring Donation Management
You can create pages where your users can manage their existing recurring commitments (including changing their credit card number, billing address, or amount) or cancel them. They will have to set a password and login.
Recurring Donation Email Stream
You can set up recurring mailings to help you manage recurring donations. You might want one to users with active recurring profiles whose credit cards are about to expire. You might also consider a mailing that goes out to anyone who attempts to set up a recurring profile but fails.
Some clients have also had success with a welcome series.
Video: Fundraising 101 (55 minutes)
Multilingual and Multicurrency Functionality
ActionKit supports both!
Read about setting up pages in other languages.
Read about accepting donations in other currencies.
Intro to Mailings
Video: Your first ActionKit Mailing (4 minutes)
The “Mailings” tab is where you create ActionKit blast mailings. If you’ve followed the instructions for setting up pages, you may have already created some mailings-related content, but we’ve linked to the most important items below.
Mailings Essentials
Advanced Mailings Options
ActionKit has lots of advanced mailing features, but here are some of the essentials. You can see a complete list in the campaigners guide to mailings.
Tags: Mailings and pages share the same tag list. Tags are useful for categorizing mailings so you can find specific mailings more quickly later.
Custom mailing fields: These can be used to insert content or trigger functionality on a mailing by mailing basis. They can also be used for tracking. We recommend tracking the ask type (e.g. donation, petition, partner_event, etc.) so you can later compare mailing stats for asks of similar difficulty.
Auto Excludes: Enable this option if you regularly need to ensure that each subscriber gets only the single most important mailing for them each day.
Recurring mailings: Recurring mailings can be used to set up a welcome series, re-engagement series, or even a reminder to recurring donors whose cards are about to expire to update their payment details.
Deliverability and Inbox Placement
Email deliverability is a general term that refers to whether your emails are being delivered to your supporters. Mailbox providers determine whether your email ends up in spam or the inbox through factors such as user behavior and sending patterns. ActionKit has an enormous suite of deliverability tools and a comprehensive guide to deliverability and inbox placement. Though it may seem like a lot, managing your email deliverability is a vital piece to any successful email program.
Staff Users
We’ll set up one or more staff users for you to start, but you can add more!
Staff users in ActionKit have access to the administrative interface. So if you have colleagues who will be needing access to ActionKit to set up pages, mailings, look at reports, or manage users, then you’ll want to create staff accounts for them.
You’ll also need to set up a staff user in order to grant API access to any external partners. Learn more about that under setting staff permissions.
Adding New Staff Users
Add staff users from the staff tab.
Setting Staff Permissions
Set permission levels for each staff user in their profile, which you reach from the Add staff users screen.
There are three checkboxes that control the status of an account, and another set of permission groups that you can use to customize the access granted to each staff account.
Active Account designates those users whose accounts are live. To disable staff accounts, uncheck this box.
Admin Interface grants login permissions to the staff user for the ActionKit admin web interface.
Superuser Status is a shortcut to grant all permissions to that staff user without needing to select them individually in the “Permission Groups” menu.
So to create a new staff account for someone who should be able to log into the admin, make sure to check “Active Account” and “Admin Interface”, and then set their permission groups.
And to create a new staff account for someone who only needs API access, check “Active Account” and then give them the “REST API” permission. Do not give them “Admin Interface” access unless you also want them to be able to log into your ActionKit admin.
There is one special permission group, which is “Mailings - Receive All Mailings”. Staff with this permission group will receive a copy of all mailings sent through the ActionKit mailer. Note that this permission group has to be explicitly assigned to staff, even for superusers, if the staff user wants to see all sent mailings.
Minimum Password Strength
Set minimum password strength requirements for staff users on your organization-wide settings screen.
Requiring Two-Factor Authentication
Individual staffers can set up their accounts to require two-factor auth which means they have to confirm their log in with a special code from a device they own (like their phone). You can also ask us to require this for your entire organization although we recommend setting up individual accounts first.
Direct SQL Access
Superusers can grant direct access to a read-only mySQL database to any staff members. From the Staff tab, find the user you want. Under Change User, find MySQL Access and click Create Account.

Once you complete the form, login credentials will be emailed to the user.
Customizing The Admin For Your Organization
You can set up your instance to have certain defaults for pages and mailings, and to enable some functionality like auto-excludes, fraud filtering, and spam checking. These settings are organization-wide defaults.
There are also built-in reports that define displays in the admin, including the Progress Report on the Home Tab, the stats on the Pages and Mailings Tabs and the reports listed on the Reports Tab. These special reports can all be customized.
Personal Settings
Suggested Configuration Settings
The ActionKit platform has lots of useful functions and settings, so we put together a list of the most useful configuration suggestions that we think every ActionKit client should take advantage of.
The settings below should help make your ActionKit more secure, easier to use, and ensure better deliverability for every email you send to your supporters. You can see the current status of each setting on the configuration suggestions page.
Security
Require two factor authentication for staff accounts: ActionKit allows you to require two-factor authentication for all staff, so that passwords alone are not sufficient to access a staff account. Contact Support to enable.
Mailings
Model mailings: Model mailings are drafts that you’ve designated as templates to be copied as the basis for other mailings, and they make adopting a consistent email format easier for your team.
Re-engagement: A super important feature for keeping your email out of the spam folder! ActionKit’s Reengagement feature helps you migrate inactive emails off your list and reactivate real emails that might not have done anything recently. It might even help you reduce your monthly bill!
Pages
Recaptcha: reCAPTCHA blocks actions from bots more effectively than a spam filter can, and can be enabled page-by-page or sitewide. Read more about how to implement reCAPTCHA or contact ActionKit support and request that this feature be turned on by default for all pages on your site.
Suppress spam actions: Mark suspicious actions as spam and suppress confirmation, tell-a-friend, and signature delivery emails. Enable in Spam Check Settings.
Model pages: Similar to model mailings, designate model pages to use as templates for other pages of the same type.
Contact Settings
Administrative and Billing Contact: Select up to 3 contacts ordered in descending priority. These will be used by ActionKit staff if they need to reach somebody from your organization for issues like invoices and contracts.
Technical Contact: Select up to 3 contacts ordered in descending priority. These will be used by ActionKit staff if they need to reach somebody from your organization for technical issues related to your ActionKit instance.
Mailer Deliverability Warnings: Any staff user specified here will receive a copy of every mailer deliverability warning message.
Configure Your Pre-Flight Dashboard
The pre-flight dashboard appears right above the Send button on your mailings’ Proof and Send screen, and you can customize it to include a wide range of automated checks, similar to a pilot’s checklist before a flight. The pre-flight checklist can help your team prevent mistakes on your most important mailings. Learn more.
Intro to A/B Testing
ActionKit has a strong a/b testing feature set that makes testing content easier for your team. With ActionKit, you can quickly configure and run tests on your mailing content and page content. Click the links below to learn more.
Intro to Reports
Video: Reports Training (12 minutes)
ActionKit’s reporting features provide useful reports out-of-the-box, and it also allows you to create your own custom reports and dashboards.
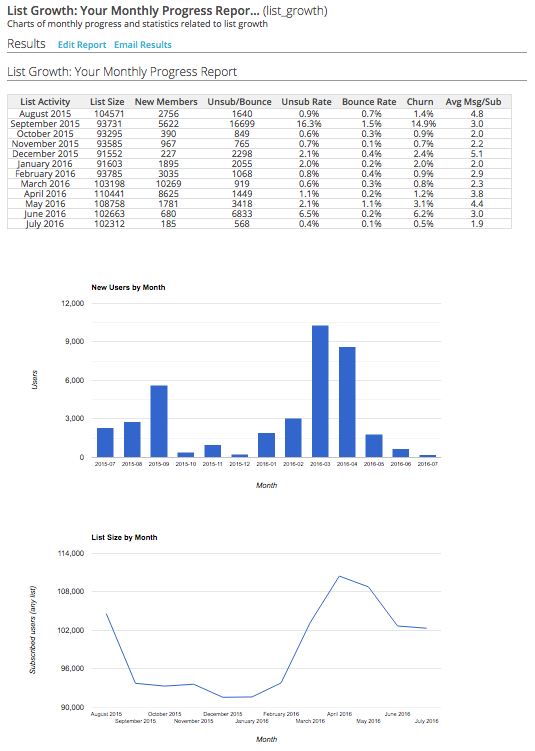
Built in reports: Our built-in reports make it easier for you to understand how your campaigns and lists are performing. Below is a screen shot of the List Growth report. To see what built in reports are available, as well as screenshots of what each report outputs, check out the Key Reports documentation and Key Reports Previews.
Build your own reports: You can also build your own custom reports based on your organizational needs. ActionKit’s query builder makes it possible for any staff person to build a report and access the ActionKit dataset. Meanwhile, staffers proficient in SQL can access the dataset directly via MySQL, or build their own custom reports via custom SQL queries.
Scorepool
ScorePool is a free, optional system that scores each of your subscribed users to predict how likely they are to engage via email in the next 30 days, based on their activity across all ActionKit clients. You can use ScorePool to target users that are most likely to engage, or exclude users that are unlikely to engage. Click here to learn more.
Sign Up To Be Notified Of ActionKit Updates
New features and bug fixes are added to all client instances in periodic releases. The night before a new release we send an email describing the new features. You can request to be added to the release notes list.
Launch FAQ
When can I update the links on my website to ActionKit URLs?
We’ve added a switch that allows you to point links on your website or elsewhere to ActionKit pages before you launch. End users follow the link and are redirected to a URL you enter for the live page in your current system. This is one easy way to avoid updating links at the last minute to point them to ActionKit.
Add a custom page field (from the pages tab under related tools) called “migration_redirect_url”.
For each page in ActionKit that you want to redirect users to the corresponding page in your existing system, click “edit” from the browse all pages screen. At the bottom of “step 1: action basics”, you’ll see a “Custom content fields” box. You won’t see this if you didn’t add the field in step 1.
Hit the green plus to add a custom content field to this specific page. Pick the migration field from the drop down. Enter the URL for your existing page into the content box.
Hit save and continue.
Test. Click on “Step 4: view on site”. You should see the ActionKit page. Copy the ActionKit URL, then log out, then go back to that URL while you’re logged out. You should see the page that’s live in your existing system.
Anyone who is logged in as an admin will see the ActionKit version of the page. Anyone who isn’t will see the page you’ve redirected to. This allows you to change any links on your main site or elsewhere now, so they point to ActionKit. Then on the day you want to “flip the switch” we’ll delete the content in all the migration fields and the ActionKit page will be live.
What can we do to improve our email deliverability as we get started?
We provide you with a dedicated IP address for your outbound email. We also enroll you in all available feedback loop and whitelisting programs to help improve your deliverability and setup cryptographic signing of your emails to help prove that they are from your organization. This guarantees that your email reputation is entirely your own. Your deliverability will not be impacted by the action of other ActionKit clients.
Some ISPs, when they start to see email from your new IPs, may temporarily treat it as spam and either delay or block it. If this happens, we’ll follow up with the ISPs on your behalf to resolve any problems.
Generally, after 4-6 weeks of receiving email from your new addresses, your reputation will be firmly established.
From your side, consistently sending solid outreaches is the best thing you can do to make sure that your new reputation is quickly established with ISPs.
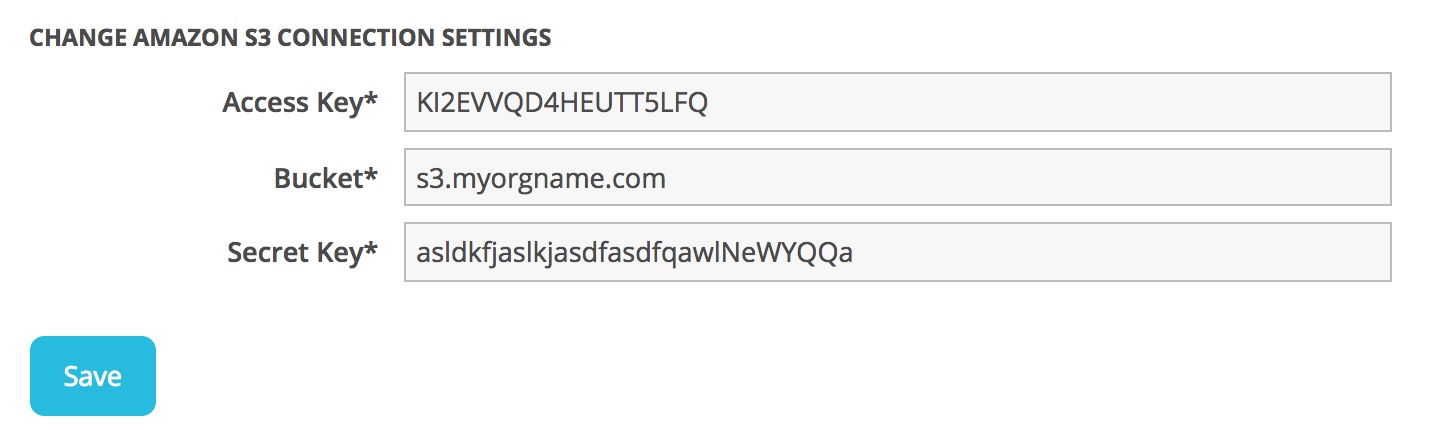
How do I obtain Access and API keys for my AWS S3 Bucket?
In order to upload images to the media library, you’ll need an S3 bucket. Below are the steps you’ll need to take to obtain the Access and API keys for your AWS S3 bucket, which you should input and save in your admin configuration settings.
Alternatively, instead of creating your own S3 bucket, you can reach out to ActionKit support we’ll create the necessary S3 bucket and user for you.
STEP 1: Log in to your Amazon AWS account at http://console.aws.amazon.com.
STEP 2: Click on the Services tab in the top left of the header and search for “S3”
Click to select S3: Scalable Storage in the Cloud
You’ll land on this page:
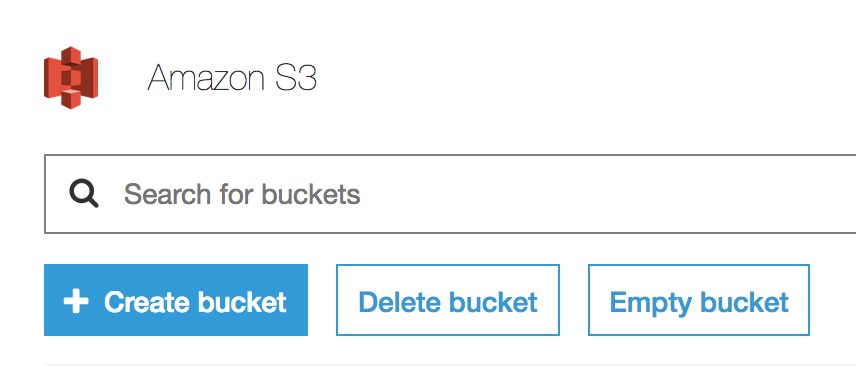
STEP 3: Click to create a bucket
You can name your bucket anything, but try to name it something like ak-[organization].
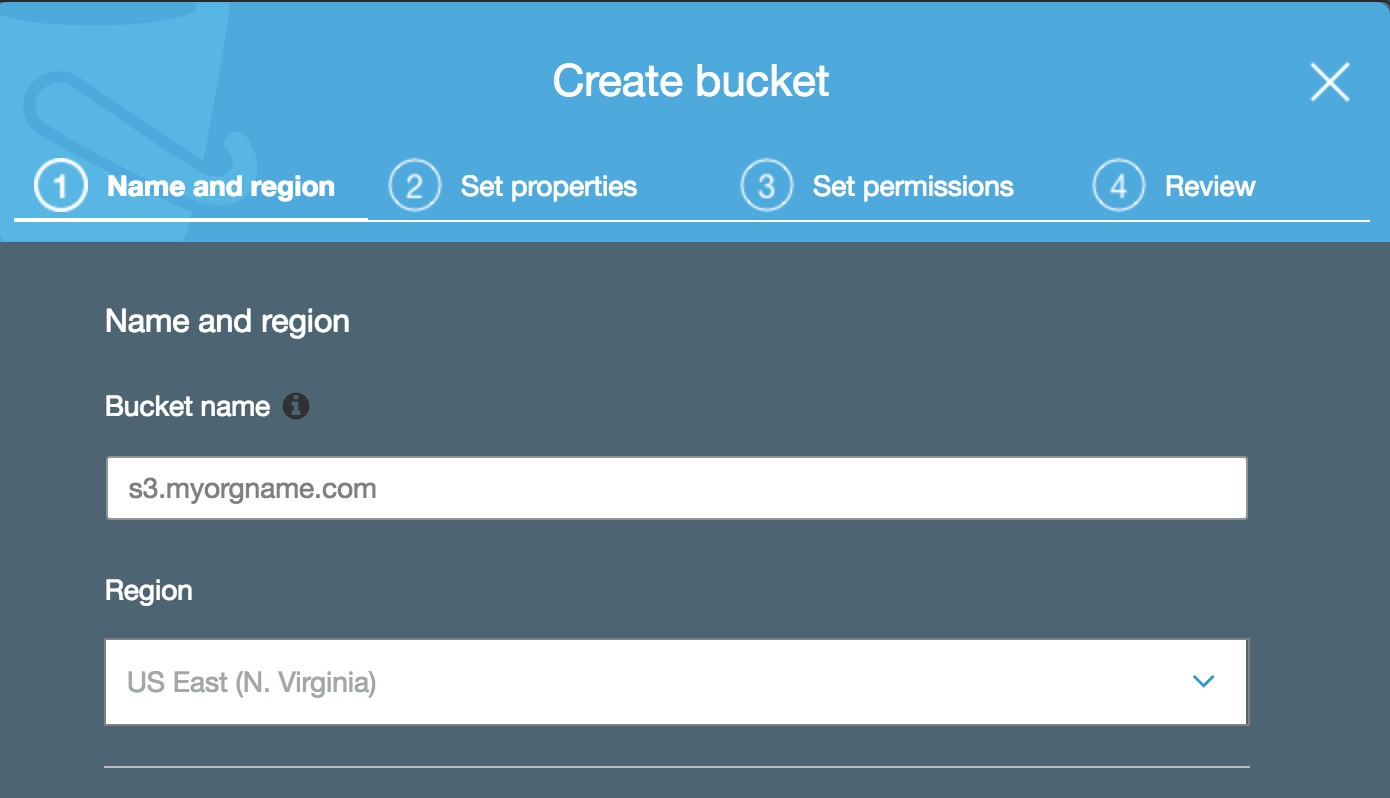
Be sure to select us-east-1 (or if us-east-1 is not available, US East N. Virginia) as your region.
Enabling ACLs for the bucket, and uncheck the “Block all public access”.
STEP 4: Create an IAM user with full permissions for the bucket.
STEP 5: After you’ve created your S3 bucket, you’re ready to get your credentials!
Click on your account username -> My Security Credentials
Click on Create new access key. In the popup that appears, click on Show Access Key. You’ll see your Access Key ID and Secret Access Key.
Copy and paste these two keys and transfer them over to the appropriate fields in your ActionKit configuration settings page at https://yourdomain.actionkit.com/admin/core/s3connection/