Pages
What Is A Page?
Pages in ActionKit generally correspond to web pages, where your users can take an action. ActionKit doesn’t offer content page types, only action pages. For most groups, it makes sense to maintain and host the home page of their website outside of ActionKit, linking from there to ActionKit Pages for advocacy, fundraising, events and other member engagement.
You direct users to your Pages to express support for your position, lobby decisionmakers, donate, sign up for events, and more. Pages capture data about those actions and your users.
Pages are also how users get subscribed to your mailing list so you can email them through ActionKit. By default, anyone who takes action is added to the mailing list you associate with the page. To maintain good email deliverability, your page should clearly indicate this, so users aren’t surprised when they receive email from you.
You can customize just about everything about your page, from the appearance, to the user form fields, to user specific content. You can host your pages with us, using our mini-CMS to enter your page content, or you can host your page externally, using another CMS.
Pages are broken down into Types to give you quick access to features specific to the page’s purpose.
What Are The Page Types?
ActionKit walks you through the process of creating Pages based on Type, streamlining the process and incorporating best practices. The Types are:
Petition – Petition Pages are generally used to petition an advocacy target on a specific issue or campaign. Users can add a personal comment but they cannot edit the statement. Petitions support one-click signing.
Letter - Letter Pages are similar to Petition Pages, but the user is encouraged to edit the letter you provide or write their own. Also, one-click signing is only available for petition pages. Letter pages are designed to encourage the user to customize the content, so you want the user to land on the screen with the content.
Call – Call Pages ask the user to call an advocacy target, generally to lobby them on an issue. These pages display the target phone number and ask the user to indicate whom they called and how it went.
Whipcount – Whipcount pages are a version of call pages that allow you to track the positions of a set of targets. A typical whipcount would target a small set of legislators who are either undecided on an issue, or hold key positions in the legislative process. Whipcount pages do not rely on a user’s address to determine targets. The user sees the full list of targets, selects one to call, then sees a form with the target’s phone number, instructions, and a contact form (unless the user is already recognized). The user calls and records the target’s position on your issue. Once enough users have confirmed a target’s response (based on your settings on the Whipcount Responses screen under User submitted), that target shows as confirmed so the next user can call a different target.
You can also use whipcount pages to generate thank and spank calls to targets.
Letter to the editor (LTE) – LTE Pages ask users to compose an original letter to the editor of a local, regional, or national newspaper. The user first selects a newspaper from a list, then composes a user, then submits. ActionKit emails the user’s letter to the editor for the relevant paper using data from a third party database. A user can only submit once for any given paper from an LTE page.
Survey – Survey Pages provide one or more questions for your users. Use surveys to get input on a specific campaign or to track opinions about your organization over time or for anything where you want input. You can provide your users with selectable answers in any format or provide space for users to enter their own free form responses.
The results are available for download as a CSV by clicking the Download Actions link on the Reports Tab.
Event – Events are usually (but not always) used to organize off-line gatherings for advocacy, team-building, public education, etc. To create an event you first create an Event Campaign, which has multiple pages associated with it, including a page where hosts sign up and one where attendees sign up.
Donation – Donation Pages ask your users to contribute, order Products, or support Candidates (through bundled contributions) using a credit card, PayPal, or ACH direct debit.
To accept credit card donations, you must have a payment account set up with a merchant vendor we integrate with. You can accept recurring donations and donations in many currencies.
To accept PayPal donations, we need information about your PayPal Account.
To accept ACH direct debit, you need a merchant account with Braintree and you must sign up for their ACH beta program.
You can also manage donations through ActionKit.
Update Recurring Donation - From pages of this type, users with existing recurring donations can update the amount of their recurring donation or update their credit card number, bank information (for ACH direct debit donations), or billing address. The billing address is prefilled from the last saved billing address for this recurring profile, and changes to the billing address are only available for Braintree, Authorize.net and PayFlowPro accounts. Users cannot update the billing address for PayPal accounts.
The update page also includes a link to the cancel recurring donation page.
If you have more than one merchant account, your page will automatically use the correct one for the user’s recurring profile.
The template for changing the layout or appearance of this page is Recurring update.
Cancel Recurring Donation – This Type allows users with an existing recurring donation commitment to log in and cancel the commitment. The user cannot request refunds for past payments from this page.
The template for changing the layout or appearance of this page is Recurring cancel.
Signup – Signup Pages are the most basic Type. You can use them to add users to a mailing list or associate them with a Tag.
Unsubscribe – Unsubscribe Pages allow your users to ask not to be sent future mailings. Once a user is unsubscribed you can’t email them from ActionKit.
Users can also ask to be removed from particular mailing lists, however, your page must make it possible to unsubscribe from all mailing lists with one click. If they’re following a link from an ActionKit mailing (e.g. they have an AKID), they must be recognized and cannot be asked to enter their email address.
When a recognized user lands on your unsubscribe page, they see a checkbox for each list they belong to, as long as your template set is based on the Original. All the boxes will be checked by default. The user can simply submit to unsubscribe entirely. If the user unchecks all the boxes and then submits, the same thing happens - the user is unsubscribed from all lists. Only if the user leaves some boxes checked do they remain subscribed to any mailing lists.
In your own templatesets and offsite pages, you must maintain this type of approach – either pre-selecting all the lists or providing a prominent remove-from-all-lists option at the top of the screen. Although you may lose a couple users who would otherwise have checked only some of the lists, this is a minor price to pay for maintaining good deliverability. If a user thinks they unsubscribed entirely, but forgot to check a box and therefore receives an email, they may become angry and complain to their ISP, which is very damaging to your email reputation.
Warning
Successful unsubscribe actions have a status of “complete”, meaning they are counted when choosing the “Non-Import Actions” Query Builder option. Unsubscribe pages have “Include in reports of member actions” off by default, so to exclude unsubscribe actions in your action totals, you can instead filter for “Member Actions”.
Account Tools – You can also create several account screens where your end users can manage their own profile, including the user update and password screens. You can only create one version of each screen.
Import Pages - This page type doesn’t correspond to a user-facing web page. Import Pages are used to add users, actions, or user data to your database from a CSV file. Add these Pages from the Pages Tab or the Users Tab.
How Do Pages Work?
Neither you nor your users see most of this, but starting when a user lands on your ActionKit page, there are a lot of things that happen! Below we describe the process and call out some key information about the data we capture for each action.
Processing User Actions
Here’s what the process looks like:
1 A user arrives on your page.
The user either followed a link or typed a URL into a browser’s address bar. Usually the link was in a mailing you sent them but it could also have been forwarded by a friend or posted on Facebook or in a blog, etc.
2 ActionKit checks the URL for an ActionKit ID (or AKID) and action source.
Mailings from ActionKit generally include this information and you can add them to other links you create.
If the link includes the AKID, ActionKit looks at your page to see what fields are required, then in the database to see if we have that information for the user. See required fields for more information.
If we have the required information, the user sees a message like Not Bob? Click here. and doesn’t have to enter any personal data. See recognized users for more information.
If we’re missing anything, the user is presented with a blank user form.
If the link doesn’t include the AKID, the user is presented with a blank user form.
3 Either way the user takes the suggested action (hopefully) and submits by clicking the button on the page (which will say something like Submit Donation or Send Letter).
4 ActionKit checks the information the user submitted.
If required fields are still missing, the user sees an error message and must enter the information before the action will be processed. See Required Form Fields for more information.
If the field is one we validate and the data is wrong (like a 6-digit zip code), the user sees an error and must correct the entry to submit.
5 Once the user successfully submits, a row is added to the core_action table. Content, like letter text, is saved. See Data Capture 101 for more information.
If the link includes an action source (included in mailings by default), it’s saved to core_action as well. If not the action is assigned the generic source, website.
6 ActionKit checks to see if the user entered an email address that is new to your database:
If so, ActionKit creates a new user by adding a row to the core_user table.
If the email is not new, that means the user was recognized from the link or entered an email address that was already in your database. Either way, ActionKit saves any new or changed information to the existing user record.
7 ActionKit checks to see if the user’s subscription status or list membership has changed. By default, taking action on a page makes the user mailable and adds them to whatever mailing list you associate with the page, if they aren’t already on it.
The user doesn’t see any of this! After submitting, the user immediately lands at the URL you specified during page creation - usually a thank you page generated from content you entered on the Edit content screen.
8 If you enabled the tell-a-friend widget, the user sees a box for friends’ email addresses. ActionKit will send them the TAF message and append the source code taf to links. (So if the friend follows the link, they start the process at the top).
9 Finally, ActionKit takes a look at the address data the user submitted and adds and corrects location-related information (for example, we add the user’s Congressional District based on their zip and address info). See Geographic coding for more information.
Pages And Users
What Is A Recognized User?
ActionKit ‘recognizes’ users who follow a link in one of your mailings to one of your pages, unless you override this. ActionKit recognizes your existing users if the link to the page includes the user’s identifier or AKID. ActionKit automatically adds the AKID to links in mailings (so the user lands on the page and sees their info). You can add the AKID to your own links, like on your website.
The goal is to get more of your users taking action by not requiring them to re-enter contact information if you already have it. Recognized users don’t usually see a user form at all in ActionKit. Instead, the user will see a sentence saying “Not User_first_name? Click here”. We use this approach instead of auto-filling any fields both to protect the privacy of your existing users and to make it easier for them to take action.
There are a few reasons a user might not be recognized, even if they came in with the standard AKID parameter:
User already took this action. By default most Pages are set to Recognize user once. This is to cover the scenario in which one of your users receives your mailing, takes action, then forwards their personalized link to a friend. The friend will click on the link and see a blank user form and (we hope) join your list as a new user.
Page type does not recognize users. Donation pages and event host pages always show the full user form to get the most current, accurate information from the user.
Need more user information. If your page requires a field (say, zip code) and a user arrives at the page with an
akid=but has no zip code on file, they’ll be shown a user form so we can get their zip. Sometimes, Pages require certain fields even if you didn’t choose them from the required form fields list. For example, Call Pages targeting U.S. Senators and Representatives will require the user’s state or zip.This particular page or link specifically disables user recognition. You can set one of your templates to disable user recognition with the code:
<input type="hidden" name="never_recognize" value="1">And you can make sure a particular link doesn’t trigger user recognition by adding the query string parameter
nr=1. You can fully ‘depersonalize’ a link (and disable click tracking for it as well) by adding the parameterno_akid=1to the link.Invalid akid=. Several things can make an AKID invalid: using a plain numeric AKID without the cryptographic ‘hash’ we use to prevent tampering, changing the user or mailing IDs in an AKID, or accidentally pasting in an AKID that was cut short by linebreaking.
Even if a user is not recognized, ActionKit will save any new or changed information to the correct user record for any email address that already exists in the database.
User Identifier
An AKID (or ActionKit ID) is the unique identifier used by ActionKit to represent a particular user. ActionKit automatically adds the AKID to links in bulk mailings (so the user lands on the page and sees their info).
Each user’s AKID is displayed on their individual user record (the screen you see if you search for the user from the Users Tab and then click on the user email). It’s displayed under the user’s name and to the right of the user_id.
The AKID is also displayed in the URL on the Thanks screen that a user sees after taking an action. You’ll usually see something like this: /thanks/testpetition1?action_id=126&akid=.2.HxiD3p&taf=1. The part after akid= and before & is the AKID.
You can use the AKID for testing. For example, if you want to test your suggested ask formula for a Donation page, you might want to view the page as if you’d followed the link in a mailing. To do this, put the link at the end of your URL like this: /yourpagenamehere/?akid=yourAKIDhere
You can also use the AKID in confirmation emails. Let’s say you want to thank users who take action on a Petition page, then ask them to contribute to the same campaign. And you want the Donation page to recognize the user. Just put this at the end of your link: /?akid={{ user.token }}. Then be sure to test!
User Form Required Fields
The user must enter a value in any required fields before they can successfully submit on a page through the user form. If a required field is blank, the user will get an error message until they fill in a value. Email address is always a required field because a unique email address is required to create a new user in ActionKit.
In general, you set which fields are required for a given page in the Customize Fields section on the Edit Content screen.
Some Pages require specific data, whether or not you set the field as required yourself. For example, ActionKit must know what district a user lives in to display a phone number for a Call page that targets the U.S. House of Representatives. If the user has a zip code in the database, ActionKit automatically assigns the user to a congressional district and shows the correct target. Zip code is required because the action can’t be submitted if the user doesn’t have a value saved in the field already.
Aside from fields required by the page Type, you decide which fields are required. By default, when you create a new page, zip is selected as a required field. We recommend requiring zip code so you know the user’s congressional district and state but you can unselect it if you wish.
Validation
ActionKit reviews the data the user submits in certain fields for obvious errors and shows the user an error message if they need to correct the data.
Email - The email address entered must include “@”, followed by at least one letter, followed by “.”, then at least two more letters. The minimum address that is acceptable is
a@b.cd. This rule applies to emails entered in the user form and in the tell-a-friend box.Zip - Zip codes must be 5 characters and if you have a separate
plus4field, 4 characters are required in that field. Validation is done only if the country is the United States.Phone - If the country is United States or if it’s unknown, the phone numbers must contain at least 10 characters. Formatting characters such as dashes and parentheses are acceptable such as in the number (555) 555-1212.
Geocoding
ActionKit looks at the zip or postal code and address information submitted and does a couple types of geo-coding.
Address And Zip Clean Up
ActionKit validates address information as follows:
If a user enters a 9 digit zip code, the zip is saved in core_user.zip and the other 4 digits are saved to core_user.plus4.
If a user enters their address and city and a zip code that doesn’t match, ActionKit will overwrite the zip code with a corrected version and add a plus 4 if we can determine the correct information.
If a user enters their zip, but not an address, city or state, ActionKit will assign a state and a city if possible to the user. Usually a zip plus 4 is required to determine the city.
If a user enters a value in a postal code field, the value is saved to core_user.postal. If the user country=’United States’, the postal code is copied to the
core_user.zipfield, and if provided, the core_user.plus4 field. In any case, the postal code field value is left as entered.If you or an end user enter ‘US’ or ‘USA’ or several similar values these will be normalized to ‘United States’.
Note
ActionKit does not attempt to determine city or region from a postal code in another country.
Legislative Districts
ActionKit uses address information to figure out which state and federal legislative districts each user is in and saves the results to the core_location table. This information is used by Petition, Letter and Call pages to determine the appropriate target for any user action.
When a user lands on one of these page Types, ActionKit looks at the core_location table (which is updated upon address change). If the relevant district field is empty, ActionKit will display an empty user form.
Here’s more detail on how ActionKit makes the district assignment:
US Senate - Based on state, or zip code if the user hasn’t entered a state.
US House - Based on zip code. Many zip codes are split between multiple congressional districts. In those cases we determine the user’s zip+4 using their address and then map that to the congressional district. If the user hasn’t entered an address and is in a zip with multiple districts, ActionKit guesses based on which district has more people in the zip.
State Senate and House - Here zip codes are most often split between multiple districts. ActionKit will not guess at state districts because it’d be wrong so often. If a user tries to sign a Petition to state legislative targets, ActionKit will assign them to the right target if their zip isn’t split or if we have their zip+4 already. Otherwise, ActionKit will ask for their full address.
Note
ActionKit only runs the processing for the legislative district assignments where the user country=’United States’.
Physical Location
ActionKit uses city, zip or postal code to assign a loc_code, which is saved in the core_location table. A loc_code is not assigned if country is the only available information. This loc_code is used for radius targeting in targeting recipients.
ActionKit also assigns a latitude and longitude to US or international users for whom we have a zip, postal or city. This is saved in core_location also. Lat/long is used to find events near a user.
Additionally, ActionKit uses the location to assign the user a time zone, which is recorded in the timezone field.
Values in core_location are updated upon address change.
How do I add a Page?
From the Pages Tab, you can create a page from scratch or starting from a model.
To create a page from scratch, click Add Page, and select the Page Type from the dropdown. To create from a model, click Page From Model and then select the model. The latter only works if you already have a model for the page type you want to create.
You’ll land on the Action basics screen.
At the top is a link to the History, which will list all changes made to this page.
There are four steps for creating a page of most types:
Action basics - Create the page and set basics like the name, tags, and type-specific info like advocacy targets. This is all information required for action processing, regardless of where you’re hosting the page.
Edit content - Select a Templateset to define the page’s appearance and customize the user form. Enter content, or if you indicate that you’re hosting the page on your own servers, we’ll put some filler in for the content.
After-action info - Define everything that happens after the user submits (again, regardless of where the page is hosted) including the landing page, thank you email, tell-a-friend and social media sharing, and after-action notifications.
View on site - Proof and test the page. If you selected the checkbox to host your own page, this step is called Preview/get HTML and you’ll see a button to download the HTML.
Petition and Letter pages have an additional step for setting up automated signature delivery. Whipcount pages have one additional screen for whipcount results. For events, you must create an Event Campaign, then the steps above are used to create Host and Attendee Pages.
Managing Your Pages
There are several features designed to assist you with managing your pages:
Default Settings
You can customize your instance’s header, change various defaults, enable advanced functionality and more from the CONFIG screen.
The page-related defaults include:
Page Settings
Languages
Default Language: Select from the drop down of languages you’ve set up in your instance. We will use the translations you set up for the corresponding language for every new page and assign that language to each new email wrapper. You will be able to change both.
If you leave this blank, ActionKit doesn’t assign a language to new pages. Actiontakers on a page with no language are assigned English. New email wrappers are also designated as English.
If you’ve set up English as a language in your instance and modified field names or system messages, you must select English here to have your modified language associated with new pages by default.
Show Multilingual: Change this to False if you would like to hide the language and multilingual campaign selection boxes on the Action Basics screen for all page types in your instance.
Page Analytics
Analytics Tag Code: If you use an analytics system, such as Google Analytics, you can use this field to paste in a bit of code (e.g., a “Google Tag”). If provided, this code will be automatically included in the page wrapper.html template.
If you have customized your wrapper.html template, you need to add the following to the bottom of this template if you want ActionKit to automatically add this code block:
{{ analytics_tag_code|safe }}
If placed in the wrapper.html of your template sets, ActionKit will automatically populate this with the Analytics Tag Code you have set in the site configuration.
Pages
Defaults apply to all new pages.
Media Prefix: Allows you to use Cloudfront to serve static files more quickly. Read more in the section on Improving Page Load Speed.
Preload Context: When this is enabled, the “context”–the URL ActionKit uses to determine if a user should be recognized, to get Representative info on a call-Congress page, and so on–is loaded earlier in the page than it would be otherwise.
Recognize Users Default: Choose always, once or never.
Redirect All Links: When this is disabled (the default) ActionKit doesn’t use the /go/ redirector for links to action pages. If you run into a problem with users’ clicks not being tracked, enable this setting. Read more about links and tracking.
Uploader
Always Use Fast User Fields Option: You can have the fast upload option enabled by default for new import pages.
Uploader: Choose whether newly created Import pages should have “Subscribe to list” selected by default. If unchecked, newly created Import pages will be set to “Don’t change subscriptions”.
User Generated Emails
User-Generated Emails: Sets the “from address” to be used for TAF emails and immediate signature delivery. The user’s email is used for the “reply to” but the from must be in your domain to ensure delivery.
Donation Settings
Payment Accounts
Helpful if you are importing legacy donations via the uploader. To accept donations in ActionKit you must have a payment account with a vendor we integrate with. To add an additional payment processor, you have to ask support, but if you’d like to add payment accounts for imports or for the ActBlue sync, you can add them here. Click here to learn more about payment accounts.
Donation Processing
Duplicate Window: You can change the time period during which ActionKit will reject a 2nd donation in the same amount from the same credit card as a duplicate. This is set at 5 minutes by default. You can disable duplicate detection by setting it to zero, although we don’t recommend this since users will sometimes hit the submit button twice in a row.
Send IP Address: Irrelevant for Payflow Pro and Authorize.net since they always capture the IP address.
If you’re using Braintree, you can send the IP address along with each one-time donation.
Warning
You must create the
customer_ipcustom field in the Braintree gateway prior to enabling the option or ALL donations will fail.
Admin Recurring Update
Braintree only.
Collect Card Code: If this is true, we will show the CVV on the form for updating recurring donations in the admin UI. If it’s false, we won’t.
This should correspond to the setting at your Braintree Gateway. If you require CVV at the gateway, you’ll want to expose it on the form.
Donation Page Defaults
Defaults set here will be pre-selected for every new donation page created in your instance.
Allow International Addresses: If enabled, new pages will have the allow international addresses box checked. Country field is added to the user form and zip or postal shows based on the country selected by the user. Postal is not required. Note: If you use PayPal or Authorize.Net as your processor, you still need to disable their AVS verification or you will not be able to accept international addresses.
Minimum Amount: The number entered here is used for new donation pages and also new recurring donation update pages.
Payment Account: The account chosen here will be the default payment account for new donation pages.
Suggested Ask Formula: The suggested ask formula chosen here will be the default formula across your organization for new donation pages.
Recurring Retry
ONLY RELEVANT if Braintree is your merchant vendor. This is not applicable to ACH direct debit recurring donations, which are handled directly by ActionKit.
Each merchant vendor handles recurring donation processing slightly differently. This includes recurring donation retries. Find details about recurring donation processing and data capture.
When a user with an active recurring profile misses a payment, the merchant vendor will try again. When and how often varies by vendor and is often something you can customize for your account.
By default, Braintree accrues missed payments toward a recurring profile. This can lead to a nasty surprise for some of your most valuable donors if their payments fail for a few months and then succeed (for a total that includes the missed months). Alternately, you can change your settings in Braintree so all retries are completed before the 2nd payment comes due but this costs you money, as some of the later attempts would be successful.
ActionKit’s Recurring Retry settings provide a workaround that allows you to establish a custom retry schedule without ever billing the user for more than their monthly commitment. Setting up Recurring Retry requires steps in ActionKit and in Braintree.
1. Configure Recurring Retry in ActionKit:
To enable this, click Edit on the CONFIG screen next to Recurring Retry, then click Enable Retries. Enter a max retry number and a retry interval. For example, you might pick 4 as the max retry with an interval of 10 days. ActionKit will prompt an attempt to bill the user’s credit card for their monthly total 10 days after the initial failed payment, then 20 days, 30 days, and the last retry will be at 40 days.
If you set Cancel After Retries to True, we’ll cancel the profile at Braintree and set the status at ActionKit to canceled as well. If this is set to False, the profiles remain active unless you manually cancel them at Braintree or through the ActionKit API.
2. Configure Braintree Gateway:
We recommend setting the following Recurring Billing Options in the Braintree gateway:
Automatically retry failed transactions: checked
After a subscription is past due, retry the subscription after: 1 day
If above retry fails, try again after: 1 day
If above retries have failed: Leave the subscription past due
Having Braintree’s automatic retries on allows the “leave subscription past due” behavior, which is what prevents accrued monthly billing from occurring. This does mean Braintree will attempt two retries, but with the above settings, they will complete before ActionKit retries begin (which have a minimum interval of four days).
If you’ve configured Braintree as described, no further attempts will be made after the max retries have been attempted. If the charge is processed at any point, no further attempts are made and there is no balance due.
ActionKit retries are recorded in the core_transaction table with a type of ‘retry’. Each ‘retry’ row will have a status of ‘success’ or ‘failure’.
Pages Dashboard
On the Pages Dashboard you can toggle between Recent Pages, Multilingual Campaigns, and Models.
The Recent Pages view displays the page type and action count for the page by default. You can change the action information displayed by editing the Page Mini-dash report.
Note
The counts on the dashboard are cached. You can double click on a count to update it but otherwise it updates every few minutes.
Select Browse All or Browse By Type buttons at the top of the Pages dashboard to see a full list of all pages or pages of a certain type, respectively.
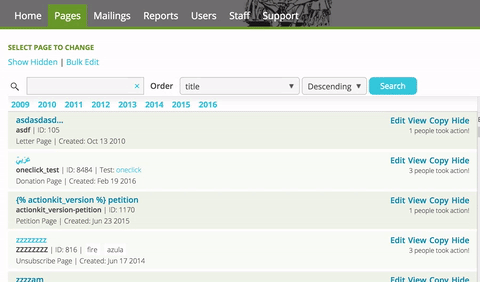
Summary Data
The following information is displayed for each page on the dashboard: short name, title, page id, page type, action count and available actions. - name given at page creation for page url. In most cases, the action options are Edit, Copy, View, and Hide.
Browse All And Browse By Page Type
The Browse All button displays the full list of all pages. Alternatively, use the Browse by Type or use the search box and the built in filters to view a list of specific pages on this screen.
These screens displays the same Summary Data as the dashboard.
From these listings you can:
Filter pages by type, tag, language and model status using the toolbar on the right.
Search short names and titles and sort the list by specifying Order By and Descending or Ascending and clicking Search.
Show hidden or disabled pages by clicking Show Hidden. Hide a page by clicking Hide.
Create a new page by copying an existing page.
Bulk edit pages to show/hide pages or add/remove tags from pages.
Advanced Search
Advanced Search provides considerably more options than browsing all.
To perform an advanced search:
When browsing all, click the Advanced Search button at the top of the results page; or click the Advanced Search button from the Pages tab.
The default is All records which will show you all the pages in your database. To limit this Add a Filter by selecting from the dropdown. You can set a sort order if you’d like. Then click Search.
Filter Options
The filter options are taken from those found in the Pages query builder. All filters include some common controls:
Click on the × icon to remove a filter.
Click and drag the ≡ to change the order in which the filters appear.
To exclude rows based on a filter, click on the green Required button to toggle it to Excluded.
Many filters include variables that you can adjust. You’ll see these as soon as you select the display.
For example, if you select the display type Number of Actions, you’ll see a dropdown with All Actions selected by default. You can change this to:
Completed Actions - only those with a “completed” status in core_action.
Non-Spam Actions - only those not designed status=”spam” in core_action; only relevant if you’ve enabled spam checks.
Spam Actions - only those with a “spam” status in core_action, only relevant if you’ve enabled spam checks.
You’ll also see options for restricting the time period of the actions (e.g. today, last year, custom range, etc.) and specifying the action count.
To see a list of the choices and the corresponding SQL for any of the available filters, view the Query Builder SQL Reference.
There are some filter options in the query builder that aren’t here (e.g. SQL expressions and row limits). Also, blank fields are treated as empty values instead of as parameters.
Bulk Editing
For Pages, you can hide pages, show hidden pages, add and remove tags from pages in bulk.
Hiding a page disables it. If a user goes to the URL for a hidden page, they’ll see a “Sorry, the URL you tried to load doesn’t exist” error. This is true for all hidden pages, whether they’re hidden individually or in bulk.
Be especially careful hiding unsubscribe pages. If the unsubscribe page is used in one of your mailing wrappers, your mailing may fail and in any case, the page won’t be reachable, leading to irritated users marking your mailing as spam and quite possibly cats and dogs living together.
To bulk edit:
1 From the Browse All screen (or from the Event List screen for events), click on the “Bulk Edit” link in the top left next to “Show Hidden”.
2 Choose the items that you want to apply the action to – you can click to select specific items, or select all items visible on the screen.
3 Click the Save button, review the count of objects to be changed, and confirm.
You’ll then see a reportback with the number of changes actually made. This may differ from the preliminary count if, for example, an object you try to apply a tag to already has that tag.
Shared Features
Confirmation Email
The Confirmation Email usually thanks the user for their action.
You can use Snippets to insert conditional content. To include a Snippet in the subject, cut and paste the Snippet from those available for the body.
There’s a Snippet that allows you to include the user’s response to any survey questions (aka action fields). The syntax is action.custom_fields.QUESTION_NAME. You can only do this for survey questions that are on the page associated with the Confirmation Email.
Note
Sometimes you’ll want to include a link to a higher-bar, or more difficult, action the user can take. For example, a Petition page Confirmation Email might thank the user and ask him or her to call their legislator about the same issue. To do this, you need to create the second action page (the Call page in this example). Then enter the link to the second action in this email and in your Thank you text box on the Edit content screen.
Your Confirmation Email must include an unsubscribe link. Not many users unsubscribe as a result of the thank you email, but offering that option contributes to your standing with the various ISPs.
To create your Confirmation Email you need to:
1 Select the Email wrapper from the dropdown list. Wrappers define the header and footer of your email. See creating email wrappers.
2 Select the Email From Line entry from the dropdown list, add a new From Line, or fill in a From Line for use in this mailing only by clicking “use a custom From Line”. See From Line.
3 Enter your Email subject.
4 Enter your Email body.
Content
The content for your page is entered here. The text boxes for all page Types share the same basic functionality.
WYSIWYG
Most everywhere that you can enter and edit text (e.g. page content text boxes, mailing body), we’ve provided a basic WYSIWYG editor (TinyMCE) and a syntax coloring editor (CodeMirror) as well as the standard browser text area.
Select Visual to use the WYSIWYG editor and view the rendered content without writing your own HTML. The toolbar has buttons you can use for standard functions and formatting. Just hover over the tool to see the name. For example, you can click to indent a paragraph or to insert an image. The show/hide toolbars button opens a second bar with additional formatting options.
Select Code in the toolbar to have color-coding and line numbers for easier editing of the code. Different elements, like Javascript or CSS, are given different tinted backgrounds or text colors.
Select Plain to remove all highlighting.
Note
The visual editor, like other WYSIWYG editors, may at times add more than you expect to the HTML, like extra <p> tags, and at other times, strip out things, like styling. You may want to avoid the visual editor when updating code-heavy items such as mailing wrappers and templatesets, and limit the use of the visual editor to areas that are more content-heavy, like page text and mailing body content.
Spell Check
We’ve made it possible for you to enable your browser’s native spell checking when using the WYSIWYG visual editor, at least for most major browsers. The keyboard shortcut, menubar command, or context menu option required to enable spell checking is different in each browser, but typically you can right-click (or control-click, or two-finger-click) on an editor panel to reveal the ‘Spelling’ or ‘Spelling and Grammar’ commands for it. Firefox users may have to begin by selecting ‘Install Dictionary’ to enable spellchecking the first time, if they have not already done so. This enables ‘check spelling as you type’ functionality in Mac Safari, Chrome and Firefox as well as possibly Windows for Chrome, Firefox and IE 10+.
File Attachments
There are two places you can add a file-upload field to an action form:
File uploads won’t work on pages hosted or embedded outside of ActionKit.
Users are limited to uploading files of no more than 50MB in size.
You can restrict uploads to just images, or accept videos or document files.
Uploaded files are stored in your AWS S3 bucket, using private URLs that allow you to download them without making them accessible to the public.
Links to the uploaded files are available in the values saved for the relevant action fields. You can use the Download Actions tool or a query report to retrieve these values.
The values saved in the action field contain three items separated by spaces:
The download URL for the file, accessible only to signed-in admin users with either “Can access user details” or superuser permissions.
The S3 storage URL, which you can use with AWS tools to retrieve or delete the file.
The file size in bytes.
You can also find a list of all files uploaded using this mechanism by querying the core_fileattachment table, which includes columns for the page, user, action, and other related metadata.
GDPR Compliance
The General Data Protection Regulation, or GDPR, came into effect in 2018. We’ve added a way to show a
privacy UI in action forms when the user selects an affected country, and to
require an extra privacy= parameter when those actions are submitted.
See GDPR Compliance for details on what’s available.
Goal
Thermometers can increase action rates, so we’ve made it easy to add one to your page.
To include a thermometer on your page, enter a numeric goal in the goal section and select the type of actions to count. The options are:
Actions – total actions
Actions – unique users
Dollars raised
Thermometer appearance is set by the progress_meter Template. A designer or developer can customize the appearance by editing the Template and set the goal to automatically increase if it’s reached.
Note
All actions, complete and incomplete, are counted regardless of status. So on pages that require multiple steps, like call pages that require targeting, the thermometer will count all users that submit on the first screen, even if they do not “complete” the action by submitting the call report on the second screen.
History
On each screen in the page creation process you’ll see a History link under the title, which provides you with the listing of changes that have been made to this page.
Host Outside ActionKit
You can host your page with ActionKit or on your own server. Either way you can access all the same functionality - your end users will be recognized, error messages returned, data submitted to the database, Confirmation Emails sent, etc.
To host a page yourself, you need to copy some code into the HTML on your server. Select the Host outside ActionKit box on the Edit content screen when you create your page. Then view the source and download the code from the Preview/Get HTML screen.
When you check the box, we prefill some generic content in the text boxes. If you want the correct content to be included in the code you download, just overwrite the filler. Otherwise, skip the text boxes and enter your text in your own CMS.
We also display a URL field. Enter the URL for your page and we’ll hook it up to the View link on the Pages Tab.
Read more tips and suggestions in the embedding section.
Language
This option is only relevant if you’ve set up Languages aside from English in your instance. If so, the additional Languages will show here in the drop down under More Options.
Select a Language to:
Save this as the user’s language for any user who takes action on this page.
Use the translated system messages (e.g. “Email is required”), if you added these when you set up the Language.
Tell ActionKit to pre-select the default Templateset for the Language on the Edit content screen and to pre-select the default Email Wrapper for the Language for your Confirmation Email – if you’ve set defaults for these.
If you don’t want the user’s language to change because they took action on this page, you can select '———' from the Language list.
To learn more about ActionKit’s Language functionality, including how to add Languages and translate error messages see Languages and Multilingual Campaigns.
List
A mailing list is just a group of your users who can be emailed (e.g. they haven’t bounced or unsubscribed). Users join a list by taking action on a page (or you can add them through the Uploader). Users who take action on this page are added to the list selected if they’re not already on it.
You may have multiple Lists, but you can only choose one for this page, unless you customize your Templateset to add users to more than one list.
Your page should clearly indicate that signers will be subscribed to your mailing list. This is essential to maintaining good deliverability.
You can also edit your Templateset to require users to opt-in to the mailing list instead.
Read more about creating and using mailing Lists.
Note
If you have users from Canada, please note that the Original Templateset includes code to change your page to require opt-in, if the user selects Canada from a country drop down. A checkbox is displayed, unchecked by default, that the user can select if they’d like to be added to your list. This is to assist you in complying with Canada’s anti-spam legislation, although we also suggest consulting an attorney to find out more about the law and decide on the best approach for your organization.
You can find the code to add to your existing Templatesets in the country_select template. It includes a details link for your users where we’ve noted that an unchecked consent box won’t unsubscribe a current member.
If a Canadian user has noscript on, they can’t subscribe even if they check the box.
If you’re concerned that the Confirmation Email may be interpreted as a violation of the law for users who didn’t opt-in, you can suppress sending a Confirmation Email by adding the tag skip_confirmation to your page as a hidden value, triggered for users from Canada.
Member Actions
Check the Include In Reports Of Member Actions checkbox if you want actions on this page to be counted as member actions in reports.
This allows you to distinguish between actions generated from users interacting with your pages, versus administrative-type actions such as updating custom user fields via import pages.
By default, Unsubscribe, Recurring Cancel and Import pages are not checked.
If you want your reports to only count actions taken on pages that are checked you’ll need to change older reports to account for this and pay attention to the options available for action counts in the query builder – some offer a drop down with an option to limit to member actions.
Model Page
You can mark a page as a Model, as you can a mailing, and use it as the basis for future Pages of the same type.
Models can be used to save standard text you include in the Confirmation Email or the tell-a-friend message for Petition Pages, or to save your most commonly used Donation page settings, or as a shortcut for creating C3 versus C4 Donation Pages with the appropriate page wrapper, merchant vendor account, Email Wrapper and From Line.
When you copy a Model, all the settings remain the same, except the copy is not marked as a Model.
Designate your Model by checking the Is model box on the Action basics screen under More options.
Click on the light gray Models link at the top of the page list on your Pages tab to see a list. Or use the filter options on the Browse all screen.
Model pages do not work differently than other pages. Users can still submit on a Model page, if you make the URL public.
Note
Only users with the Pages - plus Model Pages permission and superusers can create and edit model pages. The checkbox to designate a page as a model will not show up for other users.
Multilingual Campaign
Multilingual Campaigns allow you to associate multiple Pages with each other for tracking and reporting. If you’ve selected a Goal, the thermometer for Pages that share the same Multilingual Campaign shows the combined results.
Also, your end users will see links at the top right of the page so they can toggle to their preferred Language.
You can add a Multilingual Campaign from the Pages Tab or from the Multilingual Options section on the Action basics screen when you’re creating a page.
Create a Multilingual Campaign for each Page that you plan to translate. Then select the Campaign and the Language when you create each translation.
On the Pages Tab, if you click the grey Multilingual Campaigns link, you’ll see summary information for each Campaign including the count of action takers and a list of the Pages showing each Language.
Multiple Responses
Capture every user submission as a new action or overwrite earlier actions by a user with the newer actions from that user on this page.
Check multiple responses if you want to capture each entry a user makes. We’ll add a row to core_action each time a user submits on a page and capture all the corresponding information like custom action fields.
If the box isn’t checked, and a user submits more than once on a page, the latest entry will overwrite the previous one. Note that the action source will always reflect the original source of the first action taken by a user.
The box is unchecked by default for Petition or Letter pages, where you generally only want one signature and one comment per user.
Notes
Use the Notes field to associate information with a page for internal use. Notes are displayed on the Pages Tab and Browse All screen.
Notification Emails
Notifications are emails to someone aside from the action taker, prompted by actions on the Page.
You can use these for a variety of purposes including:
sending an email to the honoree about gifts made in their honor,
alerting field organizers to each new event created in an event campaign,
notifying a campaign director every 1,000 new actions on a page,
emailing your development staff for each new recurring commitment.
Create your notifications and then select the ones you want to associate with each page on the After action info screen. Each action can prompt multiple notification emails.
Notification emails will only send if there are values for the subject line, to emails, from email, and mailing body. So you can use conditional content to control whether the notification requirements have been met. You can also use a custom reply-to email address for your notification email to reply directly to the user who took action.

Warning
Blank mailing bodies may still have <p> tags and comment code that process as content. To block sending, use {% requires_value foo %} in the body, or use a conditional in the subject, to email, or from email.
We provide a few sample notifications that you can use or customize:
In honor of: This example shows how you’d prompt a notification email to the honoree after each gift in his/her honor. First you need to add an action field with the label ‘action_in_honor_of_email’ to the Donation Page template you’ll be using. Then you can use the to line in the example – {{ action.custom_fields.in_honor_of_email }}. The example also shows some conditional content you might include in the notification email by adding additional custom action fields to your template.
Tell staff about monthly donation: In this example, the subject includes the criteria to prompt the sending of the email. Whichever staff you select from the list or enter in the “to” line will receive this notification after each new monthly donation is created. The body includes some conditional content.
Notify every 1000: In this example, the send criteria is in the body and the subject includes conditional content.
Here are some other examples that aren’t included in your instance but that you might add:
Notify someone when a donation is greater than $250:
Subject: {% if action.order.total > 249 %}New $250+ Donation!{% endif %}

* Notify event hosts of new attendees:
To: {% for host in action.event.hosts %}{{ host.email }}{% if not forloop.last %},{% endif %}{% endfor %}

Subject: Subject {{ user.first_name }} has RSVPed for your event
Read about adding notifications.
Page Fields
Custom page fields are a powerful and flexible tool that allows you to add a section of content or code to an individual page.
For example, if you want to ask users to tweet about an action they’ve taken, you could add a page field called "twitter" and include a suggested message specific to the page. If you have a Protect Parrots petition your sample message might be “Parrots are smart. I just signed to save them here: action_URL”
Page fields you’ve created are available on the Action basics screen for each page.
Note
If you don’t see a Page fields section on this screen, no custom page fields have been created for your organization.
Use this syntax to include page fields in your templatesets or to reference them when creating a page: {{ page.custom_fields.YOUR_FIELD_NAME_HERE }}. Or, if your custom page field contains template tags or filters that need to be interpreted, then use this syntax instead: {% include_tmpl page.custom_fields.YOUR_FIELD_NAME_HERE %}.
Recognize Users
Recognize user allows you to control what happens when someone who is already in your database arrives on this page with an identifier (AKID), like from a link in one of your mailings.
The default option once, will recognize a user if we have the fields and can simply submit. This is a default because most of the time the first user who follows a link and submits on the page is the user associated with the AKID. Other users who follow the same link are generally friends who have received a message from the original user telling them about the action, so you don’t want the page to recognize them – both because the page would think the friends are still the original user and because you want to capture correct contact information for the friends.
Never requires all users (recognized or not) to enter all required information. You might use Never if you want to do something like make sure that everyone taking action on a page enters a phone number, whether or not you already have one in the database.
Always has fewer obvious uses, but we’ve included it in case there are times when you want everyone who follows a link to be counted as the user identified in the link. Be careful with this setting – with Always selected, the first action (which again is usually made by the person associated with the AKID) and any actions taken by friends who were forwarded the link, are attributed to the user who received the mailing. You don’t collect email or any other information from these friends. And the original user gets a thank you email (if you have this set up) for every action submitted by their friends.
A few page types do not include this option. Unsubscribe Pages must always recognize the user to comply with our requirements for best practices for email delivery. Donation-related Pages and Event Creation Pages require the user to enter their information, even if the user is recognized, so we don’t show these options for those page Types either.
Redirect URL
In the Required section, you’ll see the URL for the thank you page with the text you entered in the previous step. If you’d like to direct the user to a different page, enter the URL here.
The URL is always pre-filled, but you can change it if you’d like to direct users to another page instead. Just enter the URL. For example, you might want to have your users land on a Donation page after they sign a Petition.
If you change the redirect, be sure to submit from your page to confirm that you entered the URL correctly.
You can use snippets in your redirect url. This is a convenient way to send users to specific follow-up URLs based on how they filled out your form, or include dynamic parameters from the action or other data.

Snippets available here are those associated with the action taker and the action, like {{ action.order.total }}. Or, if you have a custom field named, say, donations_2024, the snippet would be {{ user.custom_fields.donations_2024 }}. You can also reference parameters from the original page URL via {{ args.<name> }}. This allows you to do things like pass along parameters from a URL in a mailing to a follow-up donation page. Be sure to test your pages extensively when using this feature. Invalid URLs or broken snippets will redirect to the standard thank you page.
Alternate approach: Using a hidden input on the page with the name redirect and value of a URL will override the redirect URL you entered.
See How do I pass a source code through to a redirect? for more on the hidden input approach.
Short Name
Edit the short name if you don’t want to use what is auto-generated from the title. This forms part of the URL for this page. Only use letters, numbers, underscores, and dashes. No spaces or other characters.
For example, the URL for a signup page is http://docs.actionkit.com/signup/your_short_name/.
Snippets And Pages
Snippets are click-to-insert template tags used to display information specific to each user within the text on your Pages and in mailings.
For example, if you wish to identify the user by name on a page or in a mailing, you would expand the User header under Snippets and select First name. The following Snippet of code will be inserted into your HTML:
{{ user.first_name|default:"Friend" }}
ActionKit can only display conditional content for recognized users. Users who aren’t recognized will see the default value defined for the specific Snippet. For example, if you insert First name an unrecognized user will see the default, 'Friend'. You can change the default value by typing over it when you insert it, but not universally for the Snippet.
Some Snippets don’t have a default value and you’d generally only want to use them in cases where the users who will see them have a value for the field. For example, it only make sense to use the average donation Snippet with past donors.
Note
Always view your page as a recognized user to make sure your Snippets are displaying as you’d expect.
The Snippets available for Pages are slightly different than those available for mailings, including the Confirmation Email. View the Snippets and the code they insert for Pages and mailings. You should be able to insert these available snippets anywhere on your page, including the page title.
You can define your own custom snippets to make it easy to insert frequently-used bits of text and code into your pages and mailings.
Spam Checking
Only relevant if you’ve enabled spam checking. Use this to tell ActionKit not to apply the checks to this page.
Targets
The U.S. House and Senate are automatically available as targets for Petition, Letter, Call or Whipcount page. Each state’s house and senate are also available, but have to be activated following the steps for Adding a new target group below before they will display in the Target Groups box. You can create a group from a subset of any legislative body (e.g. a particular committee) by following the same steps.
You can also create and select custom target groups. Custom targets can be anyone: Governors, school board members, CEOs, whoever you want. A custom target group can consist of one target or many.
Custom target groups can have the following jurisdictions:
City and state
City and country
County and state
State
Country
By default, All users is selected, which means all actions on the Page are directed to all targets in the group.
Groups with a jurisdiction work like legislative targets where the target only receives actions from their constituents. Specifically:
You can use snippets to show your users information about their target.
Only users who we know live in the states or countries specified can take action on a Call Page (you can provide a fallback URL for others). Recognized users see the correct target automatically.
Signature deliveries only include constituents.
You can use the target constituents checkbox as a shortcut to limit a Mailing to users in the states or countries specified.
For state and federal legislative targets, and custom targets with jurisdictions, certain address information is required to match each user to the right target.
For Petition and Letter Pages you don’t have to select any target, but of course you can’t deliver signatures without a target. Some signatures may be undeliverable if you add targets to the page later and you weren’t requiring the relevant information. When a user isn’t in the jurisdiction of any of the page’s targets (whether because the page has no targets or because the user lives in a different area) the page will not show an error to the user, but the signature will not be delivered.
For immediate delivery, only signatures submitted after the target is added to the page will be delivered. You can add targets later and deliver older signatures using batch delivery or e-delivery through the Mail tool.
Not all delivery methods are available for all targets. Read more about signature deliveries.
Call Pages require at least one target.
For state and federal legislators, the user’s district must be identified before we can display the phone number(s). As a result, Call Pages require a two-step process for user’s who aren’t recognized: first, the user submits the user form, then, the user sees the script and phone number. Recognized Users see the script and phone number immediately, unless we need additional address information to identify their district. If a user is outside the jurisdiction of all of the page targets, they will see an error message.
For federal legislators, you have the option to also or only display the local district office phone numbers for your targets. If you display both the user will see the D.C. office number and a link to “Local Offices”. If the user clicks the link, number(s) for the local office(s) are displayed, including the fax number. If you’d like to hide the fax, you need to edit the templateset.
There are checkboxes next to all target numbers so the user can indicate which target(s) they called and at which office. You can see which users called the local office in the core_callaction_local_office_checked table.
Tell-a-friend
If you enable the tell-a-friend widget for a page, your user is shown a box where they can fill in friends’ email addresses. They can also click a link to mail friends directly through their preferred email program.
The tell-a-friend options show on the thank you screen (and also on the action page for petitions). You can modify your Templateset to create a standalone TAF page.
If the user enters addresses through the widget, the friend will receive a message with the user’s email in the from line while the email is technically sent from your ActionKit domain (to improve delivery speed and reliability).
The user cannot edit the subject or the body of the message but they can add a short personal note. Snippets are available for these messages as well.
Alternatively, a user can follow the link to mail friends through their email program. This option opens the user’s default email program and prefills the body and subject (in the email programs that support this). The user will be able to edit the subject and body of the email in this case and the email will come directly from the user.
We don’t have an address sucker option, as we’ve found repeatedly in testing that this option depresses the action rate.
Note
Spammers may try to use these pages to send unsolicited email with links to their site from your good IP address. To block this misuse of your forms, the TAF widget won’t send any messages that link to a URL outside of the following: your domain, domains you’ve added, the URL in your original TAF message, or Youtube or Facebook. If a user includes a link outside these categories, that user won’t receive a Confirmation Email and none of their TAF messages will be sent. These rules apply to any ActionKit page, whether or not we’re hosting it.
You can see a count of how many tell-a-friend emails any user sends through the widget in the taf_emails_sent column in the core_action table. If the friend follows the link in the TAF message and takes action, the source of the action will be taf. Tell-a-friend emails sent through the user’s own email program aren’t included in the count.
To create your tell-a-friend message you must:
1 Check the Enable Tell-a-friend widget checkbox.
2 Enter the Tell-a-friend subject. This subject cannot be edited by users, unless they choose to email friends through their own email client.
3 Enter the Tell-a-friend body. Don’t forget to enter the full URL for your page in the body. (Use the “Full page URL” Snippet in the Snippet page section to insert this: {{ page.canonical_url }})”.
Templateset
Customize the look and feel of your Pages using Templates. Our templating system separates the graphic design work of creating pages with your organization’s style from the campaign work of setting goals, crafting your message, and creating content.
Templates define everything about the appearance of your pages from your page layout and colors, to the fields displayed in your user forms and the image for your thermometers. Each Page you create in ActionKit combines input from multiple Templates.
A Templateset is just a group of all the available Templates; each ActionKit Page combines input from multiple Templates.
To set a Page’s appearance you just select the appropriate Templateset from the dropdown on the Edit Content screen.
Title
Enter the title the user will see at the top of the web page.
User Form Fields
The Templateset chosen above determines what fields are in your user form, but you can override that for this page by checking Customize Fields. You can’t remove fields needed to process the action (e.g. a petition targeting your state senate requires the address field as we need it to identify the correct target). Read more in the required form fields section.
Otherwise, you can select the fields to be displayed and required, and their order. You can include, and require, any standard user field as well as custom user and action fields, if your templateset supports this.
If you see a red message informing you that some customization choices are not available, your developer or designer must update your Templateset to enable all options. The relevant changes are described here.
In any case, your user form field customization choices do not change how ActionKit processes actions.
Customize Fields
Check Customize Fields to see your default fields and customization options. Uncheck it to remove any changes you’ve made and revert to the default. Below we describe the full range of options available with a modern user form Template.
For the fields shown and any you add, you can set the field to be Always Required, Required, Visible, Visible If Blank, Visible Always, or If Needed:

Always Required: The user cannot submit on this page without filling in this field. Even if the user is recognized (e.g. came to the page from a link in a mailing with their AKID), and the user has a value for the required field, the user will still need to fill out this field. Available as an option for every field except Name, Email, and Custom HTML Fields. (Email is always “Required.”)
Required: The user cannot submit on this page without filling in this field. However, if the user is recognized (e.g. came to the page from a link in a mailing with their AKID), and the user has a saved value for the required field, this field will be hidden for the user. If the user is recognized and there is no saved value for this field, user recognition will be prevented, and the entire form will show as if there was no AKID in the URL string. Available as an option for every field except for Custom Action Fields and Custom HTML Fields.
Visible: If the user is recognized, the field will be hidden. If the user is not recognized, the field will show on the user form, but a user can submit without entering a value. Available as an option for every field except Email.
Visible if Blank: If the user is recognized, the field will only show on the page if there is no value saved for it. If the user is not recognized, the field will be visible, and a user can submit without entering a value. Available as an option for every field except Email, Custom Action Fields, and Custom HTML Fields.
Always Visible: If the user is recognized, the field will show on the page regardless of whether there is a value saved for it. If the user is not recognized, the field will still be visible, and a user can submit without entering a value. Available as an option for every field except Email and Name.
If Needed: This setting is pre-selected for address fields for Petition, Letter, and Call Pages to let you know that we’ll include these fields if required given the advocacy target you select. If the field is needed for action processing by ActionKit, it will be required even if you delete the field or change the setting. Available as an option for every field except Phone, Custom User Fields, Custom Action Fields, and Custom HTML Fields.
A few fields have additional options.
Name fields can be combined or separate. The Full Name field adds one form field titled Name to your form. You can set this to required or to First & Last Required. If you choose the latter, the user will get an error message if they only enter one name in the name field. With the former, ActionKit will accept a one word entry and save it to the first name field.
Select Separate Name Fields to convert the single Name to two fields titled First name and Last name. You can then set either or both to required.
The State/Region and Zip/Postal fields each combine two related fields, one for use in the United States and the other for international addresses. Templatesets typically use JavaScript to hide or show one of each pair, depending on which country the user has selected.
You can set these items to Required in US to mark the state or zip fields as required while leaving their international equivalents optional, or set them to Required if they should also be required for international addresses.
Select Separate Phone Fields to choose between a Phone field or separate Home Phone, Mobile Phone, and Work Phone fields.
You can use the sort handles to drag-and-drop fields into a different order, and you can click to delete fields you don’t need.
You can also add additional fields.
When using Always Required for a field that the user already has on file, only the JavaScript on action pages checks that a new value was provided with this action submit. In the future, we might check for that server-side as well.
Add Fields
At the bottom of the customize box, select from the dropdown to choose a field to add to your form.
Choose from:
User fields: A list of the available standard user form fields.
User custom fields: Your existing custom user fields. You must have already created the user fields, which you can do from the Users Tab. Once you’re selected your user field, you must select an input type. See below for formatting options.
Action custom fields: Custom action fields are the same thing as survey questions. These fields do not need to be created in advance. Just enter the label you’d like to display, the name you’d like the data to be saved under in the database, and select the input type. The name automatically starts with
action_because that is required to save information in this format.Custom HTML: If you need more control over the form input field, you can choose the Custom HTML Field option in the Add menu. Instead of choosing from the built-in input field types, this will allow you to enter a block of HTML code to be included in your form.
For example, if you wanted to prompt users for their birthday using two input fields for month and day, but wanted them to appear on a single line, you could add a custom HTML field with a label of “Birthday” and HTML containing two separate input tags. Or if you had developed a JavaScript-based widget that allowed users to click on a map to set their location, you could paste the HTML for that widget into a custom HTML field to have it included in your user form.
Read about the difference between the custom fields types.
Both custom user and custom action field types support the same input types as survey questions.
User Recognition
A recognized user (e.g. someone following a link from a mailing) won’t see the user form fields unless they’re missing a value for a required field.
For the purposes of user recognition, custom user fields are treated like core user fields: if they are required but missing, the user will not be recognized; and if the user is recognized, the custom user fields are not displayed.
However, custom action fields are treated differently: required custom action fields do not prevent user recognition, and custom action fields are not hidden when users are recognized.
Label Translation
When using user form customization, a foreign language page will still show translated field names when available. You can add translations for additional field names by including a definition for “field_fieldname” in each language you’re using.
The one exception to this is custom HTML fields, which do not use the field name translation system, but do offer a space in which you can enter the label text to use on the current page.
Page Type Specific
One-click (Petition)
In the Options section, click if you’d like to Enable One-Click Signing. This turns on a shortcut for recognized users, who sign the petition simply by clicking the link in a mailing, without entering any information. These users are directed automatically to the thank you screen and their action is recorded in the core_action table.
One-click signing makes it easier for a user to take action, increasing action rates. But it’s important to make it clear to users that they sign by clicking the link in the email.
Users who aren’t recognized will see the standard petition page with the content you entered and a blank user form.
And the one-click link only works once - subsequent clicks on the link take the user to the petition page to submit an action, just as they would for pages without one-click enabled.
Warning
You cannot use one-click if you are hosting your own pages.
Signature Deliveries (Petition & Letter)
You have several options for delivering your signatures to your target(s). Petition and Letter pages have an additional step where you can configure automated delivery by email, fax (if you have an InterFax account), or via the Communicating With Congress integration for pages targeting the US House.
You also have two non-automated delivery options. You can use the bulk delivery system to send manually when you wish, or generate a PDF for in-person delivery.
Call Pages in More Detail
Call pages walk the user through three main steps:
1. Fill out their contact information so ActionKit can find their target.2. Review a call script with talking points.3. Call the target and report back on how the call went.
What users see
On a typical call page:
Introduction and user form: For most call pages, users must enter enough address information for ActionKit to look up the correct target. Once ActionKit can match the user to at least one target, the page shows a three-step call process.
Step 1 – Review Script: Shows the script text you entered on the call page form. This is where you give callers key talking points or an example message.
Step 2 – Make the Call: Shows the target’s phone number(s) and a “Who did you call?” section. If the page is configured to show local offices, users see both local and main office number.
Step 3 – Report the Call (optional): Users see a text area where they can describe how the call went. This is often used to record how the target responded (support/oppose/undecided, or free-form notes).
Recognized vs. unrecognized users
Call pages behave slightly differently depending on whether ActionKit recognizes the user:
Recognized users: If ActionKit already has enough address information for the user, they can land directly on the three-step area and see the script and phone numbers immediately. If more information is needed to determine their district (for example, missing ZIP+4), they may still be asked to confirm their address before numbers are shown.
Unrecognized users: These users always start by filling out the user form. After they submit, ActionKit uses their address to look up their target(s). When a match is found, the page refreshes to show the script, target phone numbers, and the report-back question. If the user is outside the jurisdiction of all of the page’s targets, they will see an error message. You can optionally set a fallback page to redirect these users to a different action.
Behind the scenes (for advanced users)
You do not need to edit templates to use call pages, but it can help to know what’s happening behind the scenes.
Call pages have two main states:
Before a match is found – The page shows the introduction and user form, along with a short note explaining that the form is needed to find a phone number.
After a match is found – The three steps (Review Script, Make the Call, Report the Call) become visible, and the “Who did you call?” checkboxes appear under the target’s phone number(s).
The default templates use ActionKit’s text/ak-template blocks to switch between these states. Internally, ActionKit treats the page as “incomplete” until it has enough address information to look up a target. When the page becomes “complete”, those template blocks automatically reveal the script, target list, and report-back question.
For more detail on executable template blocks and the data they use, see “Executable ak-template blocks” in the JavaScript contexts documentation.
Fallback Page (Call)
If you’re targeting a state or federal legislator and a user who lives outside the district(s) lands on the call page they’ll see a message saying 'This action isn’t available where you live'.
Or, you can designate a fallback page to provide an alternative action for these users. For example, if your call page targets the two CA Senators, a user from NY could be directed to a related petition if you enter the petition URL here.
If you enter a fallback URL, be sure to test it. You can do so by entering a zip code that’s outside the district of any of the targets you selected for your call page.
The fallback page isn’t used if your target doesn’t have a jurisdiction in ActionKit. This includes the US President and custom targets without a state or country jurisdiction assigned.
Whipcount Responses (Whipcount)
Whipcount page creation includes an extra step called Whipcount Responses. This is where you set the source you’ll use to determine the targets’ positions and some related settings.
First you pick a Result Source. The choices are:
User submitted - If you select this option, all targets will show Unknown, call now! in the stance column until enough users submit the same response, according to the choices you make in the User Submitted section.
This option is selected by default when you create a new page because this is the standard approach to whipcount campaigns.
User submitted with admin overrides - This option is the same as user submitted, except that you can set the position yourself, instead of using the data your users provide, for one or more targets. You do this in Whipcount Response Overrides.
A use case for this option is if you’ve got staff meeting with legislators and you want to override the stance submitted by users where it doesn’t match what you’ve heard directly from the legislator.
Admin configured - If you select this option, you should set overrides for every one of the page’s targets. If you don’t set an override for one or more targets, they’ll show Unknown, call now! no matter how many calls are made.
This option is most useful if you want to create a thank and spank action.
User Submitted
Here you set two parameters that control which results are shown to users:
Minimum calls - Minimum number of reported calls before results will be displayed. Avoids one user controlling all the results.
Minimum response agreement - Percentage of calls that must agree before results will be displayed. Use to improve your confidence in the reported results.
Once the responses for a target meet these minimums, the target’s row on your page changes color (red or green) and the stance column changes to Supportive or Opposed as appropriate.
This section is not shown if you choose Admin Configured.
Whipcount Response Overrides
When you want to set the stance for a target yourself, just select the target from the dropdown on the left then select the appropriate stance.
Select Edit all target responses at once. to see a screen where you can scroll through the full list of targets and set overrides instead of selecting each target one by one.
Once you set an override, the target’s row on your page changes color (red or green) and the stance column changes to Supportive or Opposed as appropriate. Users can still call the target, but the responses they enter will never change the result for a target with a response override.
Whipcount Redirect URL (Whipcount)
You can easily ask your users to make multiple calls. The whipcount template in the Original Templateset has some special code that you can trigger by setting the Redirect URL on the After action screen to the Whipcount page’s URL. If you do this, the user will see thank you text, followed by the list of results so they can select and call again. Edit the template to change the thank you text.
User Signature Template (LTE)
When your user submits an LTE, ActionKit appends their contact information and emails the letter to the newspaper chosen.
Using the default user signature template, the user information, or signature, looks like this:
First Last
Number Street
City, ST Zip
(XXX) XXX-XXXX
You can change the format by creating a new user signature template and selecting it from the drop down in the User signature section on the Action basics screen. You add a new template by clicking the :green: + or under Other on the Pages Tab.
The default user signature template looks like this:
{% if user.first_name %}{{ user.first_name }} {% endif %}

{{ user.last_name|default_if_none:'' }} {{ user.address1|default_if_none:'' }} {% if user.city %}{{ user.city }}, {% endif %}

{% if user.state %}{{ user.state }} {% endif %}

{{ user.zip|default_if_none:'' }} {{ user.phone|default_if_none:''|format_phone }}
Snippets can be used in signature templates. They are not clickable so you need to cut and paste the snippet into the template. Use snippets to include information like occupation in the signature by creating a custom user field for occupation and adding the field to the user form in the LTE template. Then add {{ user.custom_fields.occupation }} at the bottom of the signature template.
Take action using the email address you use to log in to the admin UI to view a sample letter as it will appear to the editor. This is particularly useful if you customize the signature. The email will start “This is a preview of the message that would be delivered” and include the content you entered in your letter. To submit an LTE to a paper yourself you must submit with a different email address.
Newspaper Types & Phone Numbers (LTE)
You can select which types of newspaper you’d like your campaign to target:
National (papers with circulation greater than a million),
Regional (circulation between one hundred thousand and a million), and/or
Local (circulation less than a hundred thousand).
Make sure to check at least one paper type!
If a user submits a letter to a paper, then comes back to the same page to send another LTE, only the papers the user hasn’t sent to will display.
Display Phone Numbers (LTE)
When enabled, this feature will display the phone numbers of the newspapers.
LTE User Form Fields (LTE)
Address and phone number are required for LTE pages. Most newspapers of any type will not consider letters without these. The Customize Fields section is still accessible on the Edit content screen because you can add additional fields.
Users who are following a link from a mailing will see a blank contact form unless we already have all this information in the database.
Canned Letters (LTE)
LTE Pages have an additional section on the Edit content screen where you can provide your users with pre-written letters to use as inspiration.
Papers which get obvious form LTE submissions are not likely to publish them so you may want to include obvious prompts in your canned letters, like [INCLUDE YOUR OWN EXPERIENCES WITH ISSUE X HERE]. Alternately, canned letter paragraphs can be a series of prompts, like 'When I heard about Senator X’s stance on the jobs bill, I… '
By default, we provide space for up to three canned letters, but you can add more.
Question Builder (Survey)
The Edit content screen for Survey Pages includes the standard introduction and thank you text boxes, and is also where you compose your survey questions.
In the top-right corner of each question area is a Sort handle, which you can drag to rearrange the order of the questions in a survey. There’s also a checkbox here for deleting a question. Check the box and submit to complete the deletion.
Type your question in the Question Label box, just as you’d like it to appear on the page (including a ? if you want one to display).
Choose a type of user input field in the Question Type menu:
Custom HTML
Keyboard Entry
Text
Number
Single Selection
Select Menu
Radio Buttons
Multiple Selection
Checkboxes
Multi-Select List
Upload
File Upload
The selection of a “question type” determines which other fields are visible.
Structured Question Types
If you choose any question type other than Custom HTML, you will see these two options:
Field name: Enter the name under which user responses will be saved in the core_actionfield table and displayed by the survey downloader. The name should only include letters, numbers, and underscores (no spaces or other characters).
Required: If you check this checkbox, users will not be able to submit the survey without entering a value for the question.
There are some additional options which show up only for certain question types:
Text: You can set the field width and height if you’d like to override the defaults set by the templateset you selected for this page. You can also enter text in the placeholder box to give user’s additional guidance on what to enter.
Number: You can set the field width and a range for accepted responses. If a user submits a number outside of the range they’ll see an error message. This is not supported in all browsers.
Single or multiple selection types: Use the Values box to enter choices for the user to select from. Enter one or more values, each on their own line. You can use an equals sign to separate a short database code from a user-readable label. For example, if you enter “Y=Yes”, the user would see the option “Yes”, but the value stored in the database would be “Y”. You can also use this feature to define a “blank” value by placing an equals sign at the start of the line, like “=Choose One”. In that case, the user would see the option “Choose One”, but the value submitted to the server would be blank. If the field is marked as required, blank values are not accepted and the user will be prompted to select a value.


File Upload: You can choose which types of files users can upload, and specify a directory name to use when the files are uploaded to your S3 bucket.
Custom HTML Fields
If you choose “Custom HTML”, you will see a Question HTML box to enter the HTML markup that will be shown to the user and collect their response.
There are several requirements that must be met for the Question HTML or your page will not function correctly. See examples below.
Response options must be written as HTML. You can provide the user with choices in a drop down menu or checkboxes, or you can create a text field where users can enter a free form response.
Response options must specify the name you’d like to assign to each question. The name can only include letters, numbers, and _ (no spaces or other characters). You don’t define the name first.
Response options use the correct syntax when naming the input fields:
name="action_QUESTION_NAME_HERE".
Warning
If you are using a Custom HTML question, user responses will be permanently and silently lost unless your input fields include the question name with action_ in front of it (for example, name="action_QUESTION_NAME_HERE").
Please test your data capture by submitting a response, downloading the results at Reports > Download a survey, and checking for your response.
Advanced Examples
For examples of some cool things clients have done with surveys, including requiring certain questions to be completed, saving responses in a list format, or shuffling the order in which questions are displayed, see the examples in advanced templates.
HTML Examples
Here are two examples of questions, each shown first as a structured question type, and then using equivalent custom HTML:
Question label: “What was the first record album you bought yourself?”
Question type: Text / Field name: album / Field size: 50 spaces wide and 1 rows high
Custom HTML:
<input name="action_album" type="text" size="50">
Question label: “What’s your favorite color?”
Question type: Select / Field name: color / Alternatives:
=
red
green
purple
Custom HTML:
<select name="action_color">
  <option></option>
  <option>red</option>
  <option>green</option>
  <option>purple</option>
</select>
Minimum Amount (Donation)
Users will not be able to make a donation in an amount less than your minimum. Often this is set to an amount that just covers the transaction fee charged by your vendor.
Payment Accounts (Donation)
To accept donations in ActionKit you must have a payment account with a vendor we integrate with. You can accept credit cards through ActionKit donation pages with a traditional merchant vendor account with Braintree, Authorize.net, PayFlow Pro or PayPal. You can also accept PayPal payments where the user logs into their own PayPal account and pays with their preferred method with a standard PayPal account.
ActionKit records each donation and generates a request to the vendor, asking them to process the donation and deposit the funds in your bank account. We also provide an interface for prompting changes (like refunds), so these are captured in your ActionKit database as well.
PayPal (Donation)
Note
This section references PayPal’s standard payment product, not PayPal’s PayFlow Pro.
ActionKit’s PayPal implementation offers support for both traditional CC processing (like that provided by Braintree, Auth.net and PayFlow Pro) as well as paying via PayPal accounts. Users set up their PayPal accounts to use whatever payment method they prefer (e.g. credit card, bank account). When users pay via PayPal accounts they are redirected to the PayPal site and then back to ActionKit after they approve the payment.
Read more about our PayPal integration.
Suggested Ask Formula (Donation)
You can customize the suggested donation amounts shown to a previous donor based on that user’s giving history.
Recognized users will see a suggested donation and any larger amounts you enter on the Edit content screen. You define the formula used to set the suggested amount, basing it on the donor’s highest previous gift, 2nd highest gift, average gift,most recent gift or total over a particular time period. Imported donations are included.
You can also insert the same ask amount in a mailing using the suggested ask Snippet in the mailer.
To read more about defining the formula used to set this amount, read Suggested Ask Rules.
Allow International Addresses (Donation)
If you wish to accept credit card donations from users with international addresses, you must:
1 Select the Allow international addresses checkbox.
2 Turn off AVS with your merchant vendor.
3 Modify your donation page template to include country.
International addresses will not be accepted unless you’ve completed all three steps.
Donations must still be in U.S. dollars unless you are set up to receive donations in other currencies as outlined below.
ActionKit still requires state and zip if the user selects the United States as their billing country. Neither postal nor region are required if the user selects any other country.
Users with JavaScript will see the correct fields when they switch countries. Users without JavaScript will see all four fields (region, state, zip and postal) all the time but if they fill out extra fields they will be ignored.
Accept ACH Payments (Donation)
If you use Braintree as your merchant vendor, you can accept transfers from U.S. bank accounts using ACH Direct Debit. Before you can process these payments, you will need to do some setup as described here.
Accept Foreign Currencies (Donation)
To accept donations in other currencies you need to use Braintree as your merchant vendor. You’ll need to do some additional set up with Braintree for each currency you wish to accept. Then you can create Donation Pages, send mailings, generate reports, etc. using the currency. The set up is similar to using other languages; donation campaigns will generally need distinct Pages and mailings per currency. Details, including how to get started are at currencies.html.
Products (Donation)
ActionKit provides basic support for product sales and give aways. Products can be premiums, merchandise for sale, or something less tangible (for example, ‘adopting’ an endangered tiger).
Products are used with donation pages. If you have set up any products, you’ll be able to select them in the More options section on the Action Basics screen when you create your page.
The default layout offers users options to select a product and to make an additional donation. You can change the layout, offer products with no option for an additional donation, or allow users to donate without selecting a product on a page with products by editing the donate.html template.
Our product system is not designed to function as a storefront. If you need shipping and tax calculations and fulfillment tracking, we recommend using an external storefront and integrating the data using our API.
Candidate Donations (Donation)
Use this option to create bundling pages for candidates. You need to add Candidates first before they’ll be available for inclusion on a Donation page.
The end user fills in the amount they’d like to give to each candidate and there’s an option to make a regular donation to your organization.
In the Original Templateset, employer and occupation are automatically required for Pages with candidates. PACs can easily copy the code to require these fields everywhere or you can use it to adapt your Templatesets for bundling for non-federal races with different rules.
Fraud Filters (Donation)
Fraudsters will sometimes use Donation Pages to test whether stolen credit cards are functional or not. These carding attempts can incur transaction and chargeback fees for your organization.
Clients who use PayFlow Pro, Authorize.net or Braintree as their payment gateway can set global- and per-page fraud limits.
The fraud scores are generated using the MaxMind minFraud service. We incur a small charge for each fraud score calculated, but do not pass that charge along to you.
MaxMind looks at a lot of factors: whether the user’s IP address is that of a known fraudster, whether the country of the card issuer matches the user’s current location, HTTP request headers that can help tell automated scripts from real users, and more.
The filters can reject some real donations although the benefit of avoiding fraud may outweigh any donations lost, especially if you’re having a problem with fraud.
The filtering process logs details to the core_donationattemptlog table, where you can review exactly how many attempts were rejected and the details of the rejections.
By default, ActionKit blocks donations from IPs in 5 high risk countries: Brazil, Estonia, Ghana, Nigeria, and Vietnam. If any of those are high value for your organization, we can remove those countries on a per-client basis. Note that this comes with an increased risk of carding attempts, which can incur transaction and chargeback fees.
Read more if you want to enable fraud filters for your instance.
Donation User Form (Donation)
Unlike other page types, donation pages do not use the user form template. Instead the form is part of the donate template.
Donation pages always require the user to enter all of their contact information. By default they do not require the credit card CVV, if you use Authorize.net or Braintree, and you’ve changed your settings so this isn’t required by your merchant vendor. It is required by default by both vendors, so if you remove it from your ActionKit form without changing your settings, donations will fail.
Note
Always test changes to your donation templates by making real donations through a donation page that uses the template with the changes. This is the only way to be sure relevant donation pages are still working.
Amount Options (Donation)
You can select an amount as the default, which means it will be pre-selected on your page.
If your page also uses a Suggested Ask formula, here’s how these amounts and the Suggested Ask amount interact:
For users who aren’t recognized by ActionKit, the donation amounts entered here will be displayed. Read about which users will be recognized.
For recognized users who have never given, the Suggested Ask amount is used in place of the lowest amount on your list. The amount under Make ask amount in the Suggested Ask Conditions section for the top row is used.
For recognized users who have previously given, the Make ask amount column shows the lowest suggested donation that will be shown to all users with a total less than the amount in the first column for whichever criteria you select (e.g. Highest Donation); all larger donation amounts entered here will show as well.
For example, if your formula is based on the donor’s Highest Previous Contribution (HPC) and the user has an HPC of $150 and the suggested ask is $175, the amounts shown on the page will be $175 and any donation amounts that are larger.
There is an exception to this rule. If the donor would only see one or two donation amounts on the page because the Suggested Ask is higher than all but one donation amount, ActionKit will display all of your donation amounts (just as if the user wasn’t recognized).
For example, if a user has an HPC of $1000, the Suggested ask amount is $500 in the default formula. If the largest donation amounts entered in this section are $500 and $1000, the user would only see two suggested amounts. Instead they will see all the amounts you enter in this section.
Recurring Donations (Donation)
A Recurring Donation is a commitment your user makes to give a donation automatically on a regular basis, like monthly. Through ActionKit you can accept recurring donations by credit card, US bank transfer (ACH Direct Debit), or from the user’s PayPal account. You must sign up for recurring billing with your payment processor. Most payment processors consider recurring billing a distinct product from one-time payments. ACH Direct Debit recurring payments are handled directly by ActionKit, but you must sign up for the ACH beta program with Braintree.
By default, users are charged on the same day of the month each month by the merchant vendor. ActionKit will show the payments immediately or the next day, depending on which merchant vendor you use.
By editing your Donate template and depending on your merchant vendor, you may be able to adjust the billing date (e.g. to the 1st of each month) or change the frequency (e.g. to weekly or yearly). You can also edit your template to create a recurring only page.
Default Page (Unsubscribe)
One unsubscribe page will be used as your organization’s default, which means it will be automatically included in email wrappers. You can link to a different unsubscribe page by editing the wrapper or you can change your default unsubscribe page. All wrappers must link to an unsubscribe page.
Just select Use In Mail Wrapper under Unsubscribe Options on the Action basics screen for the page you want as the default. This will replace whatever page was previously selected as your default unsubscribe page.
Data and Reports
Data Capture 101
Table Structure
Most tables include a field called “id”, which is a unique identifier (e.g. id is a field in the core_user table that goes up by 1 each time a row is added). Other tables that include the same field reference it using part of the table name (e.g. user_id is a field in the core_action table that tells you to look in the core_user table under that id to find out who took a specific action).
Most tables include a created_at field that shows the timestamp in UTC when each id was added to the table. Many also include an updated_at field, which shows the last time information in this table was updated.
This table shows the relationships between key tables.
Users
A user is a unique email address. ActionKit doesn’t have any concept of a person. It isn’t possible to have a user with two email addresses or two users sharing an email address.
Anytime a new email address is entered on a page, a row with a unique id is added to the core_user table. A row is also added to the core_action table. The value in the created_user field is “1” if the email address is new to your database. The value in the core_action source field will be saved to the user’s source field in the core_user table. See Action sources for more information.
User Info
Basic information about each user is saved to core_user, including email, name, address, and language.
Address info entered by the user is saved after address and zip clean up. If possible based on the address info entered, Legislative districts and physical location values are saved to the core_location table.
Phone numbers are saved in core_phone. You can include phone and/or mobile_phone as a field in your user form. ActionKit will automatically write the user entry to the core_phone table with phone type ‘home’ or ‘mobile’, respectively.
Any contact information submitted using an existing email address will be saved under the user id associated with that email address. New information overwrites existing information (for example, if an existing user enters a new address it will overwrite the old address), except:
A contact field (such as, name, address, zip, etc.) with data is usually not overwritten with a blank.
But a blank is saved over existing data for an address, if the user enters a new zip and a blank address. We save the blank because usually this means that the user has moved to a new zip code and the old address is bad.
New address data is saved in core_user. The old address is saved to core_useroriginal.
Users And Lists
When a user takes action, the user is added to the mailing list associated with the page if they are not already on it. The subscribed_user field in the core_action table will equal 1 if the user is new to the list.
List membership is recorded in the core_subscription table. Only users who are subscribed to at least one list are in this table. Each user has one row for each list they are on, so if a user is on three lists, that user will have three rows in this table.
If a user is subscribed to at least one list, the value in subscription_status in the core_user table is subscribed. Only users with this status can be mailed through ActionKit. Other possible statuses are unsubscribed and bounced.
Every change in the user’s list membership and subscription status is saved to the core_subscriptionhistory table. This table shows the type of change (e.g. subscribed by an action on a page, subscribed through the uploader, unsubscribed by marking a mailing as spam, unsubscribed by a staff user). Not all changes in a user’s status and list membership are the result of an action on a page, but most are and these show the action_id associated with the change. See Data capture details for more information.
Pages
Pages are created through the admin interface or the API. Basic information about each page is saved to the core_page table with the page type, name and title, creation and last update dates, as well as some basic settings like list_id and whether the page is hidden. Page content is saved in the CMS tables.
Actions
An action is created when a user submits on a page, when you process an action using the API, and for each row you successfully import using the uploader.
For each action, a row is added to the core_action table with the user id, page id, timestamp, and action source . You can see a history of every action taken by every user in this table.
If a page does not allow Multiple responses and a user submits more than once, later actions override the first action instead of creating additional ones.
Action And User Fields
There are two field types you can use on any page to capture additional data:
Action fields - Designed for uses like survey questions, where you may want to capture multiple responses per user. The field name, the user response and the
action_idare saved to core_actionfield each time an associated action is saved. See Survey data capture for more information.
Custom user fields - Designed for information you want to associate directly with a user, where you want the value to be overwritten with new entries (for example, occupation). The field name, the user response and the
user_idare saved to core_userfield; the old response is overwritten every time the user submits a new response. See custom user fields for more information.
General Reports
Compare Pages
Select one or more pages and view this report to compare the following statistics for each:
Total Actions
Total Donations
Avg. Gift
Total People
New Members
Total Clicks
Conversion Rate
Download Actions
You can download a CSV of all actions on any page using the Action downloader. By default the report includes the user_id, action timestamp and any actionfield values. You can append user information and limit the time period for the results returned.
Action Rates: Monthly Progress
View action rates to see actions by subscriber and in total per month.
Page Type Specific Data
Petition And Letter
Each time a user adds comments to a petition they are saved to a row in the core_actionfield table (associated with the user’s action in the core_action table). The field is named comments.
The letter the user submits, with or without edits, is saved to the same field.
You can see a list of the comments by running the Comments by Page report.
Call
When a user submits on a call page, a row in core_callaction_targeted will link the action to the target. If the user checks who they called, there’ll also be a row in core_callaction_checked.
If a user fills in the user form and submits, but then doesn’t submit on the call screen where we show the phone numbers and script, an action is still added to the core_action table, but the status is set to incomplete.
For your convenience there is a Call Page Dashboard report which displays the number of actions submitted on a call page by advocacy target.
Whipcount
Call results are captured in core_whipcountactioncalled. The table shows the target_id, the action_id and the response recorded for the target’s position. Joined to core_target for information on the target for each row and core_action for the user_id of the person who made the call.
LTE
Use the LTE downloads report to download all the letters written for a particular page. Use the LTE basics report to see summary counts for a particular page, including # of letters, # of users, # by state, and # by newspaper.
Survey
As with other pages, every time a user submits on a survey page an action is created. The user’s responses are associated with the action, not directly with the user. The id of the user’s action on the survey page is the same as the parent_id in the core_actionfield table. The name of each question is saved to core_actionfield.name while responses are saved to core_actionfield.value.
Users may submit more than one value for the same field. For example, when you are using checkboxes or a multiple select.
Users can also take action on a survey page more than once and each time the responses will be saved.
The question and the response are saved together as users take action. As a result, the names in the core_actionfield for a particular survey page will not include every question name until every question has been answered at least once. Questions to which no one has responded won’t show up in the table, nor will they appear in a downloaded CSV of the survey results. If you submit a response with every question filled in, the download will include every possible field.
You can download survey responses using the action downloader, which will include a column for each question.
Donation
Donations in ActionKit are a type of action so all the standard action data like user_id, page_id, and action source are saved to the core_action table for each donation attempt.
Donations are more complicated than other action types though and a number of tables are involved. A row is also added to the core_order table with donation specific information including the amount. If the donation was processed through ActionKit (not imported) a row is added to core_transaction with information from the merchant vendor if the transaction failed. If the donation was imported, a placeholder row is added to the core_transaction table with the account field set to import.
A row is added to core_orderrecurring when a new recurring commitment is created.
Read about the information available in each table and how to view specific donation categories (failed attempts, product orders, recurring donations, etc.) under data capture details.
The following donation reports are built in:
Unsubscribe
The Unsubscribe Reasons report shows comments left by users in response to the question 'Why are you leaving?', if your page includes that. The results are stored in a custom action field associated with the unsubscribe action.
QA Your Page
This section contains the follow topics:
Testing Overview
As soon as you save a page in ActionKit it’s "live", meaning any user who ends up at the URL can see the page and take action. Of course, users generally don’t find a page unless you’ve shared it by sending an email or linking to it from your website or sharing it on Facebook or another public forum.
Always test a page before you share it with your users and again if you make changes.
You may want to do additional testing for specific cases.
If you’re using a new, untested templateset, your testing should be more extensive and involve multiple browsers. Read about templateset testing here.
For most page types, when you test your page, your actions are recorded just as your user’s actions are. You can confirm that the data you entered was recorded in the database.
Finally, you may want to check optional elements you’ve included like snippets and taf.
Snippets Testing
If you use Snippets on one of your content pages, you may want to view the page as a few different users.
For example, say you’re asking a small group of top members to take part in a whipcount calling campaign in advanced of an important vote. You want to with "Dear first_name" with a fallback to "Regional Leader" if the user doesn’t have a first name in the database. You click to insert the first_name Snippet in the Introduction text box and then delete the "Friend" default text, intending to replace it with "Regional Leader", but you get a call and forget to replace it. If one of your targeted users doesn’t have a first name in the database, they’ll just see "Dear" in the introduction.
In this case, you might want to check what the page will look like for a few of the regional leaders you’re emailing about the action.
You have several options for viewing as a recognized user.
TAF Testing
The tell-a-friend functionality is built into the templateset, so if you’re using a set that’s already been tested it’s usually sufficient to simply view and the proof TAF message for your page.
However, it never hurts to test this and viewing the actual TAF email is the best way to confirm that you included the correct action page URL.
Test this by:
1 Fill in an email address for an account you can check. This can be the address you just took action with.
2 Submit the tell-a-friend.
3 Go to the inbox for the email you just used and make sure you received the TAF and that the link you included takes you to the correct page and includes a referring akid and source. It will look something like this: http://docs.actionkit.com/?referring_akid=.1.qgzMpZ&source=taf
Data Capture Testing
As with TAF’s, the functionality that records an action and the associated data is built into ActionKit and generally can’t be "broken" by changes you make while creating a page. (Although this is one reason you need to test new templatesets).
Data capture testing is still a good idea and particularly important for survey and donation page types. We’ve outlined more information about how to check the data under the page type in Testing Protocol by page Type.
The query below is useful for confirming basic data capture for any page type:
SELECT cu.first_name, cu.last_name, cu.zip, ca.created_at as action_date, ca.source as action_source
FROM core_user cu
JOIN core_action ca on (ca.user_id=cu.id)
JOIN core_page cp on (cp.id=ca.page_id)
WHERE cp.name={page_name}
Viewing As A Recognized User
When you follow a link in Pages to view a page, you see what the page will look like for a user who isn’t recognized. Most often an existing user will follow a link in an email from you to reach your page and ActionKit will recognize the user.
For most basic testing, you don’t need to view the page as a recognized user. But here too, when you’ve got a new templateset or you want to test something specific, you may want to see what a recognized user will see.
You have two options:
You can create your draft email and send yourself proofs. Follow the link to the page in the proof to view the page as the user specified in the to line of the proof mailing.
Or
Search for the user by name or email or other criteria from the Users tab. Click through to the user record. Copy the akid shown under the user name. Return to the URL of your page. At the end of the URL, after the final "/", append “?akid=” and paste the token. The URL will look like: “http://docs.actionkit.com/?akid=.1.qgzMpW”. The page will show what this user will see if they follow a link to the mailing. You can repeat this for as many users as you’d like.
In either case, you should be careful submitting. ActionKit thinks you are the recognized user, so if you submit, an action will be recorded in the recognized user’s name and they’ll receive a Confirmation Email if you’ve set that up for the page.
If you want to view the Snippets on the thank you screen or a Confirmation Email for a user aside from yourself, it’s best to do that as another staff user.
Testing Protocol By Page Type
Signup Testing
Signup pages are the most basic.
1 View the page by clicking View for the page in the Dashboard or the Browse All listing, or by clicking View on site on the page edit screens.
2 Proof the page and check the appearance. Hit the back button and then select the appropriate step at the top of the screen to make changes.
3 Fill in your contact information and submit. If you’ve changed the required fields you can try submitting without information you expect to be required. You should see an error message like
Zip required.4 View and proof the thank you page.
If you entered a Redirect URL in your page, confirm that you land on the correct page.
If you enabled tell-a-friend, proof the tell-a-friend subject and message. Send yourself a tell-a-friend to confirm the functionality.
If you entered a goal, confirm that a thermometer is displayed and that the goal is correct. Results are cached briefly so it may be a few minutes before the action count on the thermometer increases.
5 Check your inbox for a Confirmation Email if you enabled this option. If you haven’t received one you should:
check your spam folder,
return to Confirmation Email set up and confirm that this options is enabled.
If this condition persists report a bug through the ActionKit support form.
6 Proof and test links in your Confirmation Email (if there are any).
Petition And Letter Testing
Petition and letter page testing has an additional step for signature delivery.
1 View the page by clicking View for the page in the Dashboard or the Browse All listing, or by clicking View on site on the page edit screens.
2 Proof the page and check the appearance. Hit the back button and then select the appropriate step at the top of the screen to make changes.
3 Fill in your contact information and submit. If you’ve changed the required fields you can try submitting without information you expect to be required. You should see an error message like
Zip required.4 View and proof the thank you page.
If you entered a Redirect URL for this page, confirm that you land on the correct page.
If you enabled tell-a-friend, proof the tell-a-friend subject and message. Send yourself a tell-a-friend to confirm the functionality.
5 Check your email for a Confirmation Email if you enabled this option. Proof and check links (if there are any).
6 If you enabled a signature deliveries option on your page, and you took action using the email specified in the delivery section (the one you used to log in to the ActionKit admin) and that email is in the target’s district, you’ll receive an example email. The subject line of the email will contain the prefix “[Batch delivery proof]” or “[Fax delivery proof]”. “This is true for immediate and batch delivery. Any conditional content, like a comment, will be taken from your action.
Call Testing
Be sure to submit as a user who lives in the district of your page target.
1 View the page by clicking View for the page in the Dashboard or the Browse All listing, or by clicking View on site on the page edit screens.
2 Proof the page and check the appearance. Hit the back button and then select the appropriate step at the top of the screen to make changes.
3 Fill in your contact information and submit. If you’ve changed the required fields you can try submitting without information you expect to be required. You should see an error message like
Zip required.4 View and proof the script text. Confirm that your target is who you expect given the address information you just submitted.
5 By default call pages include a survey question where the user can tell you how it went. You can confirm that responses are being captured by submitting something in the field, then selecting Download Actions on the reports tab and entering the page short name.
6 View and proof the thank you page.
If you entered a Redirect URL for this page, confirm that you land on the correct page.
If you enabled tell-a-friend, proof the tell-a-friend subject and message. Send yourself a tell-a-friend to confirm the functionality.
7 Check your email for a Confirmation Email if you enabled this option. Proof and check links (if there are any).
8 If you enabled the Fallback page functionality, complete the steps above again, using a zip code that is not represented by the the targets you selected for this page. Make sure the fallback page is the one you expect.
For example, if your call page targets CA Senators, and you’ve selected a fallback page, take action using a Nevada zip code and you should see the fallback page instead of the script and call targets.
LTE Testing
When you test an LTE page, use your staff email address and a letter won’t be sent to the newspaper.
1 View the page by clicking View for the page in the Dashboard or the Browse All listing, or by clicking View on site on the page edit screens.
2 Proof the page and check the appearance. Hit the back button and then select the appropriate step at the top of the screen to make changes.
3 View and proof the LTE screen including talking points, writing tips and canned letters, if you included any of these.
Check that your display matches the settings selected in Action basics:
Newspaper types - Make sure the papers shown match your selections among national, regional and local papers.
Phone numbers - Confirm that the paper’s phone number shows if you selected this option.
Select a paper, enter a subject and message, and submit. Remember that you’ll receive an error message and be unable to submit unless your message is at least 15 characters long.
4 Fill in your contact information and submit. Be sure to use the email address you used to log into ActionKit, if you’d like to see a proof of the final letter. Be sure to use a different address if you want to submit a letter yourself. LTE’s always require a full address and phone number.
5 If you’ve added any fields and made them required, or if you just want to check that requirements are working correctly, submit without complete information. You should see an error message like
Zip required.6 View and proof the thank you page.
If you entered a Redirect URL for this page, confirm that you land on the correct page.
If you enabled tell-a-friend, proof the tell-a-friend subject and message. Send yourself a tell-a-friend to confirm the functionality.
7 Check your email for a Confirmation Email if you enabled this option. Proof and check links (if there are any).
8 If you took action using the same email address you used to log into the ActionKit admin, you should receive a test mailing. The email will start “This is a preview of the message that would be delivered…” and include the content you entered in your letter.
9 Confirm that the signature appears as you expect given the LTE signature template chosen for this page.
Survey Testing
Testing is particularly important for survey pages because you need to confirm not only that the action works and looks as you expect but that user responses are saved to the database for future reference. We will warn you if your advanced HTML survey question does not include user_ or action_, the two field names that will prompt ActionKit to save a response, but still be careful!
1 View the page by clicking View for the page in the Dashboard or the Browse All listing, or by clicking View on site on the page edit screens.
2 Proof the page and check the appearance. Hit the back button and then select the appropriate step at the top of the screen to make changes.
3 Check the display and response options for your survey questions.
4 Select or enter responses as appropriate, fill in your contact information and submit. If you’ve changed the required fields you can try submitting without information you expect to be required. You should see an error message like
Zip required.5 View and proof the thank you page.
If you entered a Redirect URL for this page, confirm that you land on the correct page.
If you enabled tell-a-friend, proof the tell-a-friend subject and message. Send yourself a message to test the tell-a-friend functionality.
6 Check your email for a Confirmation Email if you enabled this option. Proof and check links in the email (if there are any).
7 Confirm your responses were saved. To do this, go to the Reports tab, click Download a Survey and pick the survey from the dropdown.
If your responses were not saved, return to the Edit Content screen. Confirm that the field names under Question HTML start with action_ and that the HTML is correct.
Donation Testing
The only way to test a donation page is to submit an actual donation using a real credit card. Merchant vendors offer a sandbox where you can test with a fake credit card number, but there may be (and often are) differences between the sandbox code and the live code used to process your donations.
Important
Please note when testing or when processing multiple manual donations that we have built in a delay time between donations to protect the user from erroneously clicking the submit button on a slow donation form. The default is 5 minutes. You can change this and other organization-wide default settings from the CONFIG.
We outline below how to refund your test donation afterward.
If you’ve enabled a Suggested Ask Formula in for your donation page, we suggest running additional tests as a recognized user.
1 View the page by clicking View for the page in the Dashboard or the Browse All listing, or by clicking View on site on the page edit screens.
2 Proof the page and check the appearance. Hit the back button and then select the appropriate step at the top of the screen to make changes.
Make sure the suggested donation amounts are what you expect.
If monthly giving is enabled make sure you see both the monthly and one-time donation options.
If this page is associated with a product, be sure the product is shown with the appropriate text and images.
3 Donation pages require users to enter complete address information regardless of the settings in the Action basics screen.
If there is a shippable product on the page, shipping address is also required.
If you’ve required additional information or you want to test the required field functionality, you can try submitting without information you expect to be required. You should see an error message like
Zip required.4 Enter the required information and a valid credit card number then submit.
5 View and proof the thank you page.
If you entered a Redirect URL for this page, confirm that you land on the correct page.
If you enabled tell-a-friend, proof the tell-a-friend subject and message. Send yourself a tell-a-friend to confirm the functionality.
6 Check your email for a Confirmation Email if you enabled this option. Proof and check links (if there are any).
7 If you’d like to refund your test donation:
Search for yourself using your name or email from the Users tab.
Click on the User’s Action History link near the bottom in the left column.
Find the action row for the donation you just made and select Refund.
Unsubscribe Testing
If you have multiple mailing Lists, we suggest running additional tests as a recognized user.