Mailing Tools
Find the following Mailings related tools in the sidebar on the right on the Mailings tab.
Browse All
This screen displays the same Summary Data as the dashboard except the status column indicates whether it is a draft, scheduled, or sent mailing. Recent change timestamps are not displayed for drafts.
From this listing you can:
- Filter mailings by status (draft, scheduled, completed, recurring, etc.), send start, and tag using the toolbar on the right.
- Search by key word and sort the list by specifying Order By and Descending or Ascending and clicking Search.
- Stop a mailing while it's sending; the stop link disappears when the mailing has been sent to everyone.
- Show hidden or disabled mailings by clicking Show Hidden.
- Remove a listing by clicking Hide.
- Create a new draft mailing by coping an existing mailing.
- Bulk edit mailings to show hidden mailings or add/remove tags from mailings.
Advanced Search
Advanced Search provides considerably more options than browsing all.
To perform an advanced search:
When browsing all, click the Advanced Search button at the top of the results page; or click the Advanced Search button from the Mailings tab.
The default is All records which will show you all the mailings in your database. To limit this Add a Filter by selecting from the dropdown. You can set a sort order if you'd like. Then click Search.
Filter Options
The filter options are taken from those found in the Mailings query builder. All filters include some common controls:
- Click on the × icon to remove a filter.
- Click and drag the ≡ to change the order in which the filters appear.
- To exclude rows based on a filter, click on the green
Requiredbutton to toggle it toExcluded.
Many filters include variables that you can adjust. You'll see these as soon as you select the display.
For example, if you select the display type Messages Sent, you can limit your results by how many people received your mailing.
To see a list of the choices and the corresponding SQL for any of the available filters, view the Query Builder SQL Reference.
There are some filter options in the query builder that aren't here (e.g. SQL expressions and row limits). Also, blank fields are treated as empty values instead of as parameters.
Search Queries
On the Pages, Mailings and Users Tabs, you can define and save searches that will return a matching list of pages, mailings and users, respectively, in the Tab's list layout.
Custom Search Queries are query reports saved with the relevant tag. You may want to create one to save time if you often use the same criteria under Advanced Search. Or, if your Advanced Search times out, you may be able to write more efficient SQL that will complete. Advanced Search uses the query builder, which is designed to accomodate many possible combinations and therefore writes inefficient SQL.
Defining one or more custom search queries will cause a new section to appear in the navigation links on the right hand side of the tab. Toggle open the Search Queries list to see a list of the defined search queries, then click one to run that query.
Custom search queries can support one or more query parameters to allow search values to be entered. Simply define your parameters as you would for any other query report. When you run a search query, you will be prompted to enter values for any parameters it contains.
The order of objects returned by your query will define the order of the search results, so include an ORDER BY clause to specify your desired sorting.
To create a mailings custom search query, create a query report and assign the mailing search tag to it. Use the query builder or write your own SQL. Regardless, the query can only contain SELECT statements. Only the first column returned will be used by the search function, and that first column must be named id or mailing_id and contain the IDs of the mailings who match your search.
Create New Draft
Select this option to create a new Mailing from scratch.
Draft From Model
This option is only available if your organization has at least one Model Mailing.
If so, can select the relevant model from the list as the starting point for a new Mailing. Instead of starting with a blank draft, some content, targeting and other settings will be prefilled.
Create Model
Model mailings are drafts that you've designated as templates to be copied as the basis for other mailings. Model mailings can not be sent.
You may want to create different models for particular kinds of mailings to save time and help enforce business rules. For example, if you have a C3 and a C4, you might have a model fundraising appeal for each where you've selected the proper from line and wrapper and limited the targeting to the correct list. Later, you can copy the appropriate model to create a a draft that shares those common elements, edit it as needed, and send it normally.
To designate a mailing as a model simply click the Is Model checkbox.
Note
Only staff users with the Mailings - Edit plus Model Mailings permission and superusers can create and edit model mailings. The checkbox to designate a mailing as a model will not show up for other users.
A/B Test Groups
For most mailing tests, the newer A/B Tests for Mailings will be easier to use, but test groups can still be useful for comparing mailings with very different contents.
Test groups allow you to group two or more mailings to make head-to-head testing easier and more foolproof. Using a group helps protect against common testing mistakes by making sure the mailings' targeting criteria and rough size match, that the groups don't overlap, and that they're launched at the same time. They also help simplify the process by letting you review and launch the whole set of mailings from one screen, and use a few clicks to compare the mailings with statistical details and launch the winning mailing.
You can still run manual tests, using the Compare Mailings report to compare performance. In some cases this is the better approach. Test groups only make sense when mailings' targeting, size, and launch time all match: they're not designed for testing three petitions to three different list segments, or testing sending the same message on different days of the week. Groups also aren't available for petition delivery mailings or recurring mailings.
Working With Test Groups
To start, click Create A/B Test Group on the Mailings dashboard. Enter a name; click drafts you'd like to include or, if you'd like ActionKit to create blank drafts for you, enter how many you want.
When you edit the targeting of any draft in the group, it will change targeting for all of them. When you pick a user limit, note you're limiting how many users each Mailing in the test can hit--it's not an overall limit for all mailings combined.
After you've created your test and entered final content, then click Proof and Send Test Group from any group member's Proof and Send screen (or click "Launch Test" in the drafts list). You'll see basic information on each draft and previews; if you see you need to make edits, click the title of any draft to go back to it. You can click "Edit test group settings" at the top of the page to add or remove drafts, change the title, or cancel the test. (You can access the same settings from the bottom of the targeting screen of any Mailing in the group.)
When everything's ready, scroll down to the bottom of the targeting screen. The system will check for obvious problems (e.g query not built, missing content, etc.) and hide the Send button if it finds any. When ready, click Send (or schedule, if applicable), take a moment for artistic appreciation of the haiku, and confirm. Even if you set up an immediate send, the test drafts will show in the Scheduled section on the Mailings Tab, sometimes for up to ten minutes.
Click the Test Results link on the dashboard to see the Compare Mailings report comparing the drafts. In the "results summary" view, you can see whether any draft is significantly ahead of the others (indicated by other drafts' numbers appearing greyed out) and see 95% confidence intervals for opens, clicks, and actions. (You might have to make a decision when without a single significant winner sometimes, but it's good to be aware of the uncertainty.)
Clicking one of the buttons in the Select Winner column of the report will load a copy of the winning Mailing, which excludes all of the test mailings and removes any limit on number of users. You can also click on a subject to see a mailing's individual report, or go back to the content-review screen you launched the test from. From an individual mailing report, you can click on a subject to choose a winning subject and winning mailing at the same time.
Those are the steps to running a test with test groups.
Other information you might find useful:
In test groups, some things work differently from usual, to keep mailings matching each other. Again, editing one Mailing's targeting changes targeting for the other mailings in the group, too. Test mailings' targets also won't overlap each other regardless of whether you use auto excludes, and will go to similar groups even if you use a non-random ordering like ZIP Code.
If a test Mailing stops early because of an error or is killed, you can reload it, and the reloaded mailing will assume the original mailing's test group targeting. Things work a little differently in this mode: you can't add or remove drafts from the test, and changes to the reloaded mailing's targeting won't (of course) affect the other sending drafts.
Internally, ActionKit targets test-group mailings using the MySQL MOD operator. Each group uses an arbitrarily-picked prime number, and each mailing in the test gets a WHERE condition like WHERE user_id MOD [prime] MOD [number of drafts in test] = [number of this draft]. You can see a particular draft's WHERE condition in its targeting summary. It's usually simpler to do reporting using mailing IDs, but you can also use the MOD expression directly for analysis.
Compare Mailings
The Compare Mailings report allows you to quickly compare results from two or more mailings. Use this for mailing testing or to view recent performance or performance by tag.
To compare mailings:
1 Click Compare Mailing in the Reports tab tools menu.
2 Select the mailings you want to compare. Recent mailings can be selected from a dropdown in the top box. To include an older mailing, type a word from the subject or the mailing ID in the second box.
The dropdown includes mailings that stopped or died. These mailings sometimes have sent to a set of people before they died or were stopped so it can still be useful to see the results in a comparison.3 Hit Compare.
You'll see various measures of performance for each mailing. In addition to the open, click and action stats available in the individual mailing report, you'll see the average gift size and the mailing sent date, plus unsub and bounce stats.
Scroll down to see information on the statistical significance of your test results. There's a table and definitions of terms to help you determine whether the performance difference between two or more mailings is statistically significant.
Email Wrappers
Email wrappers define the header and footer appearance and content for your mailings. You can also use them to create mailing templates to customize your mailing Compose screen.
The default wrapper doesn't include any appearance settings, but it does include a link to your default unsubscribe page. You can link to a different one, but you must link to one of your unsubscribe pages.
If you do not select an email wrapper for your mailing, then the mailing will be sent with a bare wrapper that has no appearance settings and a link to your default unsubscribe page.
You can create as many wrappers as you'd like. We've also provided some built-in examples of wrappers.
Click the Email Wrappers link on the Mailings Tab, to see a list of all your current wrappers, ordered alphabetically after the default wrappers (remember you may have a default for each Language).
Read more about creating new email wrappers.
Creating A New Wrapper
Follow these steps to create a new wrapper:
1 On the Compose screen click the + sign to the right of Email wrapper. Or select Email Wrappers from the Mailings Tab and then click Add email wrapper.
2 Enter the wrapper name. This will be the name displayed in the Email wrapper dropdown.
3 In the Template box put your header HTML before the code snippet
{% block content %}{% endblock content %}and your footer HTML after it. See Wrapper HTML for more information. If you want to use preview text in your mailings, your wrapper must support it. To add additional content fields to your mailing Compose screen, use custom mailing fields in the wrapper to create a mailing template in the wrapper.4 Leave the Text template box blank unless you want to create your own text-only template. ActionKit automatically generates a text template from your HTML template. If a user has HTML disabled in their email program, the text version is what they see. If you want to insert a logo or change the line breaks or something for text-only users, you can do that here. Be sure to include:
{% block content %}{% endblock content %}where you'd like the email body to show.5 Enter the Unsubscribe text and Unsubscribe HTML in the next two boxes. The Unsubscribe text and Unsubscribe HTML boxes will show
{% include "unsubscribe.txt" %}and{% include "unsubscribe.html" %}, respectively. These insert ActionKit's default unsubscribe language ("You can unsubscribe from this mailing list at any time.") and a link to the unsubscribe page you've set as the default. (See Unsubscribe Pages for more info.) If you want to use your own text or change the appearance or link to a different page you can make those changes in the HTML and text boxes. For example, you could enter "Click here to remove yourself from our mailing list."" and include a link to a specific unsubscribe page by entering the complete URL (such as, http://docs.actionkit.com/cms/unsubscribe/spanishunsub/ to link to a Spanish language unsubscribe page). See Creating unsubscribe links for more information.6 Select the relevant Language from the dropdown list.
7 Select Is Default if you'd like this wrapper to be the default wrapper for the language chosen in step 6. The language default is pre-selected for confirmation emails when you create a page using the same language. See languages and multilingual campaigns.
8 Click Save to store your new wrapper.
Unsubscribe Links
Every email must have an unsubscribe link. Your wrapper needs to make it easy for users to unsubscribe if they wish; if it doesn't, more of your messages will be blocked by spam filters. For example, the unsubscribe text should be in the same size and color as the rest of your mailing footer. Because unsubscribe links are so important to your reputation and deliverability, we may ask you to change your wrapper if the unsubscribe link isn't visible enough. See the Unsubscribe Page for more information.
You can change the location of the unsubscribe text and link in your wrapper. Insert these snippets in the template box where you want your unsubscribe text to show: {% block unsubscribe %}{% endblock %}. This will insert the content of the HTML or text unsubscribe box in your email. If your wrapper doesn't include these snippets, ActionKit will automatically add your unsubscribe text to the bottom of each mailing.
Wrapper HTML
HTML for email is more limited than HTML for the Web -- that's a limitation of email programs, not of ActionKit. We've included a few tips below, but you'll want someone with HTML knowledge to create your email wrappers and, if you're doing something complicated, you'll want someone who knows about coding for email. In any case, always test a new wrapper in multiple email clients.
Many people view mass mailings with images blocked, so your mailing needs to be readable even without images. <img> tags should have width= and height= attributes, and usually an alt= attribute if the image has text in it. When you'd normally use <div> and CSS for advanced layout, you may have to use tables in email to make it look right in Outlook. You can find more information about what works in emails at http://www.campaignmonitor.com/resources/.
Preview Text
To use preview text in your mailings, your wrapper must support it. Add the tag {{ preview_text }} before the {% block content %}{% endblock content %} bit -- but make sure it's wrapped inside a <span> styled so that the preview_text isn't actually visible in the mailing. Below is an example you can use.
<span style="display:none;font-size:0px;color:#fff;line-height:0px;max-height:0px;max-width:0px;opacity:0;overflow:hidden;">
{{ preview_text }}
</span>
This example includes line breaks for legibility, but you may want to remove those in your actual wrapper to avoid adding extra lines if you use this same wrapper in confirmation mails.
Note that the reason we need display: none; as well as max-height:0px; and all the other CSS precautions above is because not all email clients recognize display:none;.
Subject Text
If you need to reference the current email message's subject line in your wrapper or the body of your mailing, you can include {{ subject_text }} inside your template. You can also change content in the mailing based on the subject line:
{% if subject_text == 'foo' %}
  Foo is an odd subject line
{% else %}
  Here's what the subject line is: {{ subject_text }}
{% endif %}
Email Wrapper Fields
Email Wrapper Fields are custom fields that allow you to customize wrappers on a one-off basis, similar to how custom templateset fields allow you to customize templatesets.
Although you can easily edit your wrapper without the use of custom email wrapper fields, these fields encourage copying and reusability: using these fields, you can copy and choose different colors (for example) without making any changes to your code.
To take advantage of custom email wrapper fields, use {{ wrapper_custom_fields.name_of_your_email_wrapper_field }} in your wrapper. (Note: {{ custom_fields.name_of_your_field }} is already in use by custom mailing fields.)
Mailing Templates
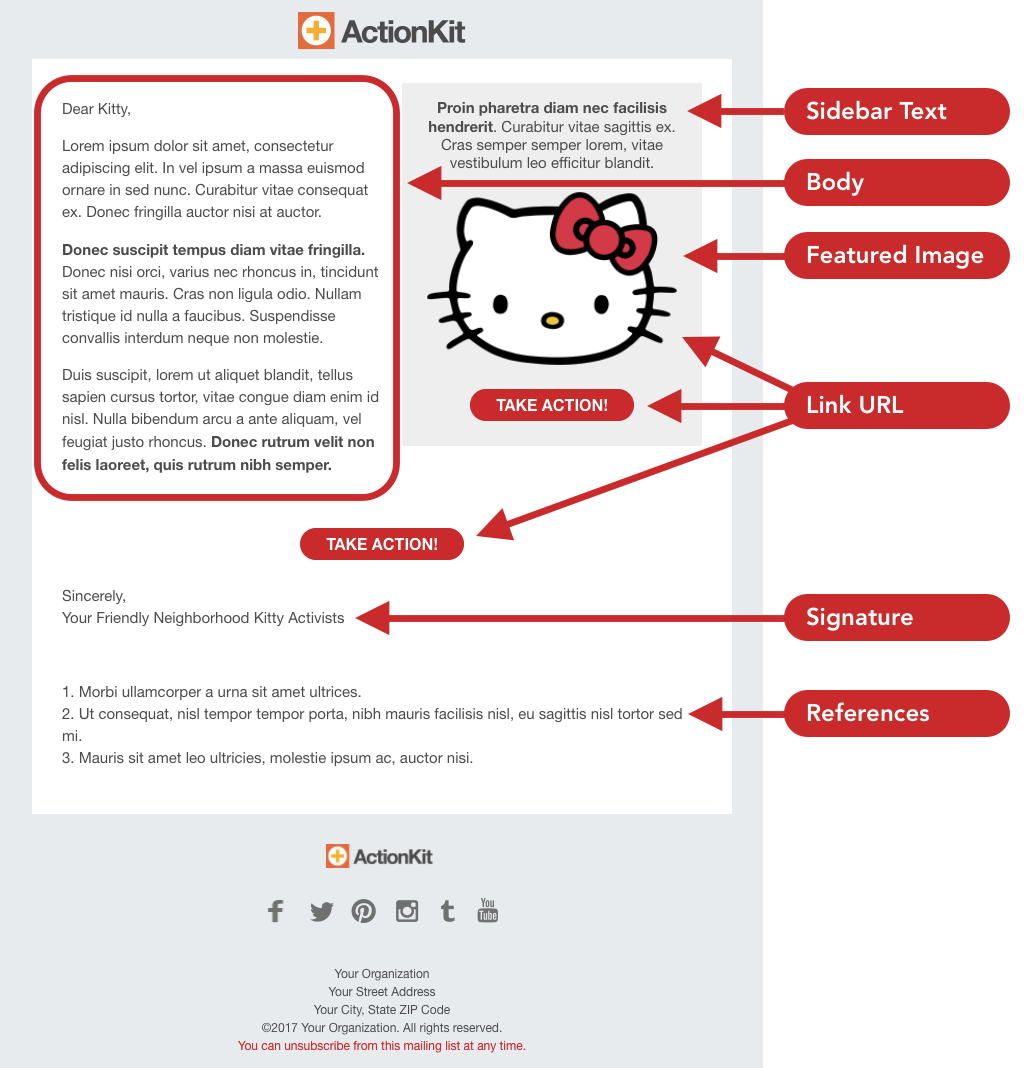
Mailing templates allow you to customize your mailing Compose screen to expose additional fields for standard content needs like headline text, call-out box text, and image URL. This allows you to keep more of the formatting of the mailing within the wrapper, while providing a place for the content to be easily updated for each mailing.
You can customize this on a per-wrapper basis so that you can have different fields appear for different email wrappers.
For an example of its use in a wrapper, refer to the built-in email wrapper Template with Sidebar, and see below for a visual of how the custom fields used in that wrapper map to the different sections of the mailing:
Creating Mailing Templates
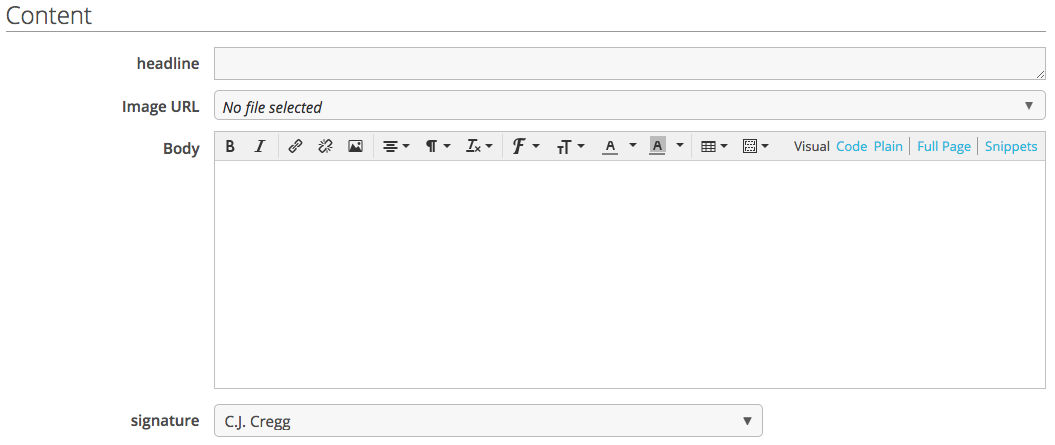
You can create a mailing template by adding custom mailing fields to your mailing wrappers. Custom fields used in the wrapper will display in the Content section of the Compose screen along with the mailing Body field so that you can have multiple editable elements of the wrapper.
For example, you may have a wrapper like this:
<h1>{% include_tmpl custom_fields.headline %}</h1>
<img src="{{ custom_fields.image_url }}" width=300>
{% block content %}{% endblock content %}
<p>{{ custom_fields.signature }}<br/>
Your Organization</p>
And so if you choose this wrapper for your mailing draft, you would see fields for headline and image URL above the Body field on the Compose screen, and a signature field below. Fields display on the Compose screen in the order that they appear in the wrapper.
Mailing fields used in the wrapper have all the attributes of normal custom fields, so you are able to set a type, description, defaults, or make it required.
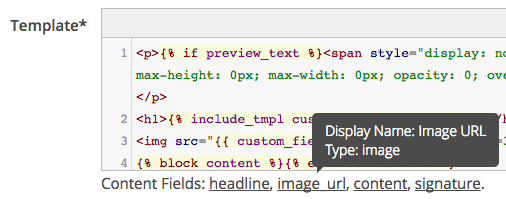
The snippets menu on the email wrapper form displays a list of the custom mailing fields you have defined; clicking those will insert the appropriate snippet in the wrapper template. Mailing fields used in the wrapper have to be created prior to including them; including a field unrecognized by the system will trigger an error.
Custom mailing fields used in your wrapper will be listed below the template editor. You can hover over the field names to see the field type, display name and description.
Note
To use template tags within custom fields, you need to reference custom fields in the wrapper as {% include_tmpl custom_fields.NAME %}. Using {{ custom_fields.NAME }} will include the custom field's value as-is, without evaluating the template tags.
Text Templates Using Mailing Templates
We automatically generate a plain text version of your mailing which converts your mailing HTML to text. However, if you would prefer to customize how the text version appears, you can define an optional text template for your wrapper that uses mailing templates. You would do this the same way that you set up the main HTML template by including custom mailing fields and the body block in the order that you would like the fields to appear in the text template.
Note
The text template expects plain text content, so should you choose to define a text template, you need to use plain text fields for the content; any HTML within custom fields specifically called in the text template will not have their HTML escaped.
Links in Mailing Templates
Links found in custom mailing fields get the standard treatment as described in the Links documentation, and accept the same snippets to control their behavior as standard links.
However, if a custom mailing field that includes a link is referenced multiple times throughout a mailing, then the link number will be the same for all places where that custom mailing field is found.
Library
This is the same feature available through the related tools on the Pages tab. Click Manage Library to add or edit the existing uploaded files in the media library.
The library provides integrated storage through an Amazon S3 account you set up for media like images and videos. Follow the link to view a list of images, search, edit, or upload a new image.
The file name must only includes letters, numbers, and _ (no spaces or other characters). Upload your image and you’ll be given a url to use to access the image.
Toggle open the Options section while you're uploading an image to set the directory, change the filename or set the content-type. If your images don't seem to be displaying properly, check that the content type is correct.
Click the "Edit" link for an image to change the filename or directory after it has already been saved. Note that you may break links to the old URL so you will see a warning before you save.
If your library isn't working, confirm that the correct Amazon account information is entered on your Amazon S3 Config screen.
From Lines
From lines should follow this format: "Tanya Africa, ActionKit.com" <tanya@actionkit.com>. The name section should be quoted.
You can also use snippets in your standard and custom from lines to generate dynamic from lines that vary depending on the recipient for mailings, event emails, and transactional emails. These could be merge snippets, custom user and action fields, or any other data that is able to be evaluated as a snippet in your from line.
The final from line at send still needs to follow the same format as from lines without snippets; from lines that do not pass validation will kill the mailing and you will receive a notification that your proof or mailing has died.
Warning
You almost always want your main ActionKit domain on every mailing's From line. ISPs' spam filters treat new and unknown domains harshly, so splitting your mail traffic between domains has deliverability risks. Changing From domains has limited branding value anyway: the From name and subject are usually shown more prominently. We suggest changing From lines' name and, if you want, the email username:
- "Tanya Africa, ActionKit.com" <tanya@actionkit.com>
- "Tanya Africa, My Separately Branded Campaign" <separate.campaign@actionkit.com>
But we advise against per-campaign From domains like this:
- "Tanya Africa, My Separately Branded Campaign" <tanya@separate-campaign.com>
So, by default, if you try to change the From domain, we'll replace it with your primary domain on the From line, and use your alternate domain in a Reply-To header instead. When we do this, you'll see a note under the From line field saying so.
If, despite the risks, you definitely want to use other From domains, contact us via support. We'll need to change your instance configuration, and you'll need to do some DNS setup for the new domain.
From the Mailings Tab, click From Lines in the sidebar on the right under Content to see your existing From Lines. From this screen you can add a new from line, edit or disable (by hiding) an existing from line, or re-enable (by showing) hidden from lines.
You can merge your from line into the body of your mailing by using a snippet.
{{ from_line }} merges the From line without any template code rendered.
{{ from_line_text }} merges the From line with the template rendered.
Domains
Client Domains
On this page, you can add a Client Domain, which is a website domain not hosted by ActionKit that should still receive user information such as the akid= parameter.
If you have ActionKit pages hosted on other domains and link to them from emails, adding them as Client Domains allows the actions to be connected back to the mailing the user received, and allows user recognition to work. Custom or third-party tools that aren't ActionKit pages but can use akid= might also benefit from being added as client domains.
Adding a domain as a Client Domain doesn't prevent the mailer from turning links to it into short links via the ActionKit redirector. See Links for a description of how redirect links are created.
See also: To understand how your From email impacts deliverability, see our documentation on Sending domains.
To edit or add a domain name:
1 In the Mailings tab, click Domains in the sidebar on the right under Content. The list of available domains is displayed.
2 To edit an existing domain name, click Edit in the Actions column for the appropriate domain name.
The history of the domain name is also available through this screen. After you have made your changes, click Save to store your changes.3 To add a new domain, click Add client domain in the header.
Insert the new domain information and click Save to store your new domain name.
Short Links
From this screen you can manipulate the links you include in a mailing to:
- correct a link to a bad URL in a mailing you already sent, or
- replace the default link in a draft with more readable one.
First, you may want to read more about how links are created and which are redirected.
A short link is automatically created for any link that will be redirected (e.g. links to any page outside of your primary domain or all of your links if you've changed the default setting). This happens when you save your draft. You can find a list of your short links by clicking Content then Short Links in the section on the right of the Mailings Tab.
From this screen you can change an existing short link. Click Edit in the appropriate row. You'll see the URL you typed into your mailing and beneath it you'll see the Short URL. The latter is what your user will see when they receive your mailing.
If you entered the wrong URL, you can fix it here.
1 Under sent mailings, click on the subject of the relevant mailing, then click "View Source HTML".
2 Find the link you need to replace and copy the URL.
3 Go to "Short Link" under Content in the menu on the right on the Mailings Tab. Paste your URL into the search box.
4 Click Edit and make your correction in the "Destination URL", then hit Save.
For example, if you entered "http://staging.actionkit.com/cms/sign/protectsharkz/" in your mailing you could fix your typo here by replacing "protectsharkz" with "protectsharks" in the URL. Users who click the link in the mailing (the Short URL) will be directed to your corrected URL.
If you haven't sent your mailing yet, you can get a more readable link and use it in your mailing. You can do this by editing an existing short link where you already have one or by adding a new short link. If you're adding a new link, you'll need to enter the URL. In either case, add a short code to be included in your link.
For example, if your initial short url is "http://staging.actionkit.com/go/269" and you enter a short code of "sharkweekmadness", your next short url will be "http://staging.actionkit.com/go/sharkweekmadness". Just copy and paste the final short URL into your mailing draft.
For the short code, only use letters, numbers, - and _. No spaces or other characters.
Mailing Haiku
You can add, delete or edit the haikus that show up on the final send screen in the mailer.
Don't like a haiku?
Delete it or warm up your
pen and replace it.
Mailing Lists
Use mailing lists to define groups of users. Only users who are on a list can be mailed through ActionKit.
Users generally join a mailing list by taking action on a page associated with the list. You can also import users to a mailing list. Users can unsubscribe from some or all of the mailing lists they belong to from any unsubscribe page.
If you don't select a list when you target a mailing, ActionKit will assume that you want to target all mailable users.
We suggest using lists to separate users you want to exclude from your main email stream to only mail for specific purposes or at specific intervals. For example, if some users signed up to receive a weekly e-newsletter and no other mail, you might make an e-newsletter list.
Note
Mailing list names are visible to users on unsubscribe pages.
To edit, add, or hide a mailing list:
1 In the Mailings tab, click Mailing Lists in the sidebar on the right area. The list of available Mailing lists is displayed.
2 To edit an existing list, click Edit in the Actions column for the appropriate mailing list.
3 To disable a list, click Hide in the Actions column for the appropriate mailing list, see Hide and delete.
4 To add a new list, click Add list in the header and enter a name for the list.
5 Click Show Hidden to display the disabled lists. For more information on disabled objects, see Hide and delete.
Tags
Tags are words or phrases you can associate with a mailing. The tag list is the same for pages and mailings, but unlike with pages, when you associate a tag with a mailing no users are associated with the tag, whether or not they receive the mailing.
Tags are used to categorize your mailings. Tags are displayed on the Mailings Tab and the Browse all listing, and you can filter by Tag. For example, you can quickly view the list of all the Mailings you have created for a particular campaign.You could also write a custom report analyzing mailing performance by tag.
To edit, add, or hide a tag, see Working With Tags.
Custom Mailing Fields
As with custom page fields, you can use these fields to insert a section of content or code in your Mailing or Email wrapper, or to create a mailing template.
After you've created the custom Mailing Field, add the field to the body of your Mailing using this syntax: {{ custom_fields.FIELD_NAME }}. Or, if your custom Mailing Field contains template tags or filters that need to be interpreted, then use this syntax instead: {% include_tmpl custom_fields.FIELD_NAME %}.
Then in the custom field row toward the bottom of the screen, select the field name on the left and enter the value on the right.
To create the field, select Custom Mailing Fields on the Mailings tab and click Add Allowed Mailing Field. Enter the name and other settings for your mailing field and then save.
Note
Select Always show if you'd like the field to be displayed whenever you create a new mailing.
To add or edit the mailing field, go to the Compose screen of your draft mailing.
Be sure to view several proofs when you use custom mailing fields.
Merge Files
Overview
Use Merge Files to insert user-specific information in your mailing from a CSV or TSV that you upload. For example, you may want to use highly localized goals based on users' cities: "We need 5 more volunteers in Oklahoma City today!", or to show users the best paper for an LTE based on their zip code.
The first column of the merge file is the key used to match targeted users to a row in the file. This is usually a geographic designation (like country, state or zip), but you can also match on the user source or unique identifier (user_id or email).
The other columns are the value or values you want to insert. Once you've selected a merge file on the Compose screen, you'll see a snippet for each column header if you click Snippets then Merge File in the Body section.
The Merge File Snippets use the prefix "merge" followed by the name of the column: {{ merge.column-name }}. As an example, if you uploaded the following merge file, the available snippets on the Compose screen are {{ merge.zip }} and {{ merge.paper }}.
If you upload a file with the columns "zip" and "paper":
zip, paper
10014, New York Post
19130, Philadelphia Inquirer
94965, Marin County Chronicle
60632, Chicago Tribune
You can click to insert the {{ merge.paper }} Snippet in the mailing, and the paper that matches the user's zip code will be included. The Merge File Snippets include requires_value so your mailing doesn't display a blank if a targeted recipient's zip code isn't in the file. That user is skipped. Read more under failed deliveries.
Alternatively, you can remove requires_value and use a conditional block ( {% if merge.paper %} ... {% endif %} ) or a default ( {{ merge.paper|default:"your local paper" }} ).
See Managing Merge Files for the full list of options for the first column and for details on creating and updating merge files.
Note that merge files will be deleted 30 days after last use. This applies to merge files that were last used in a mailing that was sent 30 days ago, or in a draft that was last updated 30 days ago. If a merge file is not connected to a mailing it will be deleted 30 days after upload.
Merge files require Amazon S3 to be configured.
Uploading Merge Files
Merge Files must be either a comma (.csv) or tab delimited (.tsv) file. For large files, you can compress them using Zip to speed uploading.
You can use any of the following fields for the column users are matched on:
idcitystate(the 2-letter abbreviation, e.g. "FL")city, state(special case where we'll match on two columns because some city names are not unique (e.g. Springfield); if city and state are the first two columns in your merge file we'll automatically use both to make sure we get the correct value for each user)regionpostalzipcountrysourceus_districtus_state_senateus_state_districtus_county, state(same behavior ascity, state)loc_codecountry_coderegion_code
(You can also match on prefix, first_name, middle_name, last_name, suffix, address1, address2 although they seem much less useful!)
Uploaded and processed merge files are listed in the dropdown for Merge File on the Compose screen. Until a merge file has completed uploading and processing successfully, it will not show on the list. The details of any problems that occurred during processing are available in the list of merge files.
To upload a merge file:
1 From the Mailings Tab, click Mergefiles in the sidebar on the right under Data. The list of existing merge files is displayed.
2 Click Add merge file.
3 Click Select file and choose the file to you want to upload from the file dialog. Then click Upload file to begin the upload.
4 When the upload is complete, the page will refresh and you'll be able to edit the name for your merge file. This is the name that will be displayed to the campaigner when creating or editing a mailing. Click Save to save your changes to the name.
Immediately after upload, you'll see a status of New Upload. Behind the scenes, your file is being checked and loaded into the database. You can reload the page to see the results of this processing, including the number of lines that were loaded and any errors encountered.
To update the data in a merge file, simply upload another CSV or TSV to the same merge file. You can add or remove columns. Be sure to upload the complete merge file; the previous data is completely discarded.
Re-Engagement List
ActionKit provides tools to help you develop and implement a list hygiene program.
Mailing List hygiene refers to the practice of "cleaning" your Mailing List by removing inactive and undesirable email addresses, in order to improve your email deliverability for the remaining active and desirable addresses.
Email deliverability is increasingly based on sender reputation. ISPs are looking at the same kind of stats we do, like open and click rates, plus some additional information that they have that we don't. The more your users interact with your email the better your reputation, and the more your mailings reach your users' inboxes in a timely manner. Sender reputation attaches to the combination of your IP address and domain name.
Sending emails that are ignored costs you because ISPs use that in calculating your sender reputation.
And long-time inactive users aren't bringing you much benefit. One large client found that users who had last opened or clicked a mailing in the last year had a 31% open rate. Those who opened or clicked in the last 12 to 24 months had a 10% open rate. The open rate dropped to less than 1% past 24 months. We encourage you to analyze your own list because these rates may vary, but the trend has been consistent.
Also, long-time inactive emails are sometimes turned into spam traps by the various ISPs. Spam traps never open your emails, and sending to them always hurts your reputation.
List hygiene can improve your deliverability, increase total actions and may even decrease your monthly ActionKit bill.
You can take advantage of our Re-engagement Tool and Blackholing Email functionality to help manage your list hygiene.
Some list hygiene steps are automatically handled by ActionKit, like unsubscribing users whose email addresses bounce as undeliverable.
We also encourage you to establish a re-engagement process, where you:
- Establish criteria to identify inactive users.
- Add those users to a special re-engagement list.
- Exclude that list from regular mailings.
- Send those users a few hand-picked mailings to prompt them to open or click.
- If they don’t re-engage, unsubscribe them.
ActionKit includes tools to help you automate this process.
To configure and enable ActionKit's re-engagement feature, click the Re-Engagement link under List Hygiene in the sidebar on the right on the Mailings Tab.
Note
Making changes on this screen requires superuser permission.
Read more about the available settings starting with defining engagement queries.
Blackholing Email
You may want to prevent certain email addresses or domains from receiving bulk and transactional messages from ActionKit. You also might want to block messages to email addresses containing certain strings such as 'spam' or 'info@'. You can use ActionKit's blackhole functionality to accomplish this.
When an address, domain, or substring is added to our blackhole list, we will automatically suppress all bulk, transactional and tell-a-friend emails to matching email addresses. Notification messages and messages sent by ActionKit itself (for example, the "mailing complete" messages sent to ActionKit admins when a mailing finishes sending) are not suppressed.
When a message is blackholed, it is logged in the core_blackholedhistory table. Where possible, the row will contain a mailing_id or action_id associated with the suppressed message. A flag (matched_email/matched_domain/matched_pattern) will indicate which blackhole list the email address matched.
Subscribed users blocked by the blackhole feature will have subscription_status='blocked' in core_user. Mailing counts don't include users with subscription_status='blocked'. After changes to the domain or substring lists, it may take a little while (usually under 20 minutes) for subscription_statuses in the database to be updated. Users with subscription_status='blocked' still have their subscriptions listed in core_subscription and still count as subscribed for other purposes, such as reengagement and billing.
Update the blackhole lists by going to the Mailings and picking List Hygiene from the menu, then choosing Blackholed Emails, Blackholed Domains, or Blackholed Patterns.
Recurring Series
Select this button to add, hide or edit recurring mailing schedules.
The schedule determines how often and at what time the mailing will be sent. Only one mailing on a given schedule is ever active at once - when you launch a new mailing on a schedule, the oldstopped.
The schedule has a name, a time zone, and scheduling options. If you make changes review the list of send dates at right to make sure it will fire when (and only when) you intend. And remember: Edits to a schedule take effect immediately when you hit Save.
Read more about creating recurring mailings.
Mailing Jobs
A job is created each time you create or rebuild a mailing’s target set. The Manage jobs button at the bottom of the related tools list shows a count of your active jobs. The count is refreshed every 15 seconds. If there are 3+ jobs running, you'll see a red exclamation point. Click the button and a list of jobs (also refreshed every 15 sec) pops in above the list of mailings. You can only kill all of the mailing count jobs at once because of the possible dependencies between mailings. The job list includes any re-engagement jobs you have running.
